---
title: "Using Inertia SSR"
layout: framework_docs
objective: See how to run Inertia SSR Laravel Apps, with just a few tweaks to the Laravel configuration.
order: 5
---
[Inertia](https://inertiajs.com/) allows you to work with your Laravel monolith application, *and still* use frontend libraries and frameworks such as [React](https://react.dev/), [Vue](https://vuejs.org/), and [Svelte](https://svelte.dev/)! Furthermore, it supports [Server-side Rendering](https://inertiajs.com/server-side-rendering), which allows HTML content to be rendered from the server instead of the client.
Once you've completed the [Server-side Rendering setup](https://inertiajs.com/server-side-rendering) for your local app, dive in below to deploy your server-side rendered, Laravel Inertia-SPA at Fly.io!
_________________________________________________
## Dockerfile Changes
[Inertia SSR](https://inertiajs.com/server-side-rendering) requires a background [Node process](https://inertiajs.com/server-side-rendering#:~:text=Node%20must%20be%20available) that will render requested html pages. You'll have to update Fly.io's generated `Dockerfile` for your Laravel app in order to include support for `Node`. You can follow any of the below options to include `Node`:
### Option 1: Quick copy of Node to Final Image
The Laravel fly-scanner already generates a Dockerfile that makes use of a `Node` image, but uses a different final image. The quickest way to include Node into your app's final image, is to copy over the `Node` image's `node` binaries and generated `node_modules` to the final `fly-laravel` image:
```dockerfile
FROM base

+  COPY --from=node_modules_go_brrr /usr/local/bin/node /usr/local/bin/node
+  COPY --from=node_modules_go_brrr /app/node_modules /var/www/html/node_modules
```
### Option 2: Install Node in Final Image
Of course, you can also instead opt to fully install `Node` in your final `fly-laravel` image. So, revise your Dockerfile to include instructions to install `node`, and build the necessary assets/node_modules into your final image:
```dockerfile
# Install node in fly-laravel image
RUN cd ~ \
    && curl -sL https://deb.nodesource.com/setup_18.x -o nodesource_setup.sh \
    && bash nodesource_setup.sh \
    && apt install nodejs \
    && cd /var/www/html

# The snippet below already exists in the Dockerfile btw,
# In the multi-stage build set up:
RUN if [ -f "vite.config.js" ]; then \
        ASSET_CMD="build"; \
    else \
        ASSET_CMD="production"; \
    fi; \
    if [ -f "yarn.lock" ]; then \
        yarn install --frozen-lockfile; \
        yarn $ASSET_CMD; \
    elif [ -f "pnpm-lock.yaml" ]; then \
        corepack enable && corepack prepare pnpm@latest-8 --activate; \
        pnpm install --frozen-lockfile; \
        pnpm run $ASSET_CMD; \
    elif [ -f "package-lock.json" ]; then \
        npm ci --no-audit; \
        npm run $ASSET_CMD; \
    else \
        npm install; \
        npm run $ASSET_CMD; \
    fi;

RUN  chown -R www-data:www-data /var/www/html/public

EXPOSE 8080

ENTRYPOINT ["/entrypoint"]
```
Since we now have node and its assets/modules in the `fly-laravel` image, we can remove our multi-build setup where we use a separate `FROM node` image ( to build and copy assets and node_modules ):
```dockerfile
# Remove the "multi stage build setup" lines below:
- FROM node:${NODE_VERSION} as node_modules_go_brrr
- RUN mkdir /app

- RUN mkdir -p  /app
- WORKDIR /app
- COPY . .
- COPY --from=base /var/www/html/vendor /app/vendor

# Remove the "set up to copy asset folder from node image to fly-laravel image"
# lines below:
- COPY --from=node_modules_go_brrr /app/public /var/www/html/public-npm
- RUN rsync -ar /var/www/html/public-npm/ /var/www/html/public/ && rm -rf /var/www/html/public-npm
```
## Running SSR as A Process
After getting your Dockerfile set up for Inertia SSR to work, you can run the SSR Server as a [background process](https://inertiajs.com/server-side-rendering#:~:text=server%20as%20a-,background%20process,-%2C%20typically%20using%20a). Here at Fly.io, you can easily run a separate VM for your SSR server instead of a monitoring tool like Supervisor.
Update your `fly.toml` file to include an `ssr` [process group](https://fly.io/docs/apps/processes/#run-multiple-processes):
```toml
[processes]
  app=""
  ssr="php /var/www/html/artisan inertia:start-ssr"
```
Adding the SSR process above creates a new machine specially for your SSR server. You'll now have separate machines for your web app, and ssr server:
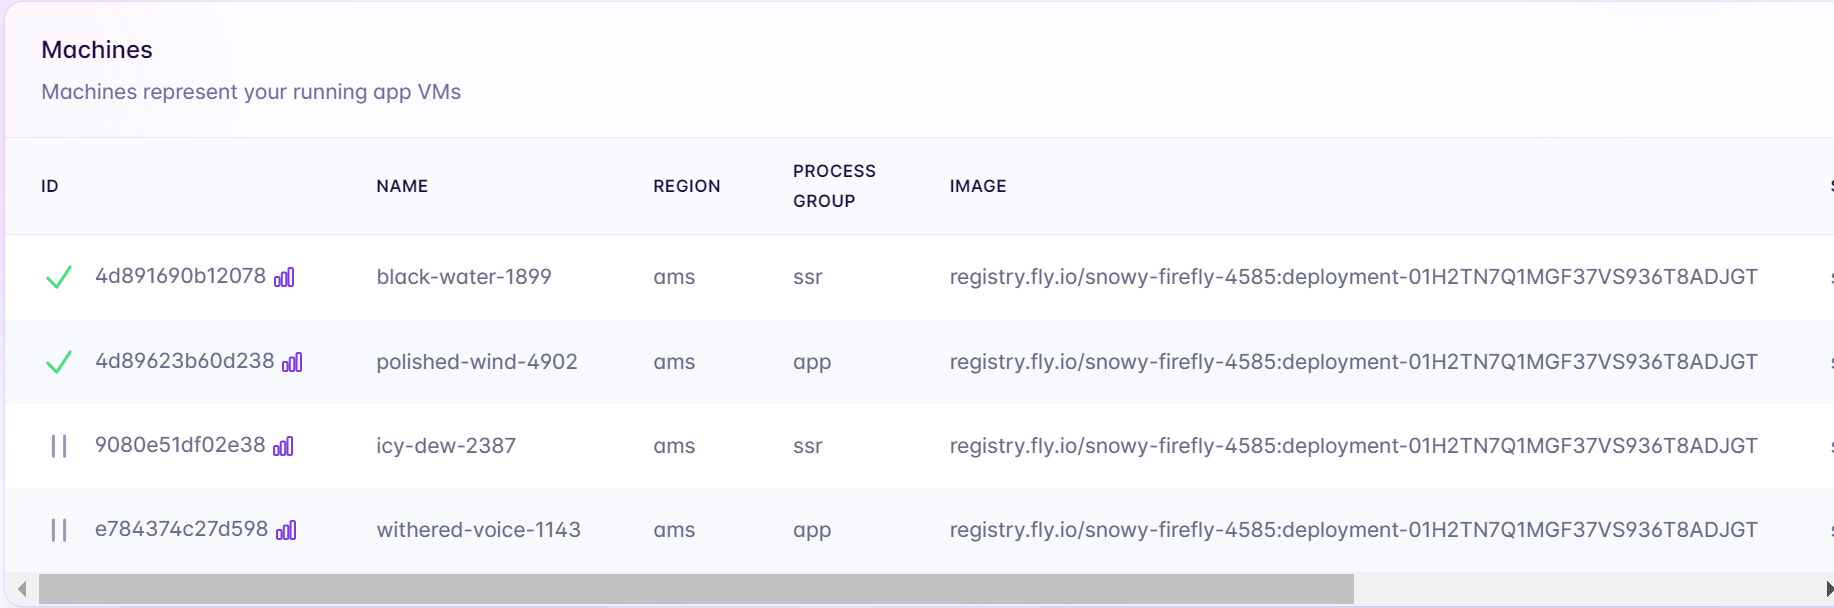
<small>Notice there are four machines above? The two machines listed at the bottom are back ups.</small>
Now that you have more than one process group for your Fly.io app, you'll have to make sure that the [`[http_service]`](/docs/reference/configuration/#the-http_service-section) is properly mapped to your `app` process. Update your `fly.toml`'s `http_service` section with the `app` process:
```toml
[http_service]
  internal_port = 8080
  force_https = true
  auto_stop_machines = true
  auto_start_machines = true
  min_machines_running = 0
+  processes = ["app"]
```
### Web and SSR Communication
The SSR server will be created as a separate VM from your web app. You'll have to configure your Laravel web VM to [talk with it](https://community.fly.io/t/process-group-aware-internal-dns-route-between-processes-with-ease/13063/4). To do so, first revise the `fly.toml` file to include an `SSR_URL` that will contain the ssr process' [.internal address](https://fly.io/docs/networking/private-networking/#fly-io-internal-addresses) routed to SSR's applicable port ( in the case below, 13714):
```.env
[env]
  SSR_URL="ssr.process.<yourAppNameHerePlease>.internal:13714"
  // other envs here
```
Finally, pull the [inertia.php](https://github.com/inertiajs/inertia-laravel/blob/master/config/inertia.php) config file into your config directory, and update it to use the `SSR_URL` env variable:
```php
/* config/inertia.php */
'ssr' => [
    'enabled' => true,
    'url' => env('SSR_URL','http://127.0.0.1:13714')
],
```
With that, do a quick `fly deploy` and you're good to go!
Using Inertia SSR
Inertia allows you to work with your Laravel monolith application, and still use frontend libraries and frameworks such as React, Vue, and Svelte! Furthermore, it supports Server-side Rendering, which allows HTML content to be rendered from the server instead of the client.
Once you’ve completed the Server-side Rendering setup for your local app, dive in below to deploy your server-side rendered, Laravel Inertia-SPA at Fly.io!
Dockerfile Changes
Inertia SSR requires a background Node process that will render requested html pages. You’ll have to update Fly.io’s generated Dockerfile for your Laravel app in order to include support for Node. You can follow any of the below options to include Node:
Option 1: Quick copy of Node to Final Image
The Laravel fly-scanner already generates a Dockerfile that makes use of a Node image, but uses a different final image. The quickest way to include Node into your app’s final image, is to copy over the Node image’s node binaries and generated node_modules to the final fly-laravel image:
FROM base
+ COPY --from=node_modules_go_brrr /usr/local/bin/node /usr/local/bin/node
+ COPY --from=node_modules_go_brrr /app/node_modules /var/www/html/node_modules
Option 2: Install Node in Final Image
Of course, you can also instead opt to fully install Node in your final fly-laravel image. So, revise your Dockerfile to include instructions to install node, and build the necessary assets/node_modules into your final image:
# Install node in fly-laravel imageRUN cd ~ \
&& curl -sL https://deb.nodesource.com/setup_18.x -o nodesource_setup.sh \
&& bash nodesource_setup.sh \
&& apt install nodejs \
&& cd /var/www/html
# The snippet below already exists in the Dockerfile btw,# In the multi-stage build set up:RUN if[-f"vite.config.js"];then\
ASSET_CMD="build";\
else\
ASSET_CMD="production";\
fi;\
if[-f"yarn.lock"];then\
yarn install--frozen-lockfile;\
yarn $ASSET_CMD;\
elif[-f"pnpm-lock.yaml"];then\
corepack enable&& corepack prepare pnpm@latest-8 --activate;\
pnpm install--frozen-lockfile;\
pnpm run $ASSET_CMD;\
elif[-f"package-lock.json"];then\
npm ci --no-audit;\
npm run $ASSET_CMD;\
else\
npm install;\
npm run $ASSET_CMD;\
fi;RUN chown-R www-data:www-data /var/www/html/public
EXPOSE 8080ENTRYPOINT ["/entrypoint"]
Since we now have node and its assets/modules in the fly-laravel image, we can remove our multi-build setup where we use a separate FROM node image ( to build and copy assets and node_modules ):
# Remove the "multi stage build setup" lines below:
- FROM node:${NODE_VERSION} as node_modules_go_brrr
- RUN mkdir /app
- RUN mkdir -p /app
- WORKDIR /app
- COPY . .
- COPY --from=base /var/www/html/vendor /app/vendor
# Remove the "set up to copy asset folder from node image to fly-laravel image"# lines below:
- COPY --from=node_modules_go_brrr /app/public /var/www/html/public-npm
- RUN rsync -ar /var/www/html/public-npm/ /var/www/html/public/ && rm -rf /var/www/html/public-npm
Running SSR as A Process
After getting your Dockerfile set up for Inertia SSR to work, you can run the SSR Server as a background process. Here at Fly.io, you can easily run a separate VM for your SSR server instead of a monitoring tool like Supervisor.
Update your fly.toml file to include an ssrprocess group:
Adding the SSR process above creates a new machine specially for your SSR server. You’ll now have separate machines for your web app, and ssr server:
Notice there are four machines above? The two machines listed at the bottom are back ups.
Now that you have more than one process group for your Fly.io app, you’ll have to make sure that the [http_service] is properly mapped to your app process. Update your fly.toml‘s http_service section with the app process:
The SSR server will be created as a separate VM from your web app. You’ll have to configure your Laravel web VM to talk with it. To do so, first revise the fly.toml file to include an SSR_URL that will contain the ssr process’ .internal address routed to SSR’s applicable port ( in the case below, 13714):
[env]
SSR_URL="ssr.process.<yourAppNameHerePlease>.internal:13714"
// other envs here
Finally, pull the inertia.php config file into your config directory, and update it to use the SSR_URL env variable:
 Notice there are four machines above? The two machines listed at the bottom are back ups.