

Today we’ll upload multi-selected files in separate requests, and in chunks—using Livewire! Upload your files close to your users with Fly.io, you can get your Laravel app running in minutes!
Livewire offers a quick way to upload multiple files in one go with the use of its WithFileUploads trait.
This however only uploads the files in one way: all files in one request, each file sent as a whole.
There are times when we’d want to send the files in separate requests, or customize how we upload each selected file—like showing separate progress indicators per file, or uploading each file in chunks.
To customize uploading our multiple-selected files, today we’ll use Livewire’s upload function. With it we’ll upload our files in parallel requests, and by the end, in chunks!
Here’s our github map you can view the relevant files in!
Version Notice. This article focuses on Livewire v2, details for Livewire v3 would be different though!
The Default Behavior
Our users want to select and upload multiple files from a single input selection. This can easily be setup with Livewire, so we create a Livewire Component with php artisan make:livewire multiple-file-uploader.
This will create a Livewire component \app\Http\Livewire\MultipleFileUploader and a matching view in app\resources\livewire\multiple-file-uploader.
Inside our view we set up our file input element. It’ll allow multiple file selection and be wired to a public attribute $uploads.
<div>
  <input type="file" wire:model="uploads" multiple>
</div>
To enable Livewire’s upload functionality, include its WithFileUploads trait in our component. Then declare $uploads as an array to cater for multiple file selection:
use Livewire\WithFileUploads;

class MultipleFileUploader extends Component {
  use WithFileUploads;
  public $uploads = [];
Neat! In just a few steps, we’re all set up for multiple file upload. Let’s see what happens when we select two files in our input element above.
Open the network inspector and select two files. We’ll see three calls to the server:
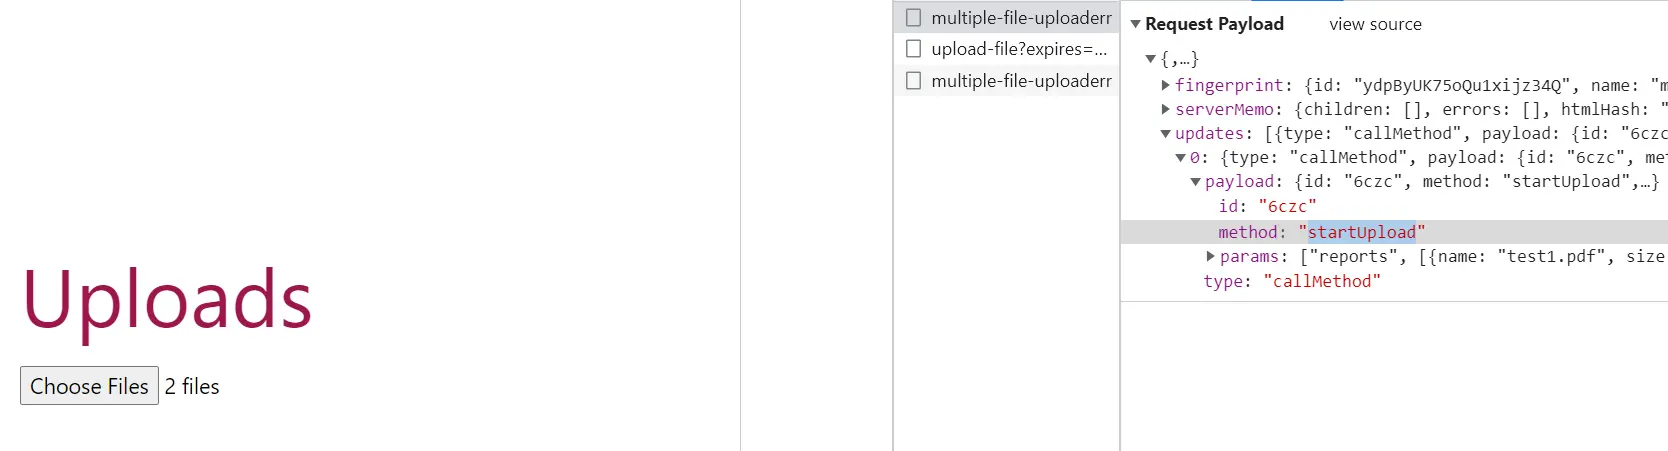
The first request is Livewire’s JavaScript call to the component in the server. This sends an “updates metadata” that instructs the component to trigger the “startUpload” method provided by the WithFileUploads trait.
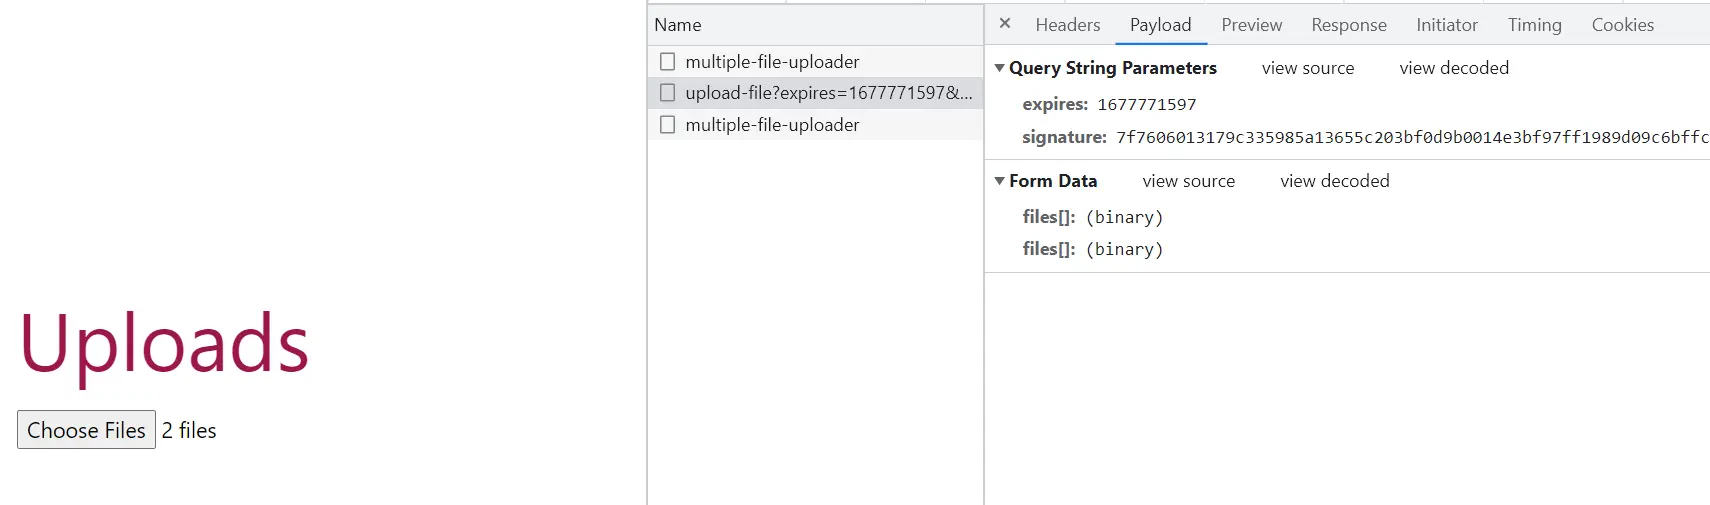
In the server, “startUpload” generates a signed url that will be used in uploading the files. It emits an upload:generatedSignedUrl that Livewire’s JavaScript in the view listens for.
Livewire’s JavaScript uses this signed url to upload the files together in the second request, saving the files in a temporary folder. Once upload completes, it sends one last request to the component to update the $uploads attribute with details on the recently uploaded files.
Next, let’s add in a progress bar to help our users keep track of their upload’s progress. We’ll wire this to a public attribute $progress( so make sure this attribute is declared in our component! ), and only show this bar when progress is available.
@if( $progress )
    <progress max=100 wire:model="progress" />
@endif
With our progress bar set up, we’ll need to sync this with our upload’s progress.
Livewire provides us the dispatched event “livewire-upload-progress” that sends back a detail.progress value. We can use this value to track our upload progress.
All we have to do is listen to this browser event and sync our $progress in the view with detail.progress. We’ll do this with the help of Livewire’s set method:
<script>
window.addEventListener('livewire-upload-progress', event => {
  @this.set( 'progress', event.detail.progress );
});
set() updates the value in the client, so it moves the value of our progress bar. However, it doesn’t immediately send a request to the server to update the attribute in the component. Instead, it will be sent along with the next available request.
Since all files were uploaded in one request, it’s important to take note of a few caveats:
- Progress percentage is on uploading all files, not individual files
- If the total size of all files being uploaded exceeds the
POST_MAX_SIZE, all files will not be applicable for upload - Uploading multiple files in a single request will definitely take up more time to finish the request, which might result in the dreaded 504 Gateway Timeout error
Of course, in this article, we’re going to solve the restrictions above. We’ll do so by uploading the files in separate requests, using Livewire’s upload api!
Fly.io ❤️ Laravel
Fly your servers close to your users—and marvel at the speed of close proximity. Deploy globally on Fly in minutes!
Deploy your Laravel app! →
Uploading Files in Separate Requests
Instead of uploading all files in one request, why not upload each file separately? This neatly separates an upload of one file from the others, allowing us to track individual file upload progress, isolate any failed file upload from the rest of the selected files, and call lighter-weight requests.
First, let’s ready our file input element for using the upload api. We’ll remove its binding to $uploads and add an id, myFiles:
<input type="file" id="myFiles" multiple>
Then, we’ll add our custom “on-change” listener to this input element( identified by id #myFiles )to separately upload each one of the selected files:
<script>
const filesSelector = document.querySelector('#myFiles');

filesSelector.addEventListener('change', () => {
    const fileList = [...filesSelector.files];
    fileList.forEach((file, index) => {
The trick here is to assign each file to a specific index in the $uploads array to avoid clashing variables for different file uploads. We’ll upload each file using Livewire JavaScript’s upload() function.
It receives uploads.<index> as the name of the attribute we’d want to bind the file with, file as the reference to a file we’re currently uploading, and several callback clauses:
        @this.upload(
          'uploads.'+index,
          file,
          (n)=>{}, ()=>{}, (e)=>{}
        );
    });
});
In our earlier section, we briefly inspected the three requests that Livewire makes when uploading a file. The first request triggers one startUpload request.
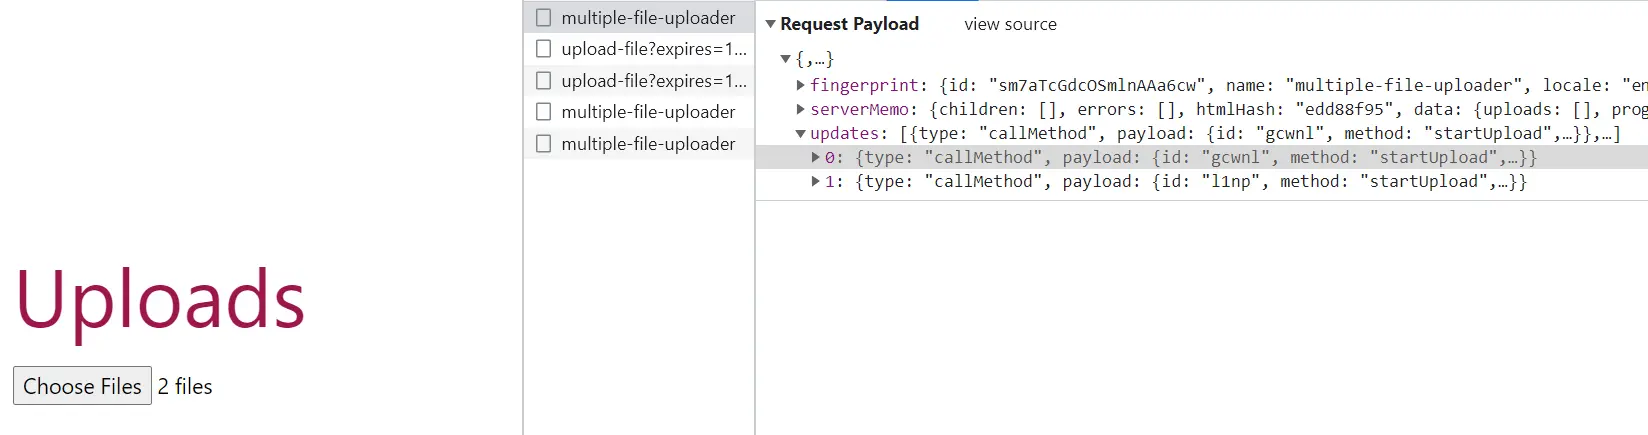
Let’s inspect what’s happening behind the scenes of our “separate” upload requests now. Make sure you have your network inspector open, and select any two files:
 Five network calls! And if we were to check the first call, we’ll see instead of one
 startUpload in the updates bag, we get two—one request for each separate file upload.
Next, inspect the two “upload-file” network calls—these are the actual file upload requests—they run in parallel! The second upload request was made even without waiting for the first one to finish, giving us concurrent upload of our two files!
 What about the last two remaining calls? Once the first upload finishes, Livewire’s JavaScript makes an update request to the component in order to update the
 $uploads[<index>] with details on its respective file details.
Then, once that update completes, Livewire proceeds with doing the same for the next completed file upload.
Customizing Per File Upload
Each file is assigned to a specific index in our $uploads array in the component, this allows us to avoid clashing simultaneous uploads for the same variable. At the same time, it paves way for us to customize each file upload!
Instead of directly assigning Livewire’s file reference as the value for each index of the array, let’s give each index an array instead. We can then add different attributes into this array. In fact, we’ll assign Livewire’s file reference as one of the attributes of said array:
// app\resources\views\livewire\multi-file-uploder.php
fileList.forEach((file, index) => {
-   @this.upload('uploads.'+index, file, (n)=>{},()=>{}, (e) => {});
+   @this.upload('uploads.'+index+'.fileRef',file,(n)=>{},()=>{},(e)=>{});
We can also include other custom details to this array index, like the file’s original name, size, or it’s upload progress! Let’s add those before calling the upload function:
+   @this.set('uploads.'+index+'.fileName', file.name );
+   @this.set('uploads.'+index+'.fileSize', file.size );
+   @this.set('uploads.'+index+'.progress', 0 );
    @this.upload('uploads.'+index+'.fileRef',file,(n)=>{},()=>{},(e)=>{});
Each file is uploaded separately and therefore have separate progress values assigned to their respective $uploads[index]['progress']. Each progress will start 0%, and get updated through each file’s upload() progress callback:
    @this.upload('uploads.'+index+'.fileRef',file,(n)=>{},()=>{},(e)=>{
      // Progress Callback
+      @this.set(
+         'uploads.'+index+'.progress',
+         e.detail.progress );
    });
});
</script>
With these attributes in place, we can show custom details per file in our html like so:
<input type="file" id="myFiles" multiple>
@foreach( $uploads as $i=>$upl )
    <div>
        <label>
            <div>{{ $upl['fileName'] }}</div>
            <div>{{ $upl['progress'] }}%</div>
        </label>
        <progress max="100" wire:model="uploads.{{$i}}.progress" />
    </div>
@endforeach
Since each file is uploaded separately, we finally get separate progress bars for each file!
Chunking Per File Upload
Now here comes the fun part. Thanks to this indexing of our file details into an array, we can now—drum rolls—chunk our separate uploads!
What’s the added benefit? Well consider uploading a file that exceeds the size of our application’s configured upload_max_file_size. Instead of increasing our application’s upload size limit to allow this upload, we can instead slice the file into smaller chunks that’s within our application’s limitations, and upload each “chunk” in separate requests.
To start chunking files we’ll have to decide on a $chunkSize. We’ll use this to slice chunks from our file. This should be within and close to our application’s configured upload limit. The closer this is to the limit, the larger the chunk we can upload in one request, the smaller the number of requests we’ll have to make to completely upload our file.
public $uploads = [];
+   public $chunkSize = 5_000_000; // 5MB
Let’s revise our logic for uploading each file: we’ll remove the call to Livewire’s upload() function here, and replace it with a call to a custom function livewireUploadChunk().
fileList.forEach((file, index) => {
    @this.set('uploads.'+index+'.fileName', file.name, true );
    @this.set('uploads.'+index+'.fileSize', file.size, true );
    @this.set('uploads.'+index+'.progress', 0, true );
-   @this.upload(...);
+   livewireUploadChunk( index, file );
});
This function relies on a starting point and an ending point to slice a chunk, so we’ll need variables for those two values. However it is important to take note that we are uploading multiple files in parallel. Because of this concurrency, it’s important we keep each file’s start point as a separate variable from other files’ to avoid clashing values.
In our current setup, one file matches one $uploads index. Therefore, we can do this separation by assigning each file’s “start” point to its respective index. But, since slicing is done client side, we won’t be assigning it to our $uploads array in the component. Instead, we’ll declare a JavaScript array chnkStarts to handle this in the client for us:
<script>
    const filesSelector = document.querySelector('#myFiles');
+   let chnkStarts=[];
Then we initialize each file’s chunk start point to 0:
    filesSelector.addEventListener('change', () => {
        const fileList = [...filesSelector.files];
        fileList.forEach((file, index) => {
          //...
+         chnkStarts[index] = 0;
          livewireUploadChunk( index, file );
        });
    });
Now that our “chunk starts” array is setup, let’s proceed with the logic for livewireUploadChunk(). This function will receive an index of a file in the $uploads array, and the file itself. It will cut a chunk from the file and upload this chunk using upload() function:
function livewireUploadChunk( index, file ){
  // End of chunk is start + chunkSize OR file size, whichever is greater
  const chunkEnd = Math.min(chnkStarts[index]+@js($chunkSize), file.size);
  const chunk    = file.slice(chnkStarts[index], chunkEnd);
Take note, we’re uploading multiple files at the same time. Depending on the number of files selected( which should be restricted—but is not covered here! ), the number of requests can sky rocket. We’d want to be thrifty on these concurrent requests, so let’s restrict one request per file at any given time.
We’ll upload one chunk per file to $uploads[index]['fileChunk']. Afterwards, we’ll hook on to Livewire’s upload()‘s progress callback, and check e.detail.progress for completion. Once this value reaches 100, we upload the next chunk by recursively calling the function on the next available chunk start.
    @this.upload('uploads.'+index+'.fileChunk',chunk,(n)=>{},()=>{},(e)=>{
      if( e.detail.progress == 100 ){
        // Get next start
        chnkStarts[index] =
          Math.min( chnkStarts[index] + @js($chunkSize), file.size );

        // Upload if within file size
        if( chnkStarts[index] < file.size )
            livewireUploadChunk( index, file );
      }
    });
} // End livewireUploadChunk
The above changes should now upload each file by chunks in our view.
Merging Files’ Chunks
Moving over to our component in the server, we’ll need to merge chunks together correctly as they get uploaded. But, how exactly do we inject logic after an upload completes?
When Livewire completes uploading a file, it would afterwards update the “wired” attribute with details of the uploaded file( Remember this third request? ). This means we can use Livewire’s updated hook on our public attribute to inject logic after Livewire updates it!
In our case, a file’s chunk is wired to $uploads[index]['fileChunk'], so we’ll intercept on updatedUploads(). Take note, $uploads is an array of arrays. updatedUploads() will run on every change to this array. Remember how we also set fileName, fileSize, and progress per $uploads index? This will also run for each of those!
We want to specifically inject logic when $uploads[index]['fileChunk'] gets updated. Livewire provides a way to identify the index of an array that got updated. We simply pass two parameters to our hook:
public function updatedUploads( $value, $key ){
$key gives us the value of the current index of the item in $uploads that has been updated. Can you guess the value of $key that gets returned when $uploads[0]['fileChunks'] gets updated?
It returns 0.fileChunk! We’ll have to parse this string, and only proceed when the attribute changed is fileChunk. From here we get the 0th index which we can use to get a reference on all attributes under that index:
    list($index, $attribute) = explode('.',$key);
    if( $attribute == 'fileChunk' ){
        $fileDetails = $this->uploads[intval($index)];
Now that we’re able to intercept update to a specific file’s fileChunk( signaling a completion of chunk upload ) we can now start merging chunks.
We’ll merge incoming chunks to a “final file”. This “final file” will require a name that is unique to avoid clashing file uploads. For now let’s imagine $fileDetails[index]['fileName'] is as unique a file name as it can be, so we’ll use this for the final file:
        // Final File
        $fileName  = $fileDetails['fileName'];
        $finalPath = Storage::path('/livewire-tmp/'.$fileName);
Then we’ll have to access our file chunk that’s been uploaded. Since Livewire already updated our $uploads[index]['fileChunk'] with details on the uploaded file chunk, we can use details here to access our chunk. For example, we can get the chunks name, and ultimately a reference to the chunk’s path:
        // Chunk File
        $chunkName = $fileDetails['fileChunk']->getFileName();
        $chunkPath = Storage::path('/livewire-tmp/'.$chunkName);
        $chunk      = fopen($chunkPath, 'rb');
        $buff       = fread($chunk, $this->chunkSize);
        fclose($chunk);
Then it’s just a matter of merging the current chunk with the final file, and cleaning:
        // Merge Together
        $final = fopen($finalPath, 'ab');
        fwrite($final, $buff);
        fclose($final);
        unlink($chunkPath);
Then, while we’re here, we can actually update the progress of our file chunk’s file upload. We can compare the current accumulated size with the total file size to get our progress:
        // Progress
        $curSize = Storage::size('/livewire-tmp/'.$fileName);
        $this->uploads[$index]['progress'] =
        $curSize/$fileDetails['fileSize']*100;
Finally, once we reach a 100% progress, we can finally set our final file as our fileRef! We’ll feed the final file to Livewire’s TemporaryUploadedFile class in order to utilize Livewire’s uploaded file features.
        if( $this->uploads[$index]['progress'] == 100 ){
          $this->uploads[$index]['fileRef'] =
          TemporaryUploadedFile::createFromLivewire(
            '/'.$fileDetails['fileName']
          );
        }
    }
} // End updatedUploads

From here, we can add a submit button and finalize saving each of our files in the $uploads[<index>]['fileRef'] by following Livewire’s guide on storing multiple files in the server.
Remarks à la Caveat
Isn’t Livewire just so remarkable to work with? See how this framework provides us not just with an easy way to implement features, but most importantly, a way to customize its default implementations. Take for example Lifecycle hooks—a way to hook on to different parts of Livewire’s processing!
Similarly, with the help of its upload api, we were able to customize our multi-files upload: from selecting and uploading multiple files in one request, to uploading files in separate, concurrent, chunked requests.
Of course, in a similar way that uploading files in one request has its drawbacks, so do uploading each file in separate, concurrent, chunked requests:
- Separately uploading multiple files means multiple requests to the server. As much as possible, we’d want to customize how fast we’re triggering these requests, or even consider limiting the number of files to reduce these calls.
- Chunking our files meant merging these chunks into a final file. Since we’ve manually configured the final file, this means we’ll also have to make sure that this final file’s name does not clash with other existing files.
- Finally, ‘customized’ requests means we get to further decide on how to handle new selection of files. When the user selects new files, should the old files be deleted, or should we merge these new files with the existing list?
Everything in life has a caveat it seems! But these little “woops” and “here we go again’s” are exactly the reason why everyday, we get to explore different nuances, and discover little treasures along the way.
And today, thanks to the caveats from uploading multiple files in one request, we found another remarkable “customization” treasure, with Livewire’s upload api 💎