

This article talks about communication between PHP and JavaScript using Livewire. Livewire’s faster close to your users. Deploy your Laravel app globally with Fly.io, your app will be flying in no time!
What makes Livewire a gem is how it easily allows us to communicate data, methods, and events across PHP and JavaScript.
No long code, no extra syntax—just straightforward, easy PHP-JavaScript communication.
Version Notice. This article focuses on Livewire v2, details for Livewire v3 would be different though!
The Livewire Bridge
Livewire bridges the gap between PHP and JavaScript with concise communication syntax.
No longer would we need to write up our client’s http requests to call methods or get response data, nor would we need to dig up client arguments from the request received by our server.
Today, we’ll skim just a teensy bit beneath the surface of Livewire, and understand the role of its magical metadata.
From there we’ll see how tossing metadata between server and client creates the bridge for PHP and JavaScript communication.
Along the way we’ll create a simple chat-bot application:
 |
|---|
| The user can send any message at the click of a button, and the chat bot will respond with its answer. |
It’s a bit rudimentary, but it will get us through some useful PHP-JS syntax:
- Triggering a PHP method from JavaScript
- Dispatching a JavaScript event from PHP
- Listening and Reacting to a PHP event from JavaScript
- Reading a PHP variable from JavaScript
You can check out our full repository here. You can also view the page here.
Under the Hood
A Livewire Component comes in two parts.
A Livewire Class processing requests in the server:
# /app/http/livewire/TalkToMe.php
<?php

namespace App\Http\Livewire;

use Livewire\Component;

class TalkToMe extends Component
{
    // Public attribute shared between server and client
    public $msg;

    // Called from the ui whenever a new msg is sent by the user
    public function getResponse()
    {
        $response = (new \App\Services\ChatBot)->processMessage($this->msg);
        $this->dispatchBrowserEvent(
          'response-received',
          ['response'=>$response]
        );
    }

    // Render the view
    public function render()
    {
        return view('livewire.talk-to-me');
    }
}
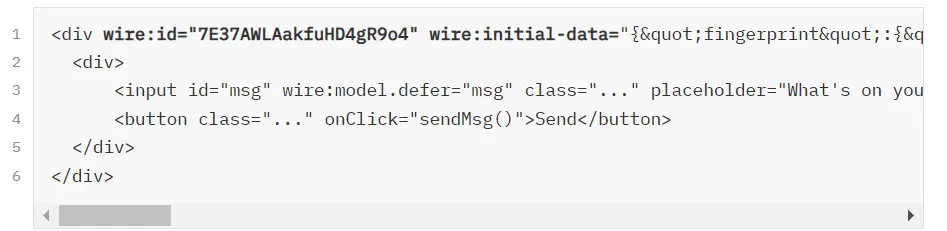
And a Livewire view that is rendered in the client’s browser:
- `wire:model` maps the input tag with a public attribute `$msg` configured in our Livewire Class above.
- wire:model`.defer` disables calls to the server during changes on the input element.
# /resources/views/livewire/talk-to-me.blade.php
<div>
    <div>
        <input id="msg" wire:model.defer="msg" class="..." placeholder="What's on your mind?">
        <button onClick="sendMsg()">Send</button>
    </div>
</div>
We can embed this Livewire component in any blade component:
<body>
  <livewire:talk-to-me />
  @livewireScripts
</body>
In the process of rendering this blade component, the server intelligently ( courtesy of Livewire ) renders the <livewire:talk-to-me /> tag into a plain HTML version of the tag’s initialized view.
The content changes, but an initialized Livewire view generally looks like:
 |
|---|
Livewire adds two additional attributes in our view’s root tag: wire:id and wire:initial-data |
It comes enclosing the actual content of the view, with two additional attributes embedded into its root tag. Livewire embeds an id in wire:id, along with its metadata in wire:initial-data.
It is this metadata shared between server and client that wires the bridge of communication across PHP and JavaScript.
The Wire that is Metadata
The Livewire class in the server shares its state with the client’s Livewire view by embedding metadata within the wire:initial-data attribute.
 |
|---|
The Livewire class’ details are jsonified into metadata, and embedded into wire:initial-data |
This metadata contains details regarding the identity of the Livewire class ( fingerprint ), the data the component needs to keep track of ( serverMemo ), and instructions on what needs to be handled on page load in the client ( effects ).
| Attribute | Description |
|---|---|
| fingerprint | Identifies the Livewire class( id, name, etc… ) |
| serverMemo | Data shared and persisted between server and client( i.e public attributes ) |
| effects | Details on effects the client needs to handle on page load |
On the client side, the Livewire view has its own JavaScript, courtesy of the @livewireScripts directive, that grabs our initialized Livewire view. The view’s root element is passed to Livewire’s JavaScript class “Component” which parses and stores the metadata embedded in its wire:initial-data.
Afterwards, it sets up the necessary JavaScript listeners and handlers matching the requirements of each wire attribute found in the Livewire view.
Once the required JavaScript has been set up for our wire attributes, our component is ready for user interaction.
Building the Chatbot
The Component class above handles interaction in our Livewire view. It records interactions in its updateQueue list, and, at the right time, coordinates these interactions to the server by sending this list as the updates metadata to the server.
Let’s create a simple chat bot page where users can send messages and receive response. It’s a bit rudimentary, but perfect for showcasing the role that the updates metadata plays in Livewire’s PHP-JS communication.
<input id="msg" wire:model.defer="msg" class="..." placeholder="...">
Our message box above, <input wire:model.defer="msg"…, is wired to the $msg attribute in our Livewire PHP class.
Wiring our input element with wire:model creates a listener that reacts to changes on its value.
Every change is pushed by the listener as a syncInput update to the Component’s updateQueue list
and is immediately sent to the server as part of the updates metadata.
However, we don’t want every change in our input field to send a request to our server! This is why we’ve included the .defer chain to our wiring.
The .defer chain instructs its listener not to fire the syncInput instruction immediately, but instead to store up the instruction in the deferredActions list for future processing.
Now that changes on our input field is deferred with wire:model.defer, let’s manually apply a listener on the user’s button click to send messages to our chat bot.
<button class="..." onClick="sendMsg()">Send</button>
This onClick listener will call our JS function sendMsg() to process our user’s message.
Calling PHP methods from JavaScript
Above, we manually registered a button click to process our user’s chat message.
Now, let’s trigger the PHP getResponse() method from our JS function sendMsg():
<script>
function sendMsg(){
  ...
+  // Get response from server regarding our latest message.
+  @this.getResponse();
}
You might be wondering ( hmmm ), why not just bind the button with the wire:click directive to easily map with a method call in our Livewire class?
Sometimes, it pays to mix and match JS with Livewire. Doing so gives us flexibility in separating client concerns from server concerns.
We can create some JS magic first before we actually call our Livewire method:
+ let chat = [];
function sendMsg(){
+    // Add user's msg to our chat transcript
+    // This chat transcript is only available in the client
+    chat.push( {
+      msg:sanitizeHTML(
+           document.getElementById('msg').value
+       ),
+      sender:0
+    });

+    // Display Messages in our chat list ui
+    refreshTranscript();

    // Ask our server to respond to user's latest message
    @this.getResponse();
}
In our case, we’d want to save the message sent by the user in a list and display the new message in our UI. Only then would we want to request for a response from the server.
updateQueList is mapped to the updates metadata sent as a request payload to the server.
Triggering @this.getResponse() adds a callMethod update to our updateQueue list, and fires an immediate request to the server.
Fly.io ❤️ Laravel
Fly your servers close to your users—and marvel at the speed of close proximity. Deploy globally on Fly in minutes!
Deploy your Laravel app! →
Tossing back the Metadata
Above, the client received the server’s Livewire class metadata, displayed its Livewire HTML, and now with a user’s click of a button, the client needs to coordinate some processing to the server through @this.getResponse().
How exactly does the Livewire view coordinate changes to the server?
It tosses the metadata back to the server.
 |
|---|
The previous metadata fingerprint and serverMemo along with an updates attribute is sent to the server |
FIFO updates by the Server
What happens to subsequent requests our Livewire view makes to our Livewire class?
Thanks to the fingerprint.name sent back in wire:initial-data, our view sends a request to /…/livewire/message/{fingerprint.name}.
The server maps this to the proper Livewire class component, receives the metadata above from our client’s request payload, and “hydrates” the properties of the selected class component using serverMemo.
Afterwards, it performs any data-binding-updates ( syncInput ), action-calls ( callMethod ), and event-emissions ( fireEvent ) based on the instructions indicated in the updates metadata.
In our case, we had two instructions pushed in our client’s updates metadata:
 |
|---|
| The updates metadata sent by the Livewire class contains instructions the Livewire class needs to process. |
The first instruction with type syncInput is the deferred action from changing the value of <input id="msg" wire:model.defer="msg". This syncInput type instruction tells the Livewire class to update its attribute $msg with the value hello.
The second instruction is a callMethod type which triggers a getResponse method in our Livewire class. Which is basically this:
public function getResponse()
{
    $response = (new \App\Services\ChatBot)->processMessage($this->msg);
    $this->dispatchBrowserEvent(
      'response-received', ['response'=>$response]
    );
}
- Our updated `$msg` attribute is sent to a custom class `\App\Services\ChatBot` for processing.
- Once we have the response, we simply call the Livewire `dispatchBrowserEvent()` method to add the event `“response-received”` in our effects list.
There are only two instructions in our updates list. After the last instruction is processed by the server, it proceeds with steps to dehyrdate its details into metadata, and finally sends back an updated metadata to the client:
 |
|---|
The serverMemo contains updated data attributes, the effects contain change instructions needed in the Livewire view |
The metadata sent back by the server contains only two attributes: effects and serverMemo. effects contain updates for the client to process, and serverMemo contains the updated data of the component.
Now that we’ve received the server’s response, let’s add the response to our chat transcript and display it in our UI.
PHP invokes JavaScript events
With the use of our Livewire metadata, we can actually invoke JS events from PHP. In our getResponse() method above, we called
$this->dispatchBrowserEvent('received-response',...)
Doing so pushes an event response-received to the dispatches array found inside the effects metdata sent back by the server:

Livewire’s JavaScript dispatches an event for each item included in the effects.dispatches array. That means we’ll have a received-response event dispatched in our client’s browser.
Right there, in one line of code, is JavaScript event creation from PHP 😎
Reactive JavaScript
Now that we have the event created in our client, this means we can easily have our JavaScript listen to the event dispatched from our server’s effects metadata:
 window.addEventListener('response-received', event => {
    // Add the server's message to our chat transcript
    chat.push({
      msg: event.detail.response,
      sender: 1
    });

    // Refresh the chat transcript displayed
    refreshTranscript();
});
JavaScript reads PHP vars
Let’s say we’d have some initialized PHP attribute from our Livewire class:
public $goodMsgs;

public function mount()
{
  $this->goodMsgs = (new \App\Services\ChatBot)->goodMessageList();
}
From our JavaScript we can simply use the @js directive to read this PHP variable:
<script>
- let hints = JSON.parse('<?php echo json_encode($goodMsgs) ?>')
+ let hints = @js($goodMsgs);
The @js directive is one of the Livewire blade directives that Livewire class from the server scans the Livewire view for.
The server reads this and renders a proper JavaScript variable for us. This is pretty neat, because using it removes our need to manually add JSON parsing in JavaScript for reading objects or arrays.
Brighter Magic with Clarity!
The more we look under the magic of Livewire, the more astonishing its workings become.
Because now, not only do we know the surface level of instantaneous, seamless interaction of wire elements with user interaction.
Under the hood, we now know, that behind every PHP Livewire component, is a JavaScript component coordinating interactions behind the scene.
PHP and JavaScript communication is bridged, all under the magic of the wire that is metadata. 🪄