

Fly takes a Docker image, converts it to a VM, and runs that VM anywhere around the world. Run a Laravel app in minutes!
Shopping carts don’t empty out when the user leaves the page. Why? Well, for that I’ll need to take you back in time. Cue the wavy flashback transition!
Once upon a time, there was an everyday, regular, normal guy named Jack. Jack loved shopping online and often spent hours browsing various websites for the best deals. He would add items to his shopping cart, but he never seemed to order them. Instead, he would often check back on his cart, admiring the items he had selected, but never actually clicking the “buy” button. Jack would order them only when he was completely one hundred percent definitely certain he wants them.
Do I know Jack?

Yes, I have a habit of filling shopping carts with stuff I’ll order months later, or just outright forget. ChatGPT-generated fairy tales about my character flaws aside, we’re here to talk about the real heroes of the story: the shopping carts that thanklessly hold our possible future buys on various webshops. Remember to thank them for their service sometime.
Anywho, let’s build one to see how they work!
These are the topics this article touches on :
- http session, and the session facade in Laravel
- Livewire
- the Service pattern
- the Money package
- Laravel collections
The Goal
Our end goal will be to create a new order with all the products that the user has in their shopping cart. To enable that, we’ll need some Livewire components for updating the values without reloading the page as well as a shopping cart that keeps track of the products of our users (the users’s products?). Quick spoiler, we’ll use a Service class for that and in there we’ll use Laravel’s Session facade.
So, we’ll be building a very barebones webshop. I’ll try to keep it short and simple in two steps: adding products to the cart and using the cart to place an order.
Briefing over, let’s build!
The Models
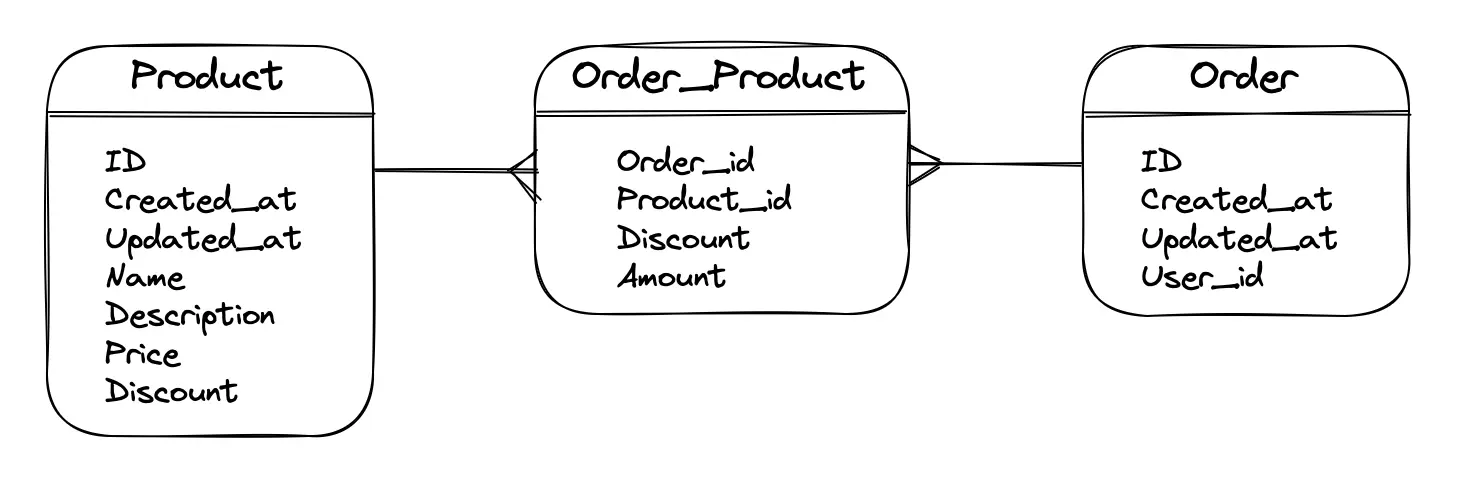
In our barebones webshop, we have 2 models to worry about:
- the Product table with an ID, timestamps, name, description, price and discount. This contains multiple Orders.
- the Order table that belongs to one User, has an ID and timestamps and contains multiple Products.
Since this is a many-to-many relationship, we’ll need a pivot table. This will contain foreign ids for Product and Order, as well as fields for discount (the product’s discount at the time of ordering) and amount (of products ordered). Here’s how the Product and Order models are set up:
class Product extends Model
{
    //other stuff here

    public function orders()
    {
        return $this->belongsToMany(Order::class)->withPivot('discount', 'amount');
    }
}
class Order extends Model
{
    //other stuff here

    public function products()
    {
        return $this->belongsToMany(Product::class)->withPivot('discount', 'amount');
    }
}
Laravel will automagically assume the name of the pivot table is [alphabetically first model name]_[alphabetically first model name], which is order_product in our case. Laravel will also assume the foreign id’s will be called product_id and order_id. The withPivot method enables us to add extra columns in the table, like discount and amount in our case, as shown in the docs.
This is how our tables will look:
Adding Products to the shopping cart
Building the Shopping Cart Service
The shopping cart service will handle all the storing and fetching of data into/from the http session. This way, we can reuse the code and inject it into all the components where it’s needed.
Create an app/Services folder and in there make a new php class called CartService.php. Before we begin with adding products into our cart, we need to talk about what data we’re going to save. I’ve found the most performant and secure way is to:
- Keep only what we need for displaying and/or creating an Order
- Only keep scalar types (int, float, bool, string)
So, here’s what we’re going to save in our CartService:
- productId - for creating the order_product
- amount - to display and for creating the order_product
- product price - to display
- product name - to display
- discount - to display and for creating the order_product
To make our data easily searchable, we’ll give it the productId as key as well. This is how it’ll look:
749 => [
  'productId' => 749,
  'amount' => 5,
  'price' => 1499, //always save price as an int!
  'name' => 'Creative product name here',
  'discount' => 0,
]
Okay, we have all we need now. Make an addToCart function in the CartService:
public function addToCart(int $productId): array
{
    // get data from session (this equals Session::get(), use empty array as default)
    $shoppingCart = session('shoppingCart', []);

    if (isset($shoppingCart[$productId]))
    {
        // product is already in shopping cart, increment the amount
        $shoppingCart[$productId]['amount'] += 1;
    }
    else
    {
        // fetch the product and add 1 to the shopping cart
        $product = Product::findOrFail($productId);
        $shoppingCart[$productId] = [
            'productId' => $productId,
            'amount'    => 1,
            'price'     => $product->price->getAmount(),
            'name'      => $product->name,
            'discount'  => $product->discount
        ];
    }

    // update the session data (this equals Session::put() )
    session(['shoppingCart' => $shoppingCart]);
    return $shoppingCart;
}
Because we use the product ID as the key, we can easily check if the shopping cart already contains the product using isset($shoppingCart[$productId]) . If the shopping cart already contains the product we can easily increment the amount, otherwise we need to fetch the product and save all it’s properties in a new array element.
Removing items from the cart is quite similar: check if it exists in the cart (it should!) and check the amount. If it’s 1, remove the element from the array completely and otherwise just decrement the amount. Here’s how it looks:
public function removeFromCart(int $productId): array | null
{
    $shoppingCart = session('shoppingCart', []);

    if (!isset($shoppingCart[$productId]))
    {
        // should not happen, and should throw an error.
        return null;
    }
    else
    {
        if ($shoppingCart[$productId]['amount'] == 1){
            unset($shoppingCart[$productId]);
        }
        else
        {
            $shoppingCart[$productId]['amount'] -= 1;
        }
    }

    session(['shoppingCart' => $shoppingCart]);
    return $shoppingCart;
}
Now let’s use our brand new methods, shall we?
Firstly, for Livewire components to use the CartService they will need the productId. In my example, I made a Livewire component for the ‘add to cart’ button and gave it the productId while I was looping over the products to display. It looked something like this:
@foreach($products as $product)
    <tr>
        <td>{{$product->name}}</td>
        <td>
            <livewire:add-to-cart-button :productId="$product->id"></livewire:add-to-cart-button>
        </td>
    </tr>
@endforeach
The second thing the components will need is the CartService itself, which is where Laravel’s dependency injection comes in handy: just pass the CartService as a parameter in a Livewire component method, and Laravel will take care of business. Here’s how my addToCart method looks:
public function addToCart(CartService $cartService)
{
    $cartService->addToCart($this->productId);
}
The CartService is injected and ready to use wherever it’s added like this. Easy-peasy lemon-squeezy!
I have a shopping cart overview component as well, that will need to update its own values when the user increments or decrements the amounts. Here’s how I managed that:
In the mount Livewire lifecycle hook , I’ll let the component fetch the shopping cart contents:
public function mount(CartService $cartService)
{
    $this->shoppingCart = $cartService->getShoppingCart();
}
And when changing the amounts, I’ll use the return value of the CartService methods:
public function incrementAmount(int $productId, CartService $cartService)
{
    $this->shoppingCart = $cartService->addToCart($productId);
}
There’s an issue here: What if there are two components on screen that need to be updated? The shopping cart overview and the shopping cart button in the navbar, for example?
Refreshing Livewire views
Worry not, Livewire’s got you covered! Just emit an event (I’d suggest ‘updateShoppingCart’ or something similar) and listen to it on the components that will need updating. Like this:
// in the 'incrementAmount' method
$this->emit('updateShoppingCart');

// in the shoppingCartButton component:
class ShoppingCartButton extends Component
{
    //public properties here...
    protected $listeners = ['updateShoppingCart' => 'updateShoppingCart'];

  public function updateShoppingCart(CartService $cartService)
    {
        $this->shoppingCart = $cartService->getShoppingCart();
        $this->cartAmount = $cartService->getCartAmount();
        $this->subTotal = $cartService->getCartSubTotal()->format();
    }
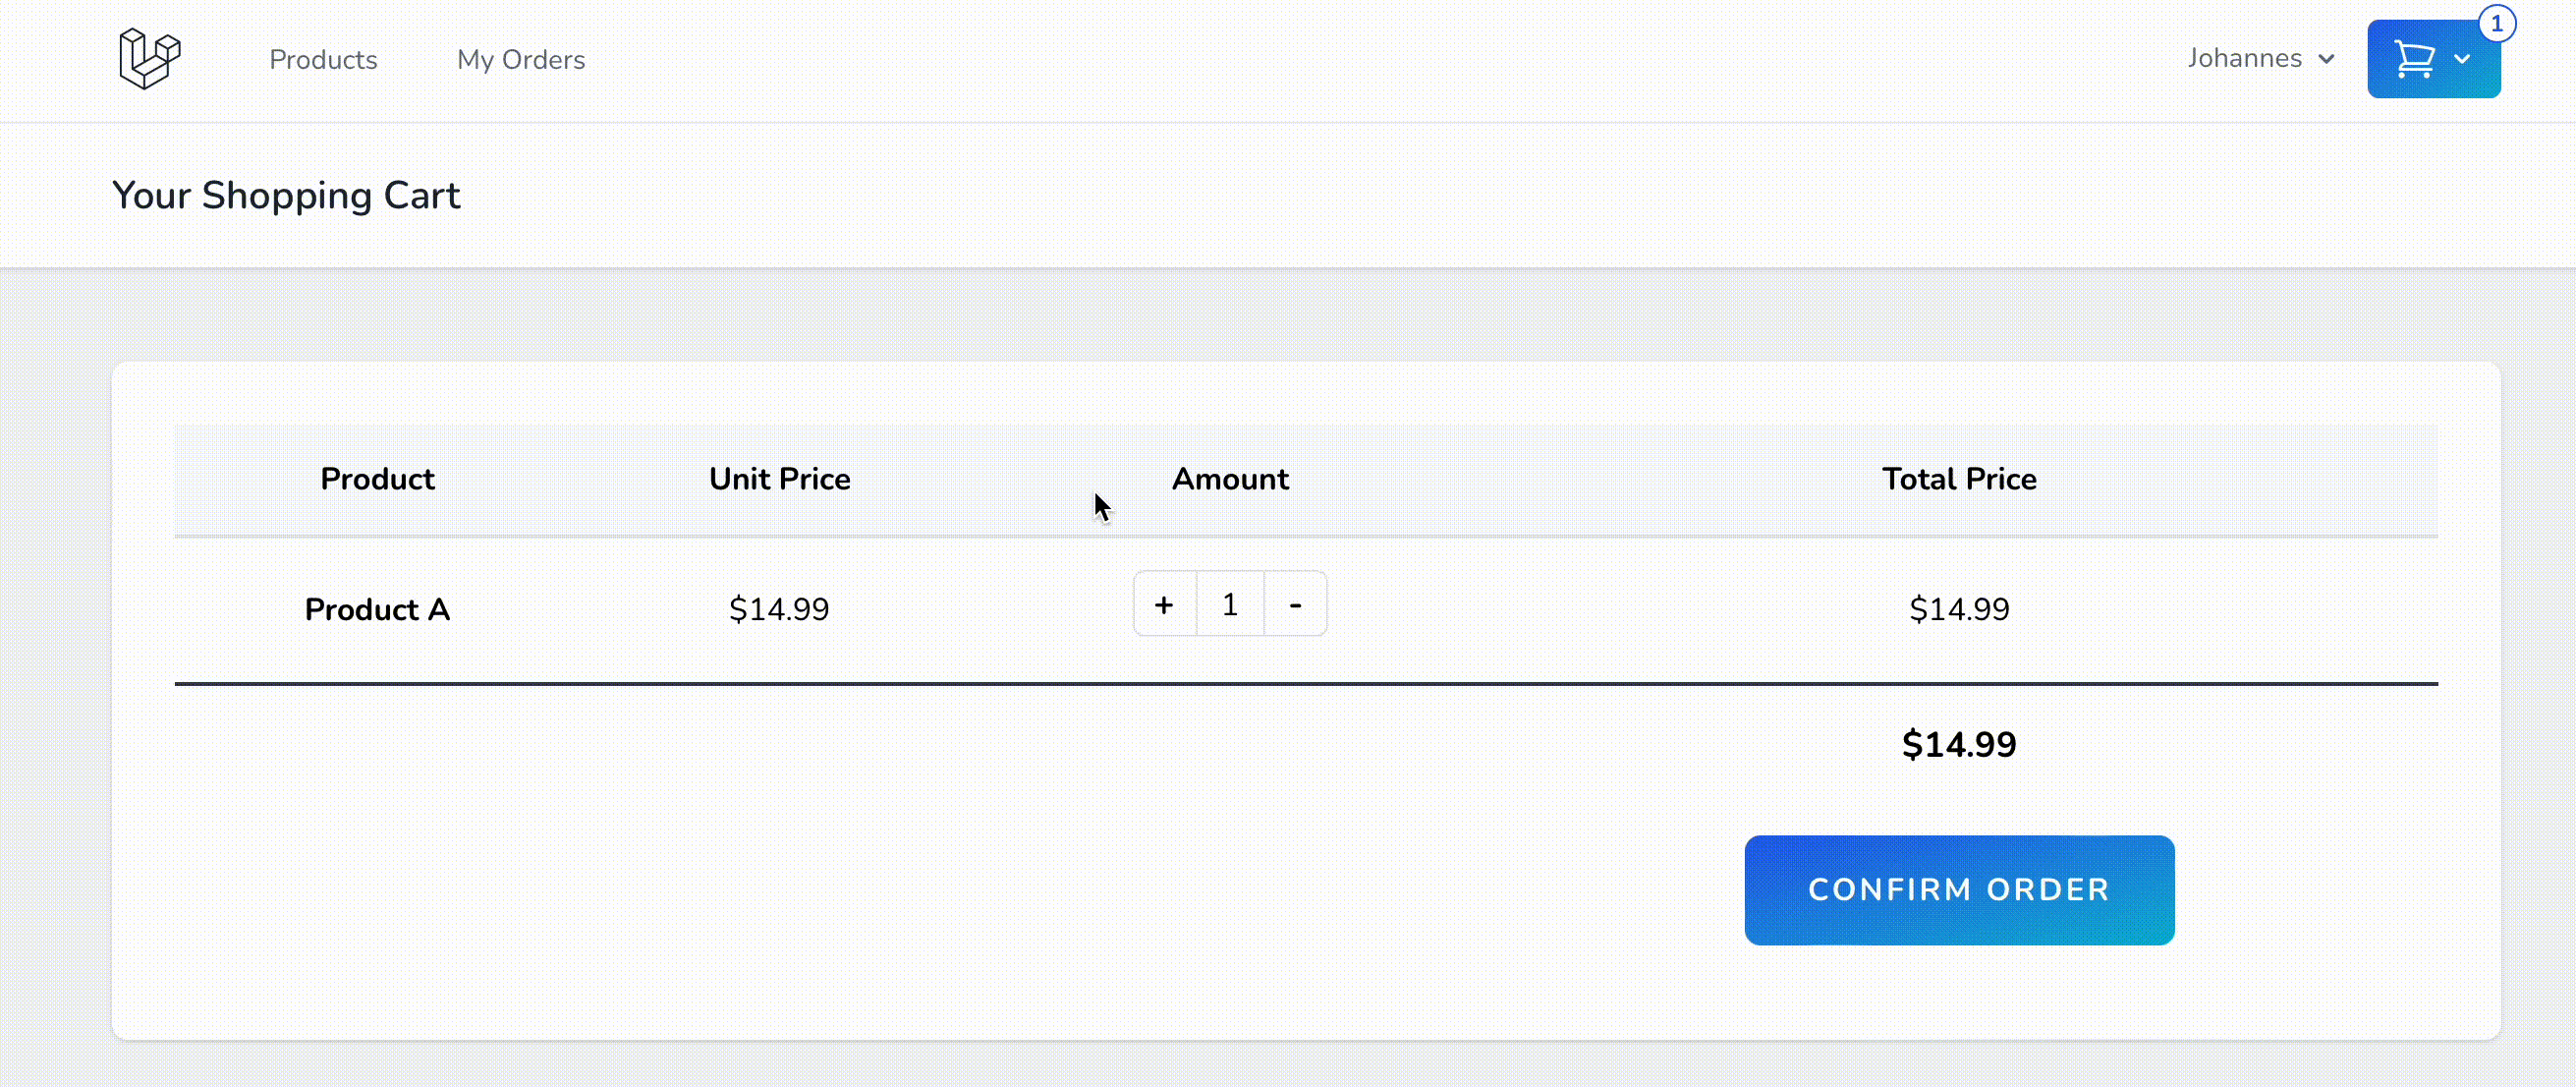
I’ll quickly touch on the cartAmount and subTotal here: the getCartAmount()method just counts all the amounts of all the array elements in the shopping cart. It’s basically how many pieces there are in the shopping cart: 2 apples and 3 bananas makes 5 in total.
The subTotal is the sum of the price x amount for each product, so 2 apples for $1 each and 3 bananas for $10 would get a subTotal of $32. To make formatting easy, I use the laravel-money package. getCartSubtotal will return a Money object, which can be formatted however you like using the format() method.
Boom, filling the shopping cart is done and dusted! Now, let’s put on our backend hats and check out the checkout process. Get it?
Fly.io ❤️ Laravel
Fly your servers close to your users—and marvel at the speed of close proximity. Deploy globally on Fly in minutes!
Deploy your Laravel app! →
Creating Orders with a many-to-many relationship
Okay, our customers now have a digital assistant holding all their selected products while they continue browsing. Get it?
Next up: actually creating an Order from a basket of products. Firstly, send the shopping cart contents along as a form input:
<form method="post" action="{{route('orders.store')}}">
    @csrf
    <input type="hidden" name="orderProducts" id="orderProducts" value="{{json_encode($shoppingCart)}}">
    <button type="submit">{{__('Order')}}</button>
</form>
Just json_encode the array and send it along as a string. Straighten your back-end hat and join me over in the StoreOrderRequest to look at the validation.
Validating a FormRequest with an Array
You could just use the json validation rule, but I’d urge you to decode it in a FormRequest and validate it as an array. It’s more flexible this way:
protected function prepareForValidation()
{
    /**
     * We need to decode the JSON, so we can validate it as an array.
     * This is how the original input data looks:
     * $productId => ['amount' => $amount, 'price' => $price, 'name' => $name, 'discount' => $discount, 'productId' => $productId]
     */
    $this->merge(['orderProducts' => json_decode($this->orderProducts, true)]);
}
Validation rules:
return [
    'orderProducts.*.productId' => ['required', 'integer'],
    'orderProducts.*.amount' => ['required', 'integer', 'min:1'],
    'orderProducts.*.discount' => ['required', 'numeric', 'between:0,100'],
];
The orderProducts.*. means that the validation rule has to be applied on every element of the orderProducts array. This way, we can validate down to singular properties.
Okay, home stretch: saving the Order in the database!
Attaching Intermediate Tables to a Model
Right, we’ve received the data and it’s all looking good: background checks have been run and the metal detectors didn’t beep at us. Let’s create our Order now!
Like always, Laravel makes it quite easy on us: we can use the attach() method on the belongsToMany relationship to add a row in the intermediate table, like this:
$order->products()->attach($productId);
This will add an intermediate table between $order and the Product with ID $productId. Adding the discount and the amount to it isn’t hard as well: just add the key=>value pairs after the $productId:
$order->products()->attach($productId, ['amount' => $amount], 'discount' => $discount]]);
Now, we just need to do this for every order_product we get from the shopping cart. It’s an array, remember? Here’s how the final version looks:
$validated = $request->validated();

$order = new Order();

foreach ($validated['orderProducts'] as $orderProduct)
{
    $order->products()->attach($orderProduct['productId'], ['amount' => $orderProduct['amount'], 'discount' => $orderProduct['discount']]);
}
$order->save();
Now, the user can order just fine but there’s one detail left to fix: The shopping cart doesn’t empty itself after ordering. I’ll let you figure it out on your own, but I’m sure the session→forget() method will come in handy.
As always, thanks for reading!
Johannes