
Fly.io has Enterprise-grade GPUs and servers all over the globe (or disk, depending on which side of the flat Earth debate you fall on) making it a great place to deploy your next disruptive AI app.
Some people daydream about normal things, like coffee machines or raising that Series A round (those are normal things to dream about, right?). I daydream about commanding a fleet of chonky NVIDIA Lovelace L40Ss. Also, totally normal. Well, fortunately for me and anyone else wanting to explore the world of generative AI — Fly.io has GPUs now!
Sure, this technology will probably end up with the AI talking to itself while we go about our lives — but it seems like it’s here to stay, so we should at least have some fun with it. In this post we’ll put these GPUs to task and you’ll learn how to build your very own AI image-generating Discord bot, kinda like Midjourney. Available 24/7 and ready to serve up all the pictures of cats eating burritos your heart desires. And because I’d never tell you to draw the rest of the owl, I’ll link to working code that you can deploy today.
Latent Diffusion Models Have Entered the Chat
In the realm of AI image generation, two names have become prominent: Midjourney and Stable Diffusion. Both are image generating software that allow you to synthesize an image from a textual prompt. One is a closed source paid service, while the other is open source and can run locally. Midjourney gained popularity because it allowed the less technically-inclined among us to explore this technology through its ease of use. Stable Diffusion democratized access to the technology, but it can be quite tricky to get good results out of it.
Enter Fooocus (pronounced focus), an open source project that combines the best of both worlds and offers a user-friendly interface to Stable Diffusion. It’s hands down the easiest way to get started with Stable Diffusion. Sure there are more popular tools like Stable Diffusion web UI and ComfyUI, but Fooocus adds some magic to reduce the need to manually tweak a bunch of settings. The most significant feature is probably GPT-2-based “prompt expansion” to dynamically enhance prompts.
The point of Fooocus is to focus on your prompt. The more you put into it, the more you get out. That said, a very simple prompt like “forest elf” can return high-quality images without the need to trawl the web for prompt ideas or fiddle with knobs and levers (although they’re there if you want them).
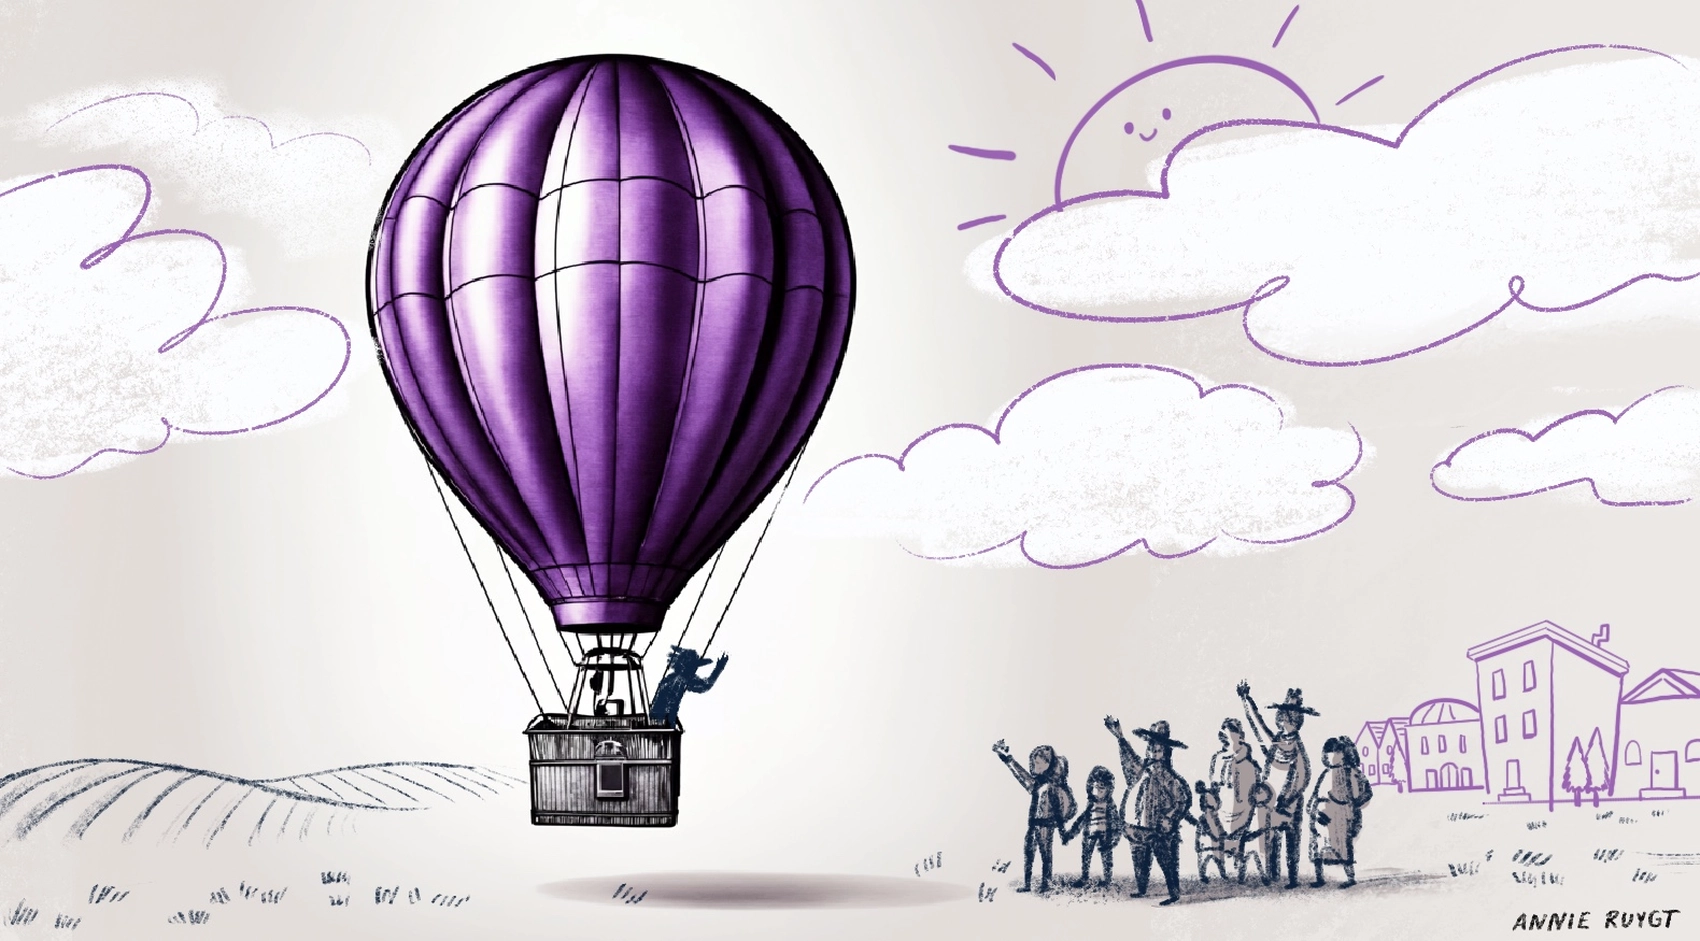
So, what can this thing do? Well, this…

Here’s the full command I’ve used to generate this image: /imagine prompt: sketch of hot-air balloon over a mountain range style1: Pencil Sketch Drawing quality: true ar: 1664×576
What We’re Building
We’ll deploy two applications. The code to run the bot itself will run on normal VM hardware, and the API server doing all the hard work synthesizing alpacas out of thin air will run on GPU hardware.
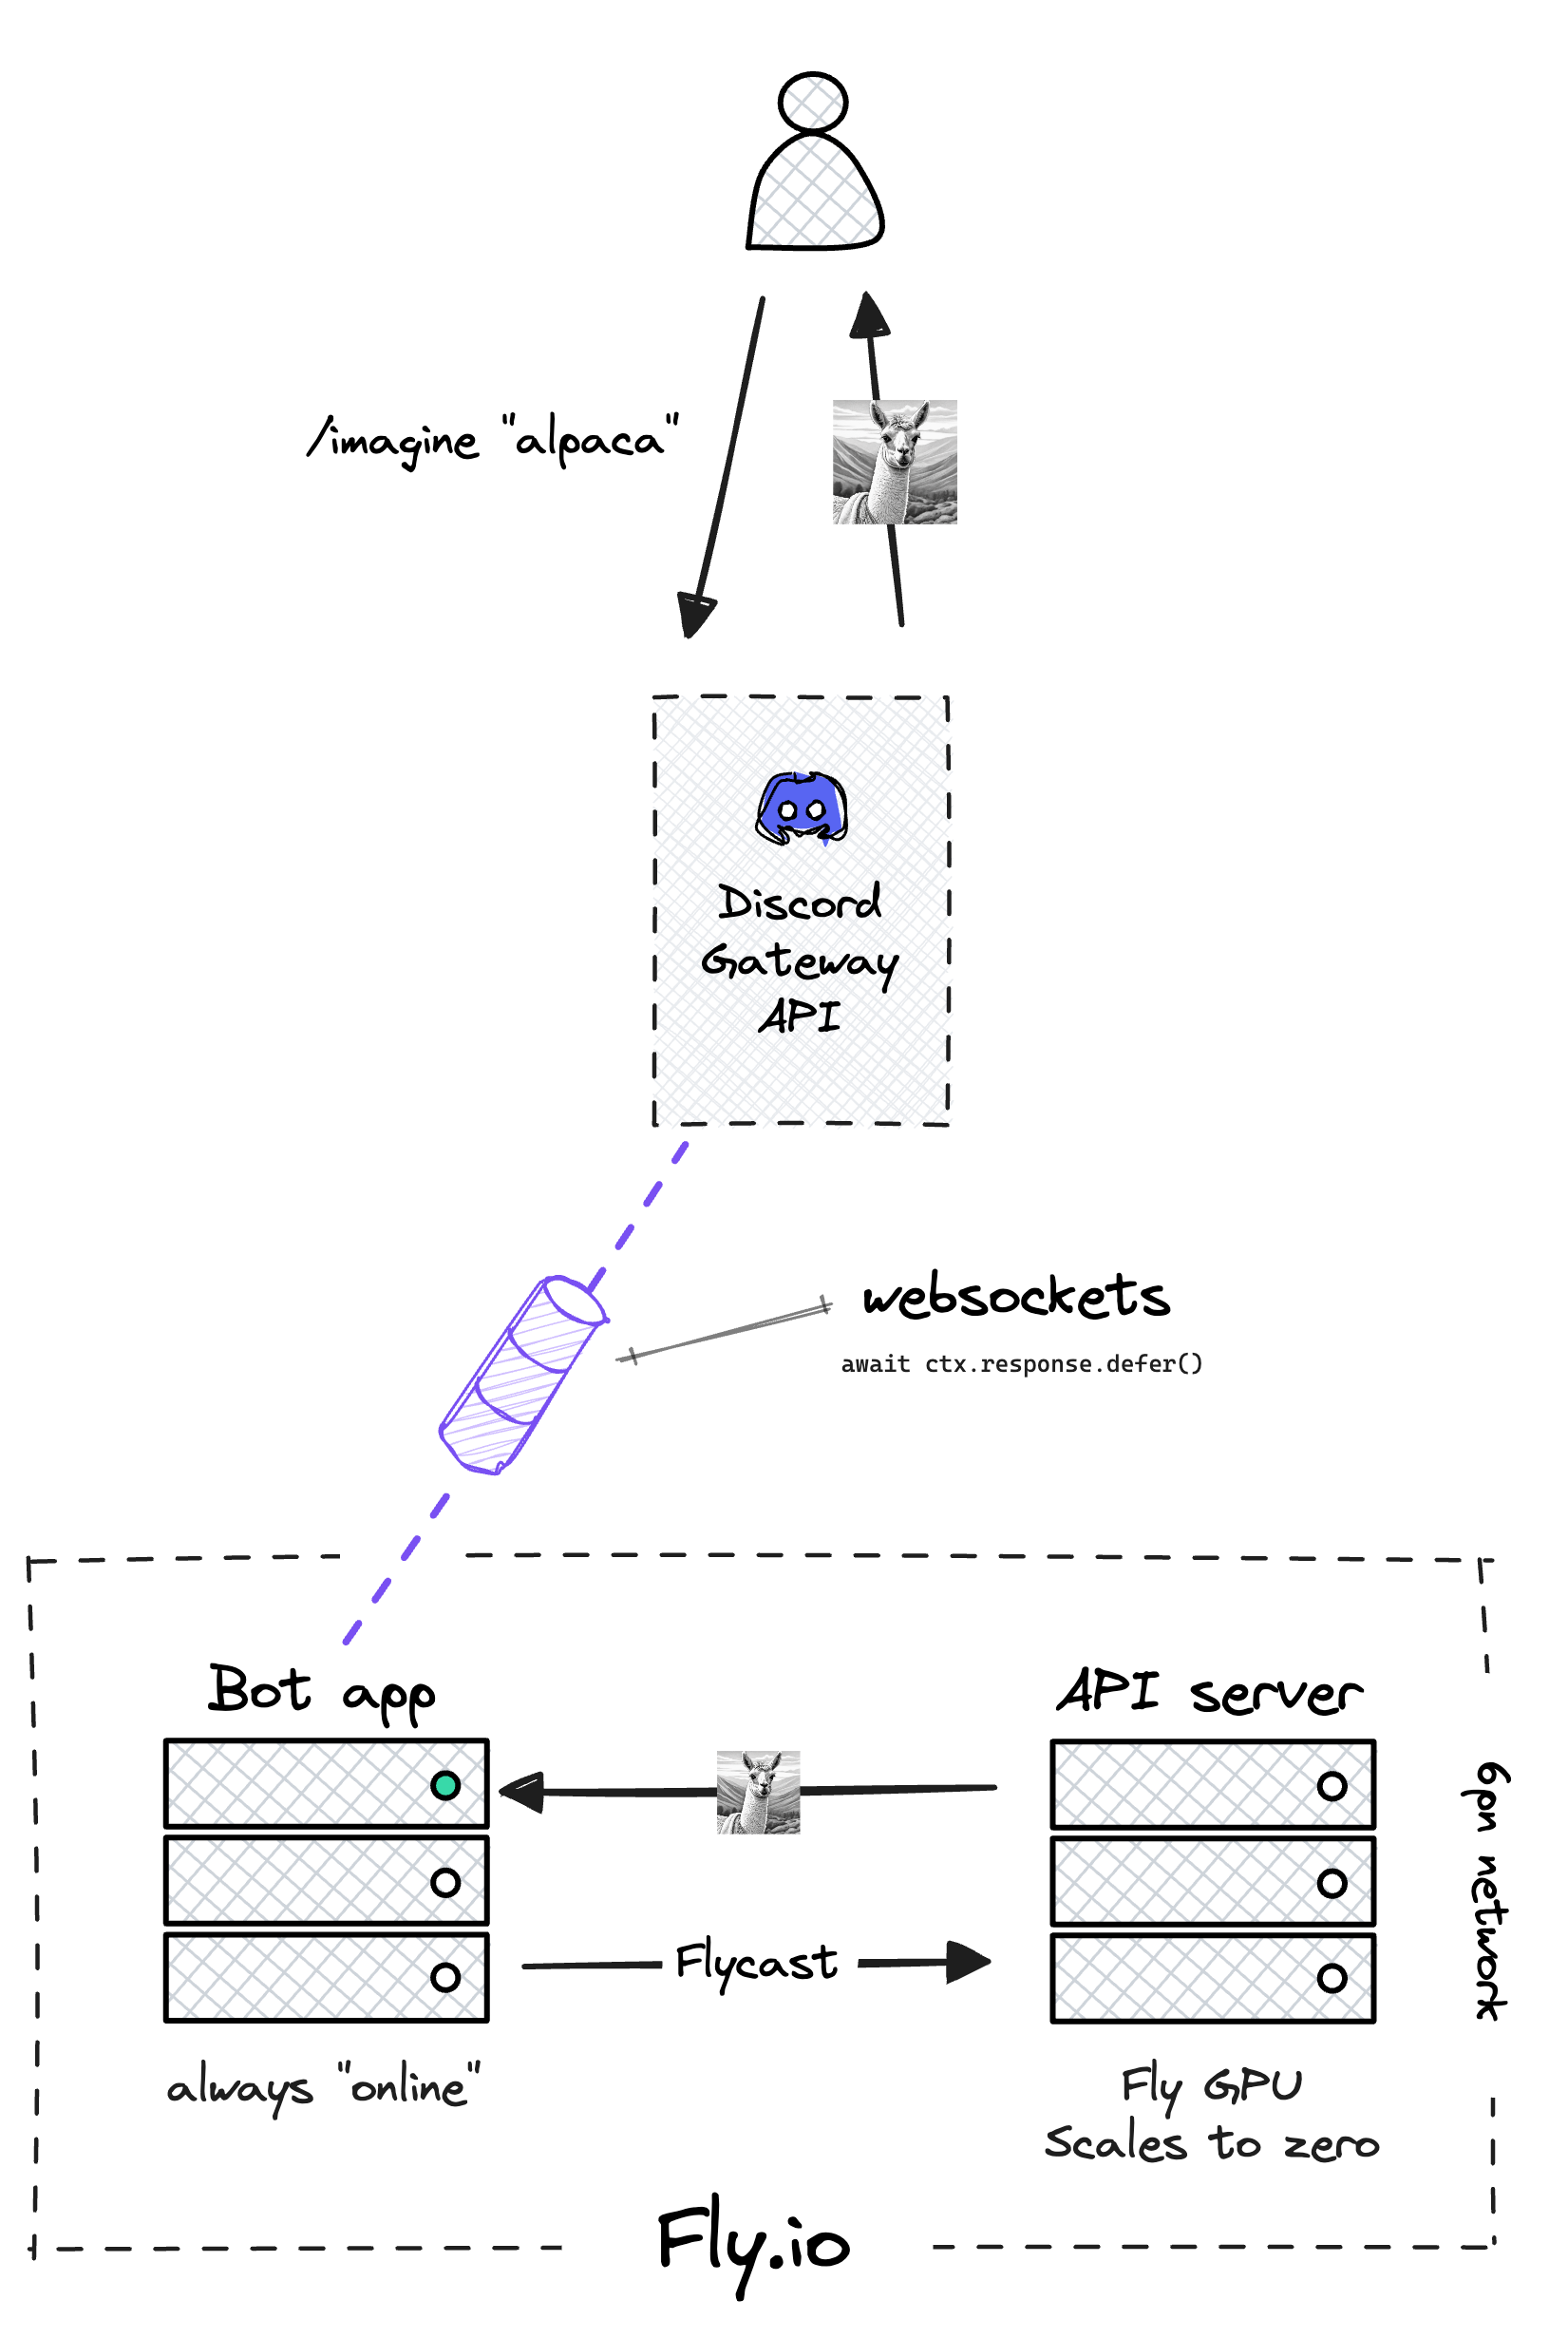
Fooocus is served up as a web UI by default, but with a little elbow grease we can interact with it as a REST API. Fortunately, with more than 25k stars on GitHub at the time of writing, the project has a lively open-source community, so we don’t need to do much work here — it’s already been done for us. Fooocus-API is a project that shoves FastAPI in front of a Fooocus runtime. We’ll use this for the API server app.
The Python-based bot connects to the Discord Gateway API using the Pycord library. When it starts up, it maintains an open pipe for data to flow back and forth via WebSockets. The bot app also includes a client that knows how to talk to the API server using Flycast and request the image it needs via HTTP.
When we request an image from Discord using the /imagine slash command, we immediately respond using Pycord’s defer() function to let Discord know that the request has been received and the bot is working on it — it’ll take a few seconds to process your prompt, fabricate an image, upload it to Discord and let you share it with your friends. This is a blocking operation, so it won’t perform well if you have hundreds of people on your Discord Server using the command. For that, you’ll want to jiggle some wires to make the code non-blocking. But for for now, this gives us a nice UX for the bot.
When the API server returns the image, it gets saved to disk. We’ll use the fantastic Sqids library to generate collision-free file names:
unique_id = self.sqids.encode(
    [ctx.author.id, int(time.time())]
)

result_filename = f"result_{unique_id}.png"
We’ll also use asyncio to check if the image is ready every second, and when it is, we send it off to Discord to complete the request:
while not os.path.exists(result_filename):
    await asyncio.sleep(1)

with open(result_filename, "rb") as f:
    await ctx.respond(
        file=discord.File(f, result_filename)
    )
Neither of these two apps will be exposed to the Internet, yet they’ll still be able to communicate with each other. One of the undersold stories about Fly.io is the ease with which two applications can communicate over the private network. We assign special IPv6 private network (6pn) addresses within the same organizational space and applications can effortlessly discover and connect to one another without any additional configuration.
But what about load balancing and this “scale-to-zero” thing? We don’t just want our two apps to talk to each other, we want the Fly Proxy to start our Machine when a request comes in, and stop it when idle. For that, we’ll need Flycast, our private load balancing feature.
When you assign a Flycast IP to your app, you can route requests using a special .flycast domain. Those requests are routed through the Fly Proxy instead of directly to instances in your app. Meaning you get all the load balancing, rate limiting and other proxy goodness that you’re accustomed to. The Proxy runs a process which can automatically downscale Machines every few minutes. It’ll also start them right back up when a request comes in — this means we can take advantage of scale-to-zero, saving us a bunch of money!
The /imagine Command
The slash command is the heart of your bot, enabling you to generate images based on your prompt, right from within Discord. When you type /imagine into the Discord chat, you’ll see some command options pop up.
You’ll need to input your base prompt (e.g. “an alpaca sleeping in a grassy field”) and optionally pick some styles (“Pencil Sketch Drawing”, “Futuristic Retro Cyberpunk”, “MRE Dark Cyberpunk” etc). With Fooocus, combining multiple styles — “style-chaining” — can help you achieve amazing results. Set the aspect ratio or provide negative prompts if needed, too.
After you execute the command, the bot will request the image from the API, then send it as a response in the chat. Let’s see it in action!

Deployment Speedrun
First, we’ll deploy the API server. For convenience (and to speed things up), we’ll use a pre-built image when we deploy. With dependencies like torch and torchvision bundled in, it’s a hefty image weighing in just shy of 12GB. With a normal Fly Machine this would not only be a bad idea, but not even possible due to an 8GB limit for the VMs rootfs. Fortunately the wizards behind Fly GPUs have accounted for our need to run huge models and their dependencies, and awarded us 50GB of rootfs.
Fly GPUs use Cloud Hypervisor and not Firecracker (like a regular Fly Machine) for virtualization. But even with a 12GB image, this doesn’t stop the Machine from booting in seconds when a new request comes in through the Proxy.
To start, clone the template repository. You’ll need this for both the bot and server apps. Then deploy the server with the Fly CLI:
fly deploy \
  --image ghcr.io/fly-apps/not-midjourney-bot:server \
  --config ./server/fly.toml \
  --no-public-ips
This command tells Fly.io to deploy your application based on the configuration specified in the fly.toml, while the --no-public-ips flag secures your app by not exposing it to the public Internet.
Remember Flycast? To use it, we’ll allocate a private IPv6:
fly ips allocate-v6 --private
Now, let’s take a look at our fly.toml config:
app = "alpaca-image-gen"
primary_region = "ord"

[[vm]]
  size = "performance-8x"
  memory = "16gb"
  gpu_kind = "l40s"

[[services]]
  internal_port = 8888
  protocol = "tcp"
  auto_stop_machines = true
  auto_start_machines = true
  min_machines_running = 0

    [[services.ports]]
      handlers = ["http"]
      port = 80
      force_https = false

[mounts]
  source = "repositories"
  destination = "/app/repositories"
  initial_size = "20gb"
There are a few key things to note here:
- Currently, the NVIDIA L40Ss we’re using when we specify
gpu_kindare only available inORD, so that’s what we’ve set theprimary_regionto. We’re rolling out more GPUs to more regions in a hurry — but for now we’ll host the bot in Chicago. - Out of the box, 8GB of system RAM is suggested. In my testing this wasn’t close to enough: the Machine would frequently run out of memory and crash. I got things working better by using 16GB of RAM.
- The FastAPI server binds to port 8888; we need to set this as our
internal_port, or the Fly Proxy won’t know where to send requests. - We want our Machine to automatically stop and start.
- Flycast doesn’t do HTTPS, so we won’t force it here. Don’t worry, it’s still encrypted over the wire!
- A volume is automatically created on the first deploy. On first boot, the app clones the Fooocus repo and downloads the Stable Diffusion model checkpoints onto that volume. This takes a couple of minutes, but the next time the Machine starts, it’ll have everything it needs to serve a request within seconds.
The README for this project has detailed instructions about setting up your Discord bot and adding it to a Server. After setting up the permissions and privileged intents, you’ll get an OAuth2 URL. Use this URL to invite your bot to your Discord server and confirm the permissions. Once that’s done, grab your Discord API token, you’ll need it for the next step.
With the API server up and running, it’s time to deploy the Discord bot. This app will run on a normal Fly Machine, no GPU required. First, set the DISCORD_TOKEN and FOOOCUS_API_URL (the Flycast endpoint for the API server) secrets, using the Fly CLI. Then deploy:
fly deploy \
  --image ghcr.io/fly-apps/not-midjourney-bot:bot \
  --config ./bot/fly.toml \
  --no-public-ips
Notice that the bot app doesn’t need to be publicly visible on the Internet either. Under the hood, the WebSocket connection to Discord’s Gateway API allows the bot to communicate freely without the need to define any services in our fly.toml. This also means that the Fly Proxy will not downscale the app like it does the GPU Machine — the bot will always appear “online”.
Not interested in GPUs?
You can still deploy apps on Fly.io today and be up and running in a matter of minutes.
Deploy an app now→
How Do I Know This Thing Is Using GPU for Reals?
That’s easy! NVIDIA provides us with a neat little command-line utility called nvidia-smi which we can use to monitor and get information about NVIDIA GPU devices.
Let’s SSH to the running Machine for the API server app and run an nvidia-smi query in one go. It’s a little clunky, but you’ll get the point:
fly ssh console \
  -C "nvidia-smi --query-gpu=gpu_name,utilization.gpu,utilization.memory,temperature.gpu,power.draw --format=csv,noheader --loop"
Connecting to fdaa:2:f664:a7b:210:d8b2:8fd8:2... complete

NVIDIA L40S, 0 %, 0 %, 46, 88.63 W
NVIDIA L40S, 0 %, 0 %, 46, 88.61 W
NVIDIA L40S, 36 %, 4 %, 51, 103.41 W
NVIDIA L40S, 65 %, 25 %, 57, 280.90 W
NVIDIA L40S, 0 %, 0 %, 49, 91.13 W
NVIDIA L40S, 0 %, 0 %, 48, 89.76 W
What we’ve done is run the command on a loop while the bot is actually doing work synthesizing an image and we get to see it ramp up and consume more wattage and VRAM. The card is barely breaking a sweat!
How Much Will These Alpaca Pics Cost Me?
Let’s talk about the cost-effectiveness of this setup. On Fly.io, an L40S GPU costs $2.50/hr. Tag on a few cents per hour for the VM resources and storage for our models and you’re looking at about $3.20/hr to run the GPU Machine. It’s on-demand, too — if you’re not using the compute, you’re not paying for it! Keep in mind that some of these checkpoint models can be several gigabytes and if you create a volume, you will be charged for it even when you have no Machines running. It’s worth noting too, that the non-GPU bot app falls into our free allowance.
Rates are on-demand, with no minimum usage requirements. Discounted rates for reserved GPU Machines and dedicated hosts are also available if you email sales@fly.io
In comparison, Midjourney offers several subscription tiers with the cheapest plan costing $10/mo and providing 3.3 hours of “fast” GPU time (roughly equivalent to an enterprise-grade Fly GPU). This works out to about $3/hr give or take a few cents.
Where Can I Take This?
There is a lot you can do to build out the bot’s functionality. You control the source code for the bot, meaning that you can make it do whatever you want. You might decide to mimic Midjourney’s /blend command to splice your own images into prompts (AKA img2img diffusion). You can do this by adding more commands to your Cog, Pycord’s way of grouping similar commands. You might decide to add a button to roll the image if you don’t like it, or even specify the number of images to return. The possibilities are endless and your cloud bill’s the limit!
The full code for the bot and server (with detailed instructions on how to deploy it on Fly.io) can be found here.