

We’re Fly.io. We run apps for our users on hardware we host around the world. Leveraging Fly.io Machines and Fly.io’s private network can make delegating expensive tasks a breeze. It’s easy to get started!
There are many ways to delegate work in web applications, from using background workers to serverless architecture. In this article, we explore a new machine pattern that takes advantage of Fly Machines and distinct process groups to make quick work of resource-intensive tasks.
The Problem
Let’s say you’re building a web application that has a few tasks that demand a hefty amount of memory or CPU juice. Resizing images, for example, can require a shocking amount of memory, but you might not need that much memory all of the time, for handling most of your web requests. Why pay for all that horsepower when you don’t need it most of the time?
What if there’s a different way to delegate these resource-intensive tasks?
The Solution
What if you could simply delegate these types of tasks to a more powerful machine only when necessary? Let’s build an example of this method in a sample app. We’ll be using Next.js today, but this pattern is framework (and language) agnostic.
Here’s how it will work:
- A request hits an endpoint that does some resource-intensive tasks
- The request is passed on to a copy of your app that’s running on a more beefy machine
- The beefy machine performs the intensive work and then hands the result back to the user via the “weaker” machine.

To demonstrate this task-delegation pattern, we’re going to start with a single-page application that looks like this:
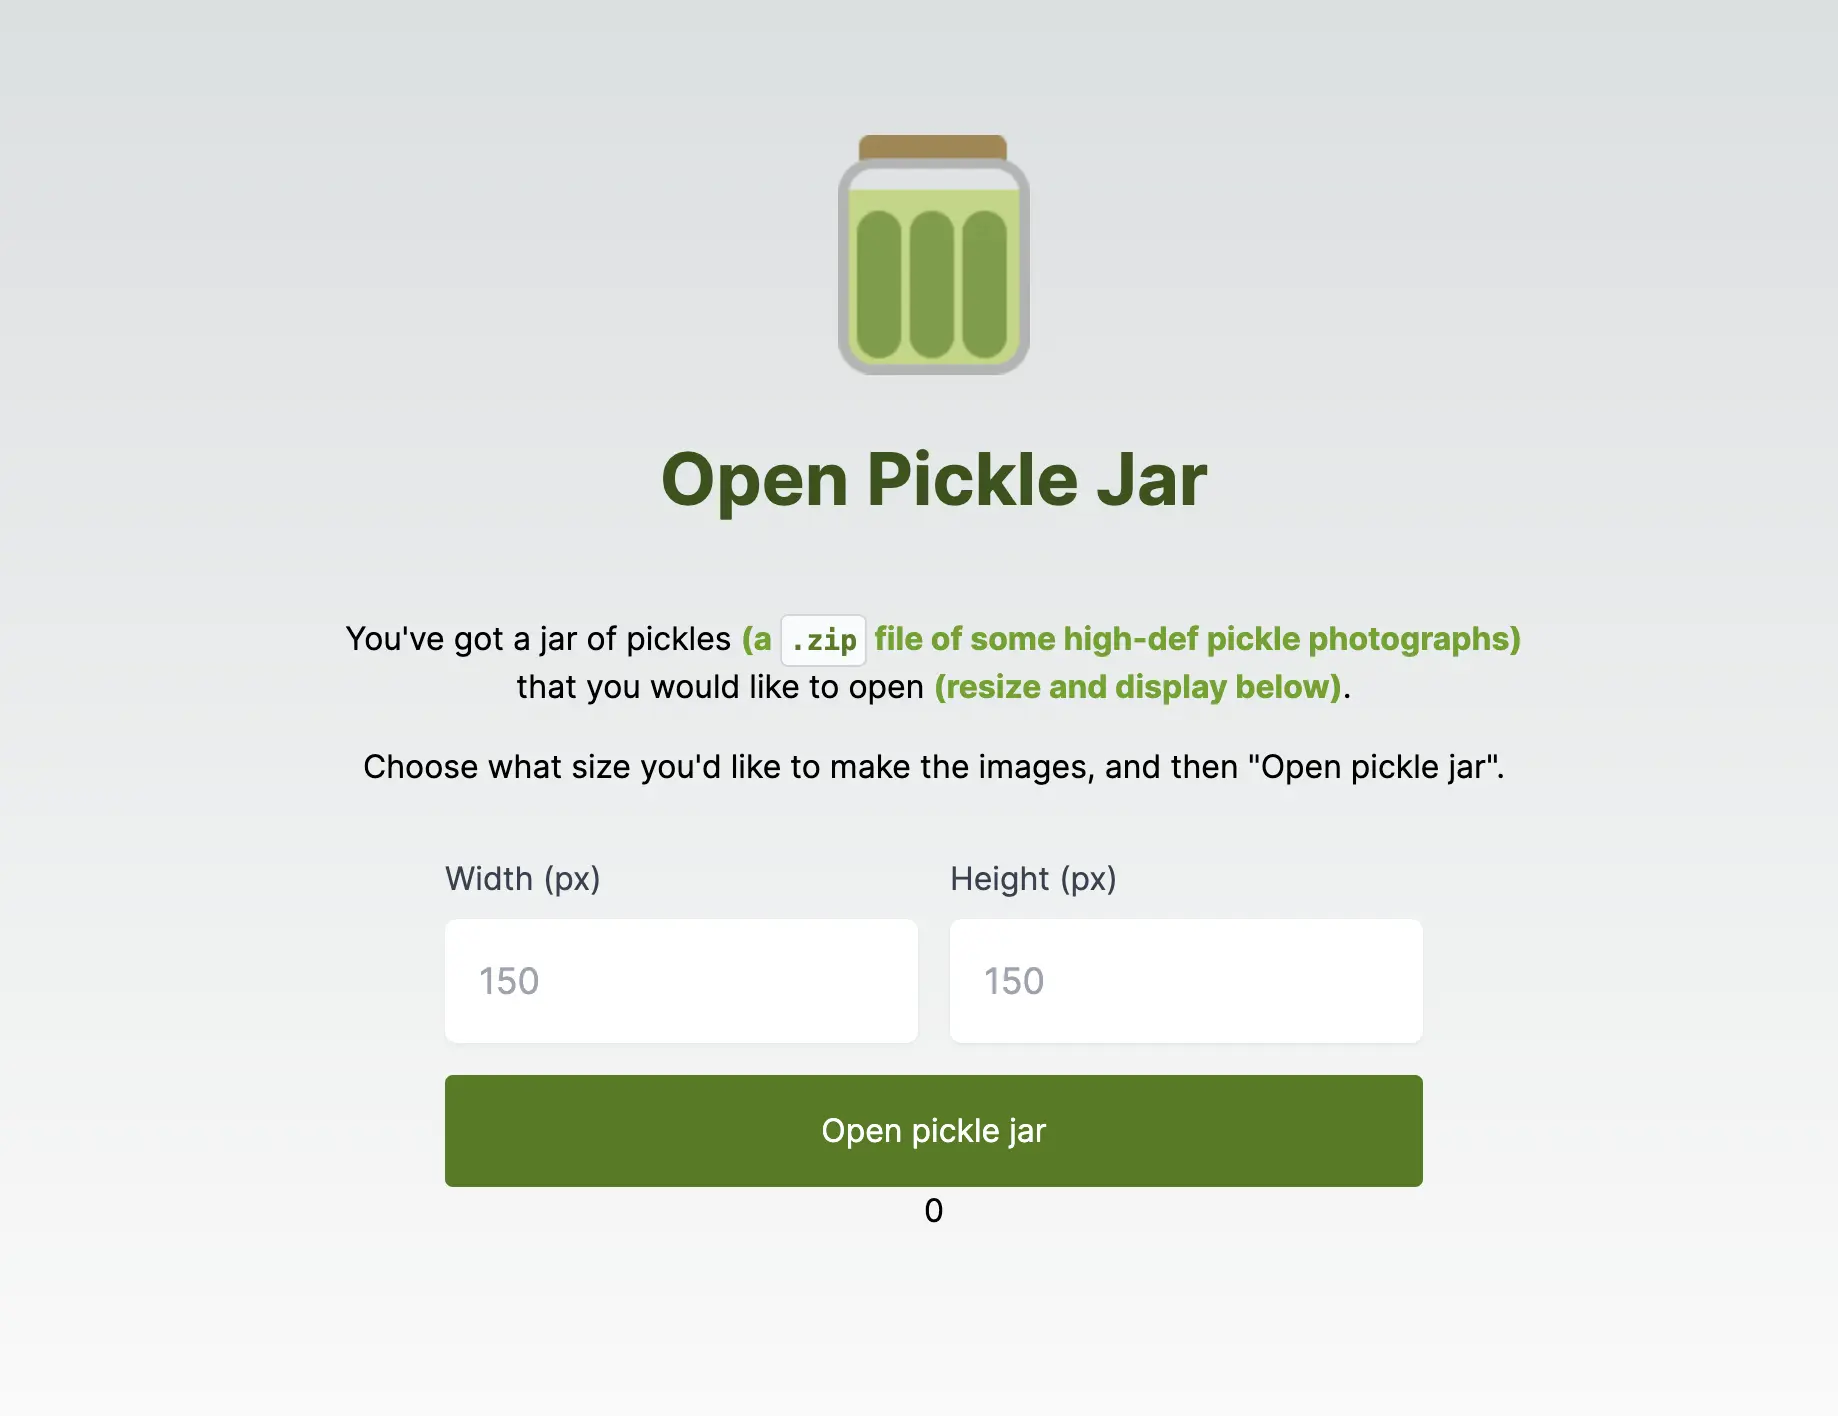
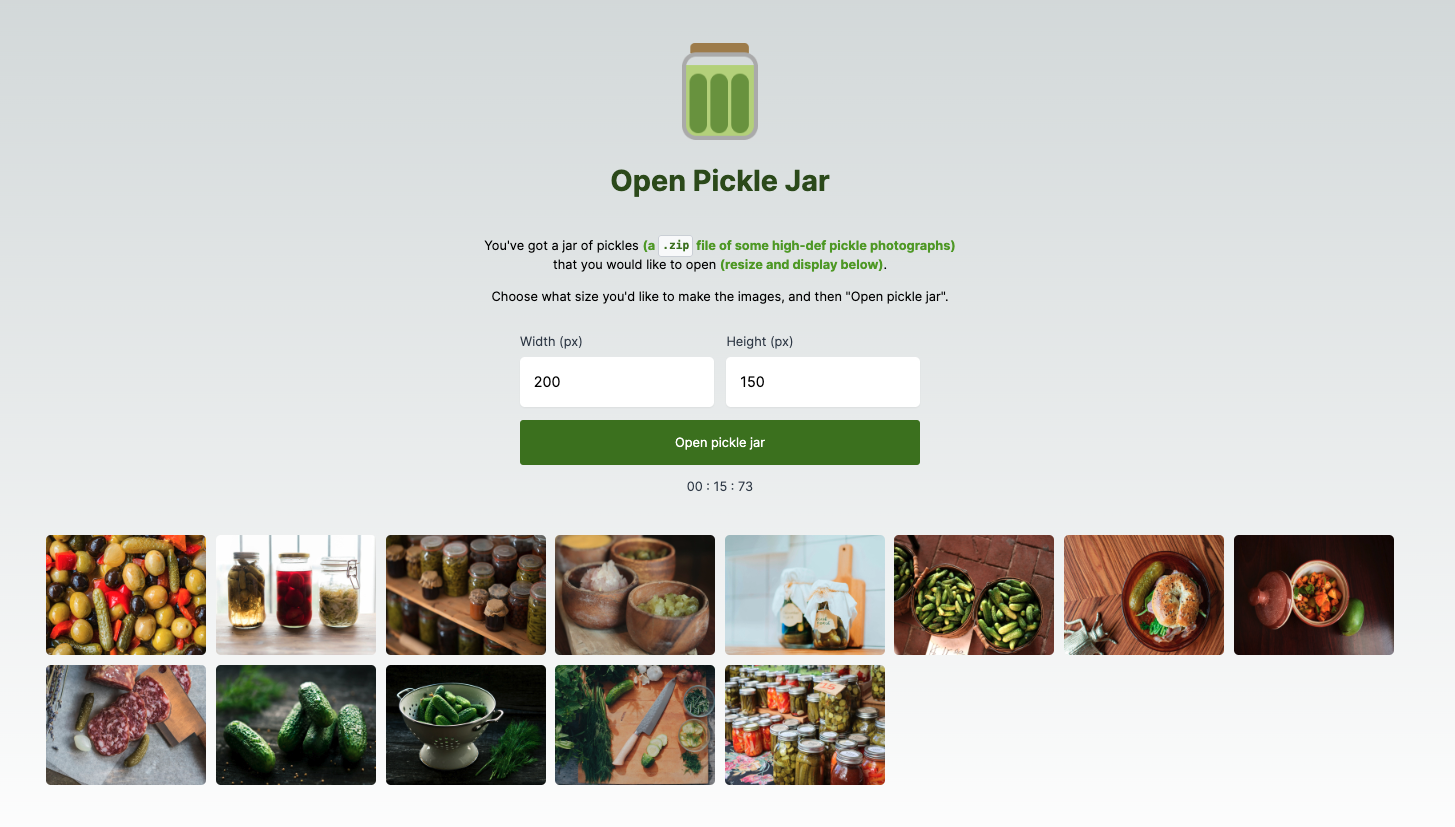
Our “Open Pickle Jar” app is quite simple: you provide the width and height and it goes off and resizes some high-resolution photos to those dimensions (exciting!).
If you’d like to follow along, you can clone the start-here branch of this repository: https://github.com/fly-apps/open-pickle-jar . The final changes are visible on the main branch. This app uses S3 for image storage, so you’ll need to create a bucket called open-pickle-jar and provide AWS_REGION, AWS_ACCESS_KEY_ID, and AWS_SECRET_ACCESS_KEY as environment variables.
This task is really just a stand-in for any HTTP request that kicks off a resource-intensive task. Get the request from the user, delegate it to a more powerful machine, and then return the result to the user. It’s what happens when you can’t open a pickle jar, and you ask for someone to help.
Before we start, let’s define some terms and what they mean on Fly.io:
- Machines: Extremely fast-booting VMs. They can exist in different regions and even run different processes.
- App: An abstraction for a group of Machines running your code on Fly.io, along with the configuration, provisioned resources, and data we need to keep track of to run and route to your Machines.
- Process group: A collection of Machines running a specific process. Many apps only run a single process (typically a public-facing HTTP server), but you can define any number of them.
- fly.toml: A configuration file for deploying apps on Fly.io where you can set things like Machine specs, process groups, regions, and more.
Setup Overview
Here’s what we’ll need for our application:
- A route that performs our resource-intensive task
- A wrapper function that either:
- Runs our resource-intensive task OR
- Forwards the request to our more powerful Machine
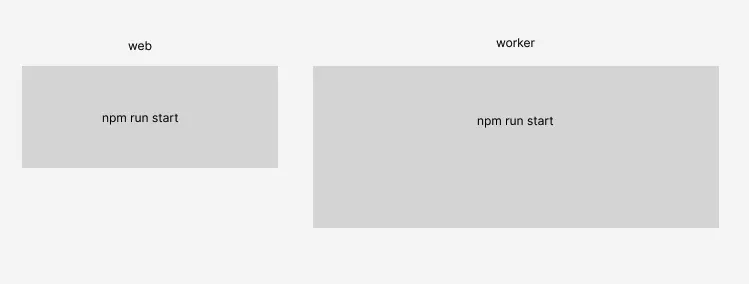
- Two process groups running the same process but with differing Machine specs:
- One for accepting HTTP traffic and handling most requests (let’s call it
web) - One internal-only group for doing the heavy lifting (let’s call it
worker)
- One for accepting HTTP traffic and handling most requests (let’s call it
In short, this is what our architecture will look like, a standard web and worker duo.
Creating our route
Next.js has two distinct routing patterns: Pages and App router. We’ll use the App router in our example since it’s the preferred method moving forward.
Under your /app directory, create a new folder called /open-pickle-jar containing a route.ts .
(We’re using TypeScript here, but feel free to use normal JavaScript if you prefer!)
...
/app
  /open-pickle-jar
    route.ts
...
Inside route.ts we’ll flesh out our endpoint:
// /app/open-pickle-jar/route.ts

import delegateToWorker from "@/utils/delegateToWorker";
import { NextRequest, NextResponse } from "next/server";
import { openPickleJar } from "../openPickleJar";

export async function POST(request: NextRequest) {
  const { width, height } = await request.json();
  const path = request.nextUrl.pathname;
  const body = await delegateToWorker(path, openPickleJar, { width, height });
  return NextResponse.json(body);
}
The function openPickleJar that we’re importing contains our resource-intensive task, which in this case is extracting images from a .zip file, resizing them all to the new dimensions, and returning the new image URLs.
The POST function is how one define routes for specific HTTP methods in Next.js, and ours implements a function delegateToWorker that accepts the path of the current endpoint (/open-pickle-jar) our resource-intensive function, and the same request parameters. This function doesn’t yet exist, so let’s build that next!
Creating our wrapper function
Now that we’ve set up our endpoint, let’s flesh out the wrapper function that delegates our request to a more powerful machine.
We haven’t defined our process groups just yet, but if you recall, the plan is to have two:
web- Our standard web serverworker- For opening pickle jars (e.g. doing resource-intensive work). It’s essentially a duplicate ofweb, but running on beefier Machines.
Here’s what we want this wrapper function to do:
- If the current machine is a
worker, proceed to execute the resource-intensive task - If the current machine is NOT a
worker, make a new request to the identical endpoint on aworkerMachine
Inside your /utils directory, create a file called delegateToWorker.ts with the following content:
// /utils/delegateToWorker.ts

export default async function delegateToWorker(path: string, func: (...args: any[]) => Promise<any>, args: object): Promise<any> {

  if (process.env.FLY_PROCESS_GROUP === 'worker') {
    console.log('running on the worker...');
    return func({...args});

  } else {
    console.log('sending new request to worker...');
    const workerHost = process.env.NODE_ENV === 'development' ? 'localhost:3001' : `worker.process.${process.env.FLY_APP_NAME}.internal:3000`;

    const response = await fetch(`http://${workerHost}${path}`, {
      method: 'POST',
      headers: {
        'Content-Type': 'application/json'
      },
      body: JSON.stringify({...args })
    });
    return response.json();
  }

}
In our else section, you’ll notice that while developing locally (aka, when NODE_ENV is development) we define the hostname of our worker process to be localhost:3001. Typically Next.js apps run on port 3000, so while testing our app locally, we can have two instances of our process running in different terminal shells:
npm run dev- This will run onlocalhost:3000and will act as our localwebprocessFLY_PROCESS_GROUP=worker npm run dev- This will run onlocalhost:3001and will act as ourworkerprocess (Next.js should auto-increment the port if the original3000is already in use)
Also, if you’re wondering about the FLY_PROCESS_GROUP and FLY_APP_NAME constants, these are Fly.io-specific runtime environment variables available on all apps.
Accessing our worker Machines (.internal)
Now, when this code is running in production (aka NODE_ENV is NOT development) you’ll see that we’re using a unique hostname to access our worker Machine.
Apps belonging to the same organization on Fly.io are provided a number of internal addresses. These .internal addresses let you point to different Apps and Machines in your private network. For example:
<region>.<app name>.internal– To reach app instances in a particular region, likegru.my-cool-app.internal<app instance ID>.<app name>.internal- To reach a specific app instance.<process group>.process.<app name>.internal- To target app instances belonging to a specific process group. This is what we’re using in our app.
Since our worker process group is running the same process as our web process (in our case, npm run start), we’ll also need to make sure we use the same internal port (3000).
Defining our process groups and Machines
The last thing to do will be to define our two process groups and their respective Machine specs. We’ll do this by editing our fly.toml configuration.
If you don’t have this file, go ahead and create a blank one and use the content below, but replace app = open-pickle-jar with your app’s name, as well as your preferred primary_region. If you don’t know what region you’d like to deploy to, here’s the list of them.
Before you deploy: Note that deploying this example app will spin up billable machines. Please feel free to alter the Machine ([[vm]]) specs listed here to ones that suit your budget or app’s needs.
app = "open-pickle-jar"
primary_region = "sea"

[build]

[processes]
  web = "npm run start"
  worker = "npm run start"

[http_service]
  internal_port = 3000
  force_https = true
  auto_stop_machines = true
  auto_start_machines = true
  min_machines_running = 1
  processes = ["web"]

[[vm]]
  cpu_kind = "shared"
  cpus = 1
  memory_mb = 1024
  processes = ["web"]

[[vm]]
  size = "performance-4x"
  processes = ["worker"]
And that’s it! With our fly.toml finished, we’re ready to deploy our app!
Discussion
Today we built a machine pattern on top of Fly.io. This pattern allows us to have a lighter request server that can delegate certain tasks to a stronger server, meaning that we can have one Machine do all the heavy lifting that could block everything else while the other handles all the simple tasks for users. With this in mind, this is a fairly naïve implementation, and we can make this much better:
Using a queue for better resiliency
In its current state, our code isn’t very resilient to failed requests. For this reason, you may want to consider keeping track of jobs in a queue with Redis (similar to Sidekiq in Ruby-land). When you have work you want to do, put it in the queue. Your queue worker would have to write the result somewhere (e.g., in Redis) that the application could fetch when it’s ready.
Starting/stopping worker Machines
The benefit of this pattern is that you can limit how many “beefy” Machines you need to have available at any given time. Our demo app doesn’t dictate how many worker Machines to have at any given time, but by adding timeouts you could elect to start and stop them as needed.
Now, you may think that constantly starting and stopping Machines might incur higher response times, but note that we are NOT talking about creating/destroying Machines. Starting and stopping Machines only takes as long as it takes to start your web server (i.e. npm run start). The best part is that Fly.io does not charge for the CPU and RAM usage of stopped Machines. We will charge for storage of their root filesystems on disk, starting April 25th, 2024. Stopped Machines will still be much cheaper than running ones.
What about serverless functions?
This “delegate to a beefy machine” pattern is similar to serverless functions with platforms like AWS Lambda. The main difference is that serverless functions usually require you to segment your application into a bunch of small pieces, whereas the method discussed today just uses the app framework that you deploy to production. Each pattern has its own benefits and downsides.
Conclusion
The pattern outlined here is one more tool in your arsenal for scaling applications. By utilizing Fly.io’s private network and .internal domains, it’s quick and easy to pass work between different processes that run our app. If you’d like to learn about more methods for scaling tasks in your applications, check out Rethinking Serverless with FLAME by Chris McCord and Print on Demand by Sam Ruby.
Get more done on Fly.io
Fly.io has fast booting machines at the ready for your dynamic workloads. It’s easy to get started. You can be off and running in minutes.
Deploy something today! →