

Need a place for your Laravel app in the cloud? Fly it with Fly.io, it’ll be up and running in minutes!
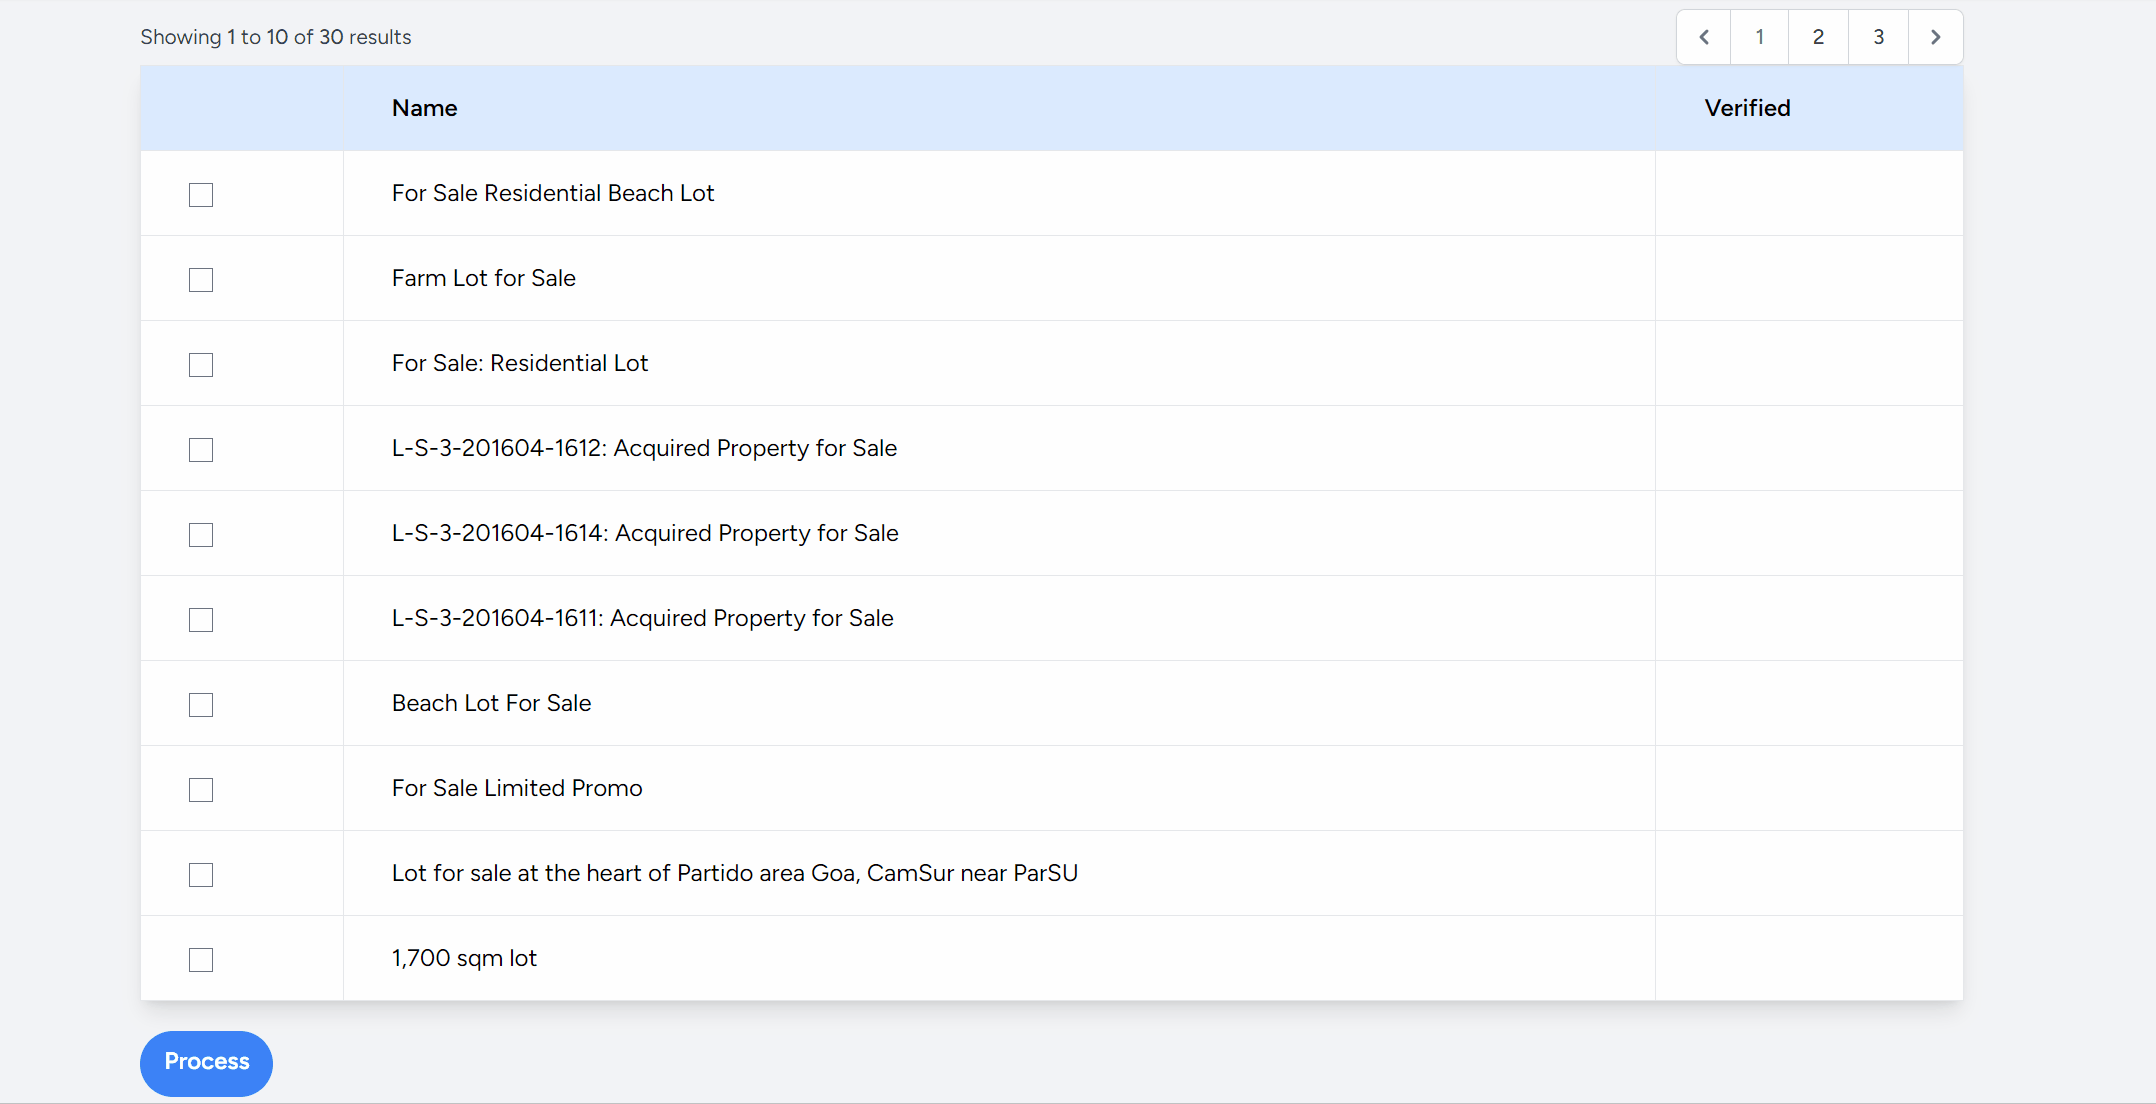
Previously, we looked into displaying progress in bulk processing of data. Just with one request, we were able to
stream updates to the UI as each data completed processing thanks to the wire:stream directive. This allowed the UI to get updated real-time as each item updated in the server:
When the client sends a request to the server expecting a streamed response, that long-lived request is going to take up connection space, resource, and time from our web app.
What if our web app starts struggling with all our long-lived requests that pile up with each new request from our users? It’s going to start becoming unresponsive and unavailable.
Wouldn’t it be neat then, if instead of our web app’s instance—which we expect to be responsive and available at all times—instead of that instance, we have a separate instance, exclusively handling long-lived requests that wait on streamed responses?
That would be neat, right?! And yes, we can have exactly that extra processing power—on the go—with Fly Machines—lightweight, Firecracker VMs startable and stoppable at subsecond speeds.
—Excited?!
Then, let’s do this!
Prerequisites
In a previous article, we made use of Livewire’s wire:stream directive to get up and running with streamed responses sent to the client. We’re going to build on top of that setup, but of course, it’s not a necessary arrangement. You can have any kind of wire:stream setup for your Laravel app, have it deployed on Fly.io, and you’ll be good to go.
Livewire’s wire:stream
Say, we have a Livewire component, and in it, a button wired to a process() method of the component. This method does a bunch of processing on a list of data, and thanks to Livewire’s stream() method, it sends updates to the client as each item completes:
/* app/Livewire/MyComponent.php */

public function process(){
  foreach( $this->ids as $id=> $details ){
      // Process item
      $this->processItem( $id );

      // Update item's status to processed
      $this->ids[ $id ][ 'status'] = 'Processed!';

      // Stream update to the client
      $this->stream(
          to: 'process-stream'.$id,
          content:  $this->ids[ $id ][ 'status'],
          replace: true
      );
  }
}
The first time Livewire’s stream() method is called, Livewire streams back a long-running response to the client. As each item is processed, Livewire sends each item’s update to this stream. Each update is then reflected to its matching wire:stream-ed element in the client identified by the stream name process-stream<n>:
<!-- app/resources/livewire/my-component.blade.php -->

@foreach( $items as $key=>$item )
    <tr>
        <td wire:stream="process-stream{{ $item->id }}">
            {{ $ids[$item->id]['status'] }}
        </td>
    </tr>
@endforeach
This long-running request stays open until all items in the list are completely processed and the process() method’s call ends.
Re-assigning Long-Running Requests
Right now, the request made to call the process() method is sent to the main instance of our web app. That instance is in charge of handling user-facing requests. So as much as possible, we’d want it to be available and free from long running requests, such as the request to our process() method.
To keep our web app’s instance hands-free from requests such as our streamed response above, we would have to redirect the requests to a separate instance, created specifically to handle our long-running requests.
Take notice! There are three note-worthy things above:
- Catch long-running requests,
- Create an instance to handle these requests, and
- Redirect requests to the new instance.
Catching Requests
To redirect a request to our Livewire component’s process() method, we’ll have to catch requests first. Run php artisan make:middleware RedirectRequestToTaskMachine, this will create a middleware we’ll use to intercept and redirect our process() requests.
The first part of our middleware is simple: check for a Livewire request to a process() method, indicated from request->components[n]['calls'][m]['method'] == 'process':
/* app/Http/Middleware/RedirectRequestToTaskMachine.php */

public function isForTaskerMachine( Request $request )
{
  // Check request is for Livewire "process()" method
  if( isset($request->components) ){
    foreach( $request->components as $component ){
        if( isset($component['calls']) ){
            foreach( $component['calls'] as $call ){
                if( $call['method'] == 'process' ){
                    Log::info('process method request found!');
                    return true;
                }
            }
        }
    }
  }
  // Not a request to "process()"
  return false;
}
The trick here is to name our long running tasks using one name( in our case, process() ), this way we can always catch long-running Livewire requests through this method name!
Creating the New Instance
Our next puzzle piece is the creation of a new instance to handle processing our items. It will have all capabilities required to handle our Livewire’s wire:stream processing, and exclusively take-in long-running requests. To provide these capabilities easily, we’ll create a near-exact copy of our web app’s instance( and therefore provide the needed capabilities! ).
With our Laravel app deployed in Fly.io, we can easily set this up with Fly Machines: First, we set an array of configuration values, then pass this array to an api call that will spin and boot up a new Fly Machine.
We can create our Fly Machine with the following configuration array:
Here’s a reference, you’re welcome:
| Attribute | Description | Value Passed |
|---|---|---|
| config.image | Fly Machines are built from Docker images! So we pass one. | FLY_IMAGE_REF - Since we want to create a copy of our web app we provide the image used to create it. FLY_IMAGE_REF is an env variable automatically set by Fly.io pointing to the image reference used to spin up our app’s Fly Machine. |
| config.env | Environment variables required by our app. | We include all env variables necessary for our web app to work on our new Fly Machine. We also include a new variable “FLY_TASKER_MACHINE” as a flag that this new Machine can be used for processing long running tasks. |
| config.services | Services enable connections from the internet. | Ports for https, http, and most importantly, the autostop flag to stop our VM when it goes idle. |
public function getPayload()
{
    return  [
        "config" => [
              // Image to build our Machine From
              "image" => env('FLY_IMAGE_REF'),

              // Env Vars required by our app
              "env" => [
                  // ... Other env vars
                  "FLY_TASKER_MACHINE"=>"true"
              ],

              // Enable connection from the internet
              "services" => [
                    [
                        "autostop"=>true,
                        "ports" => [
                          [
                              "port" => 443,
                              "handlers" => [
                                "tls",
                                "http"
                              ]
                          ],
                          [
                            "port" => 80,
                            "handlers" => [
                                "http"
                            ]
                          ]
                        ],
                        "protocol" => "tcp",
                        "internal_port" => 8080
                    ]
              ],
        ]
      ];
}
There’s a bunch of stuff up there! Let’s break it down with some context.
See, every application we deploy in Fly.io is, at its core, a Fly Machine—and yes—this includes the Laravel web app we deploy in Fly.io. That main instance of our web app? That’s a Fly Machine!
Fly Machines are Firecracker VMs that are bootable-stoppable in subsecond speed! Each Fly Machine is built out from a Docker image, and accepts extra configuration settings like environment variables and services(amongst other things!).
Fly Machines in stopped state don’t use RAM or CPU—no additional costs are incurred for that stopped state duration!
This is why we have the first attribute config.image—pointing to FLY_IMAGE_REF, the docker image of our web app’s Fly Machine. As well as config.env to pass all env variables used by our web app, with an additional flag FLY_TASKER_MACHINE that we’ll use to mark the machine as a “Tasker Machine”. Finally, we include a config.services to allow public access to the new Machine, and importantly include an autostop flag to allow the Fly proxy to automatically stop it once it becomes idle.
Once we have the configuration figured out above, we simply send this to the Fly Machine’s api endpoint to create a new Fly Machine on the spot:
public function createTaskerMachine()
{
  // The URL is built with the `FLY_APP_NAME` env set by Fly.io
  $url = 'https://api.machines.dev/v1/apps/'. env('FLY_APP_NAME') .'/machines';

  // Please retrieve your token with `fly auth token`
  $token = env('FLY_AUTH_TOKEN');

  // Create Task-Processor Fly Machine
  $response = Http::withToken( $token )
  ->post(
      $url,
      $this->getPayload()
  );

  $result = $response->json();
  return $result['id'];
}
The function above will, on a successful creation of the Fly Machine, return the value of id assigned to the Fly Machine we just created.
With it we can direct our requests to our newly created Fly Machine—which we shall now refer to, and dub as, “Tasker-Machine”!
Finding the Tasker-Machine
We can keep creating Tasker-Machines on the go—this will create one new Machine per long running request, at which case we’ll have to clean up after each Machine completes its intended processing.
OR instead, we can use the first Tasker-Machine to handle all our long-running request! We simply inspect our available Machines, and get the Machine which contains the FLY_TASKER_MACHINE flag:
public function getTaskerMachine( )
{
    // The URL is built with the `FLY_APP_NAME` env set by Fly.io
    $url = 'https://api.machines.dev/v1/apps/'. env('FLY_APP_NAME') .'/machines';

    // Please retrieve your token with `fly auth token`
    $token = env('FLY_AUTH_TOKEN');

    // Get list of machines
    $response = Http::withToken( $token )->get( $url );
    $result = $response->json();

    // Return Machine with FLY_TASKER_MACHINE flag
    foreach( $result as $machine ){
      if( isset($machine['config']['env']['FLY_TASKER_MACHINE']) ){
          return $machine['id'];
      }
    }

    // Otherwise, Create the Tasker Machine
    return $this->createTaskerMachine();
}
The function above makes a call to the Fly Machine endpoint to retrieve the list of Machines for our app. It then loops through this list to find the Machine containing the Tasker-Machine’s flag and return that Machine’s id.
If that’s not available, we call the createTaskerMachine() method to create a new one, and return that new Fly Machine’s id as its result.
Replaying to the Tasker-Machine
Now that we’ve setup methods isForTaskerMachine(), and getTaskerMachine() of our middleware available, it’s time to orchestrate them together to redirect our requests to the Tasker-Machine:
public function handle(Request $request, Closure $next): Response
{
    // Req should be processed by Tasker-Machine
    if( $this->isForTaskerMachine( $request ) ){

        // The current Fly Machine is a Tasker-Machine
        if( env('FLY_TASKER_MACHINE') != null ){

            // Go ahead and proceed with request
            return $next($request);

        }else{
        // The current Fly Machine is NOT a Tasker-Machine

            // Get machine id of the TaskerMachine
            $instanceId = $this->getTaskerMachine();

            // Stop, and redirect request to Tasker Machine
            return response('', 200, [
              'fly-replay' => 'instance='.$instanceId,
            ]);

        }

    }
}
Above, we first check if the request should be redirected to the Tasker-Machine. If so, we check what kind of Fly Machine is handling the request through the env flag, FLY_TASKER_MACHINE. It’s availability tells us that the current Machine handling the request is the Tasker-Machine, and therefore we proceed with handling the request.
On the other hand, if it’s not available, that means the handler is our app’s main Fly Machine. We can’t continue the processing from here, so we get the Tasker-Machine’s id. With this, we stop the processing the request, and send an abrupt response back to the client.
This response holds the essential fly-replay response header pointing to the newly created machine’s id. This let’s Fly.io’s proxy network know that we’d like to “replay” the request to a different Fly Machine, specifically the one with the id indicated in the header.
Replaying to the Main Fly Machine
Right now we have two Fly Machines accepting user requests. The main, original Machine that was spun up when we deployed our Laravel app to Fly.io, and the other, “Tasker-Machine” Machine.
This means that our user requests have the chance to get processed by the Tasker-Machine. We don’t want that! We want our Tasker-Machine to handle our specific long-running requests, BUT, have our main Fly Machine exclusively handling all other requests.
We already have our logic above for redirecting requests to the Tasker-Machine, let’s setup our logic for redirecting requests to the original Fly machine:
public function handle(Request $request, Closure $next): Response
{
    // Check if request is applicable for Tasker-Machine
    if( $this->isForTaskerMachine( $request ) ){
      // ...Redirect to Tasker-Machine Logic here...
+   }else if( env('FLY_TASKER_MACHINE')!= null ) {
+      // Replay to the main Fly Machine
+      return response('', 201, [
+          'fly-replay' => 'elsewhere=true',
+      ]);
+    }

}
Above, we simply add an else if after the first condition that checks whether the request is for the Tasker-Machine. Because if the request is not for the Tasker-Machine, and it lands on the Tasker-Machine, evidenced by env('FLY_TASKER_MACHINE')!=null, that means we need to redirect it to the main Fly-Machine.
Again we make use of the fly-replay response header to redirect our request. This time around we use the value of elsewhere=true, which asks the Fly proxy to replay the request to a Fly Machine other than the current Machine.
Applying the Middleware
Now that our re-direction logic is complete, it’s time to apply this middleware to our requests. We do this by applying our middleware as a global middleware in our Kernel.
Once applied, all requests will pass through our middleware, and properly get routed to the correct machine.
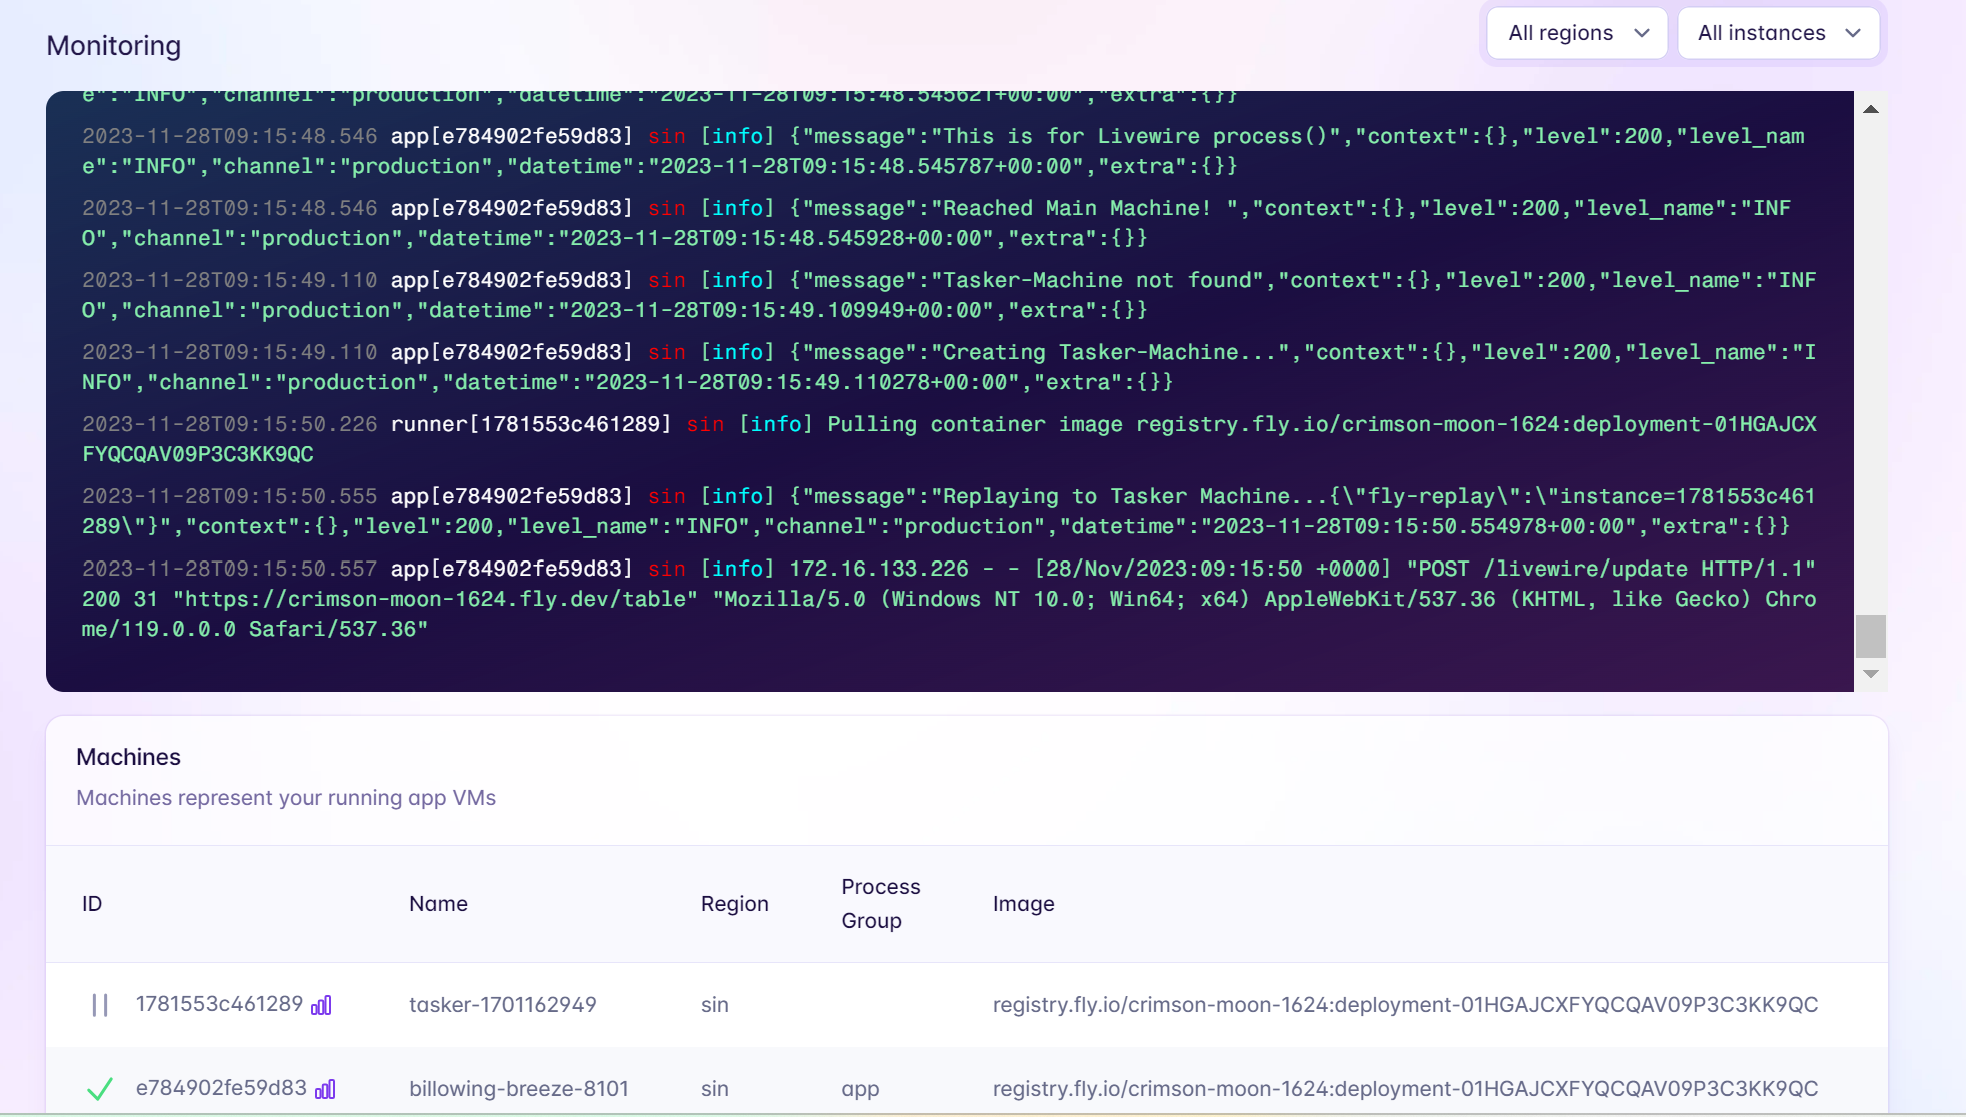
Here’s the logs when our Main Fly Machine gets a process() method request, the Tasker-Machine is not yet available, so a new Tasker-Machine is created:
Once the new Machine is available, it receives the redirected request thanks to Fly.io’s fly-replay feature:
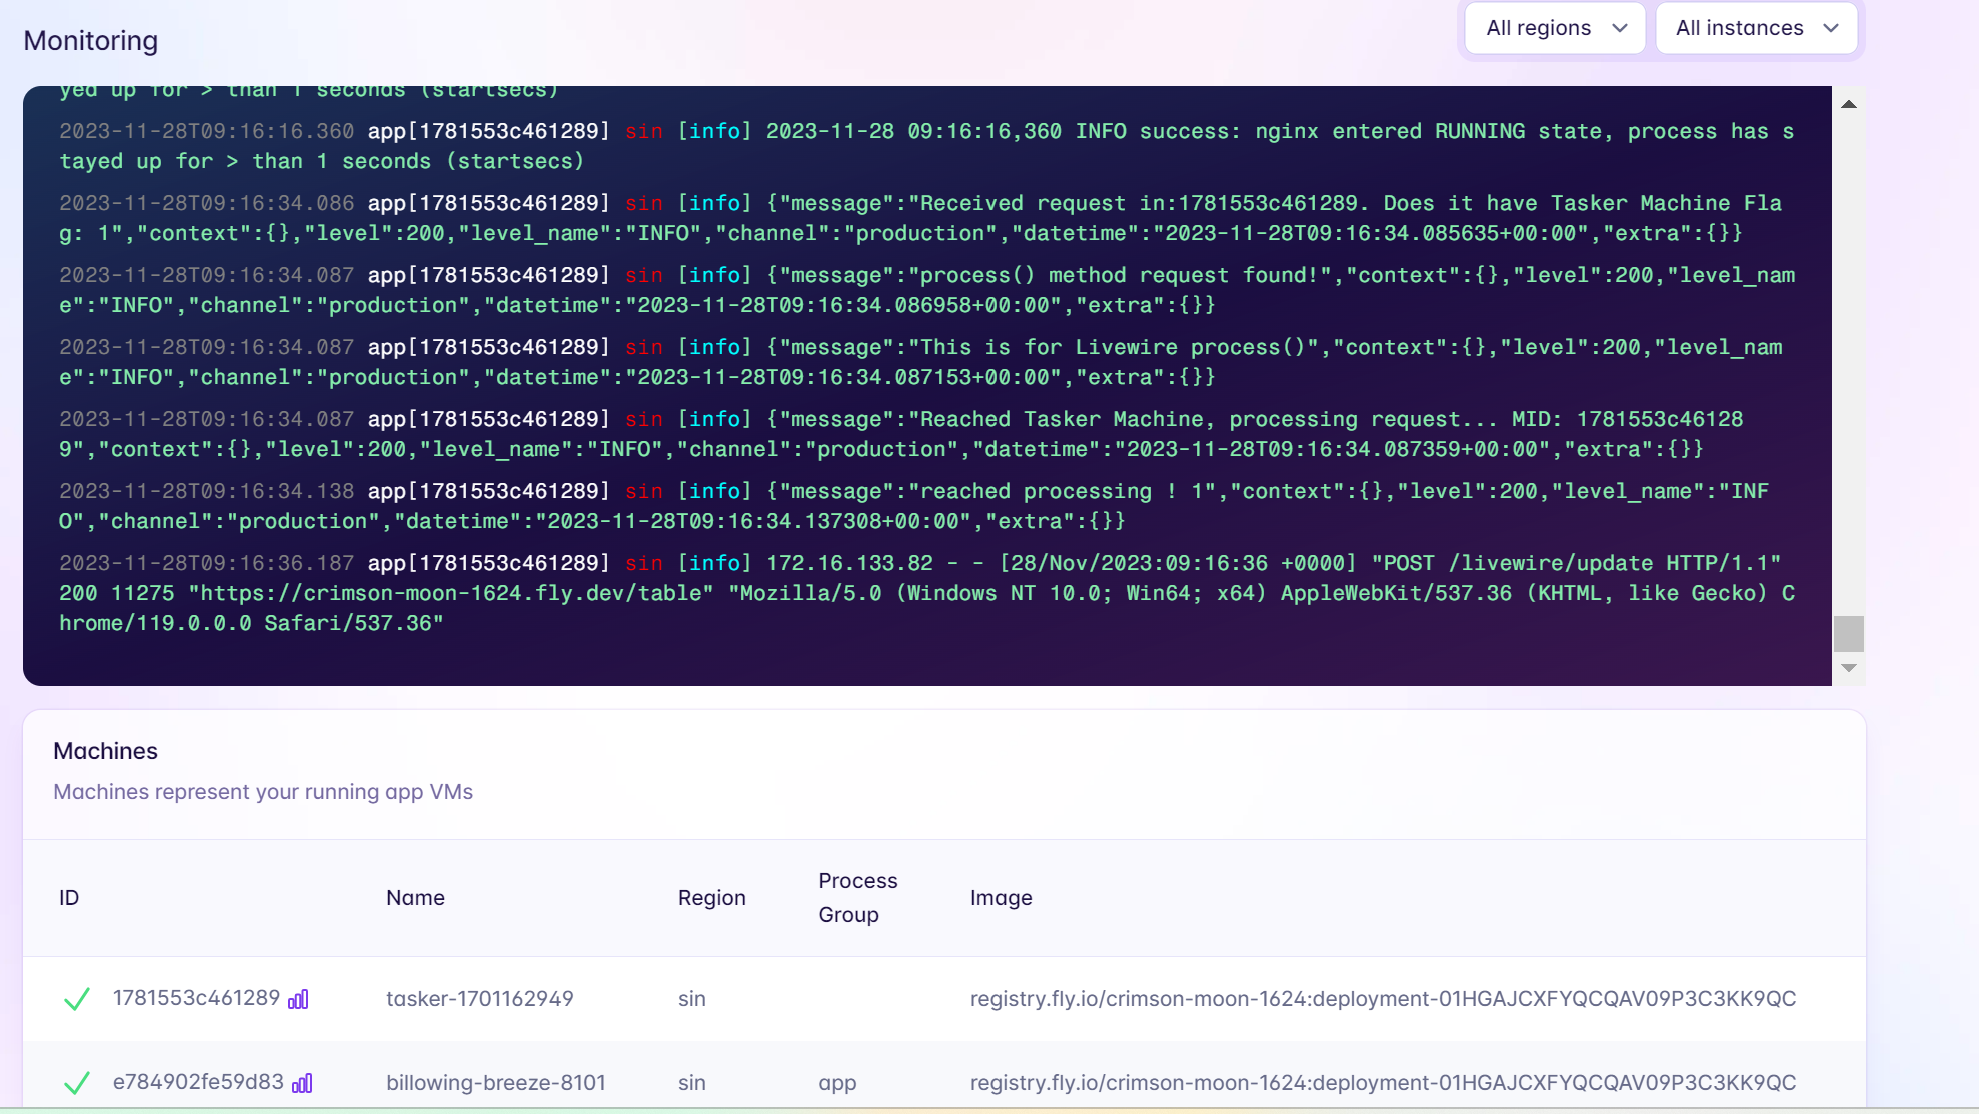
And see our process() method handled by our new Tasker-Machine!
Look Forward!
And, that’s it! We have two Fly machines. We created one on the go ( Tasker-Machine ), which handles a specific kind of requests for us. While we have our original Machine ( created during deployment of our app )handling all other requests.
Fly Machines provide such versatile a playing field for our Laravel apps. It can be created on the go, isolate user code, and give us an option to provide different “playing fields” for different services of our app.
We can create as much Fly Machines to handle as much different parts of our Laravel app! We can isolate resources for long-running tasks( like we just did! ). We can isolate user code( even untrusted ones! ). We can even run our background workers with Fly Machines!
And remember that little small detail about the autostop part of our configuration? Yup! Stopped Machines don’t use CPU or RAM, and so don’t incur additional processing costs at its stopped state!
Such an exciting piece of callable VMs aren’t they?
Go ahead then, and check out our Fly Machines!
Fly.io ❤️ Laravel
Fly your servers close to your users—and marvel at the speed of close proximity. Deploy globally on Fly in minutes!
Deploy your Laravel app! →