

We’re going to use Livewire to stream some content to the browser. Livewire works best with low latency! Luckily, Fly.io lets you deploy apps close to your users. Try it out, it takes just a minute.
We’re going to see how to stream content to the browser using Livewire.
🤔 What’s that mean?
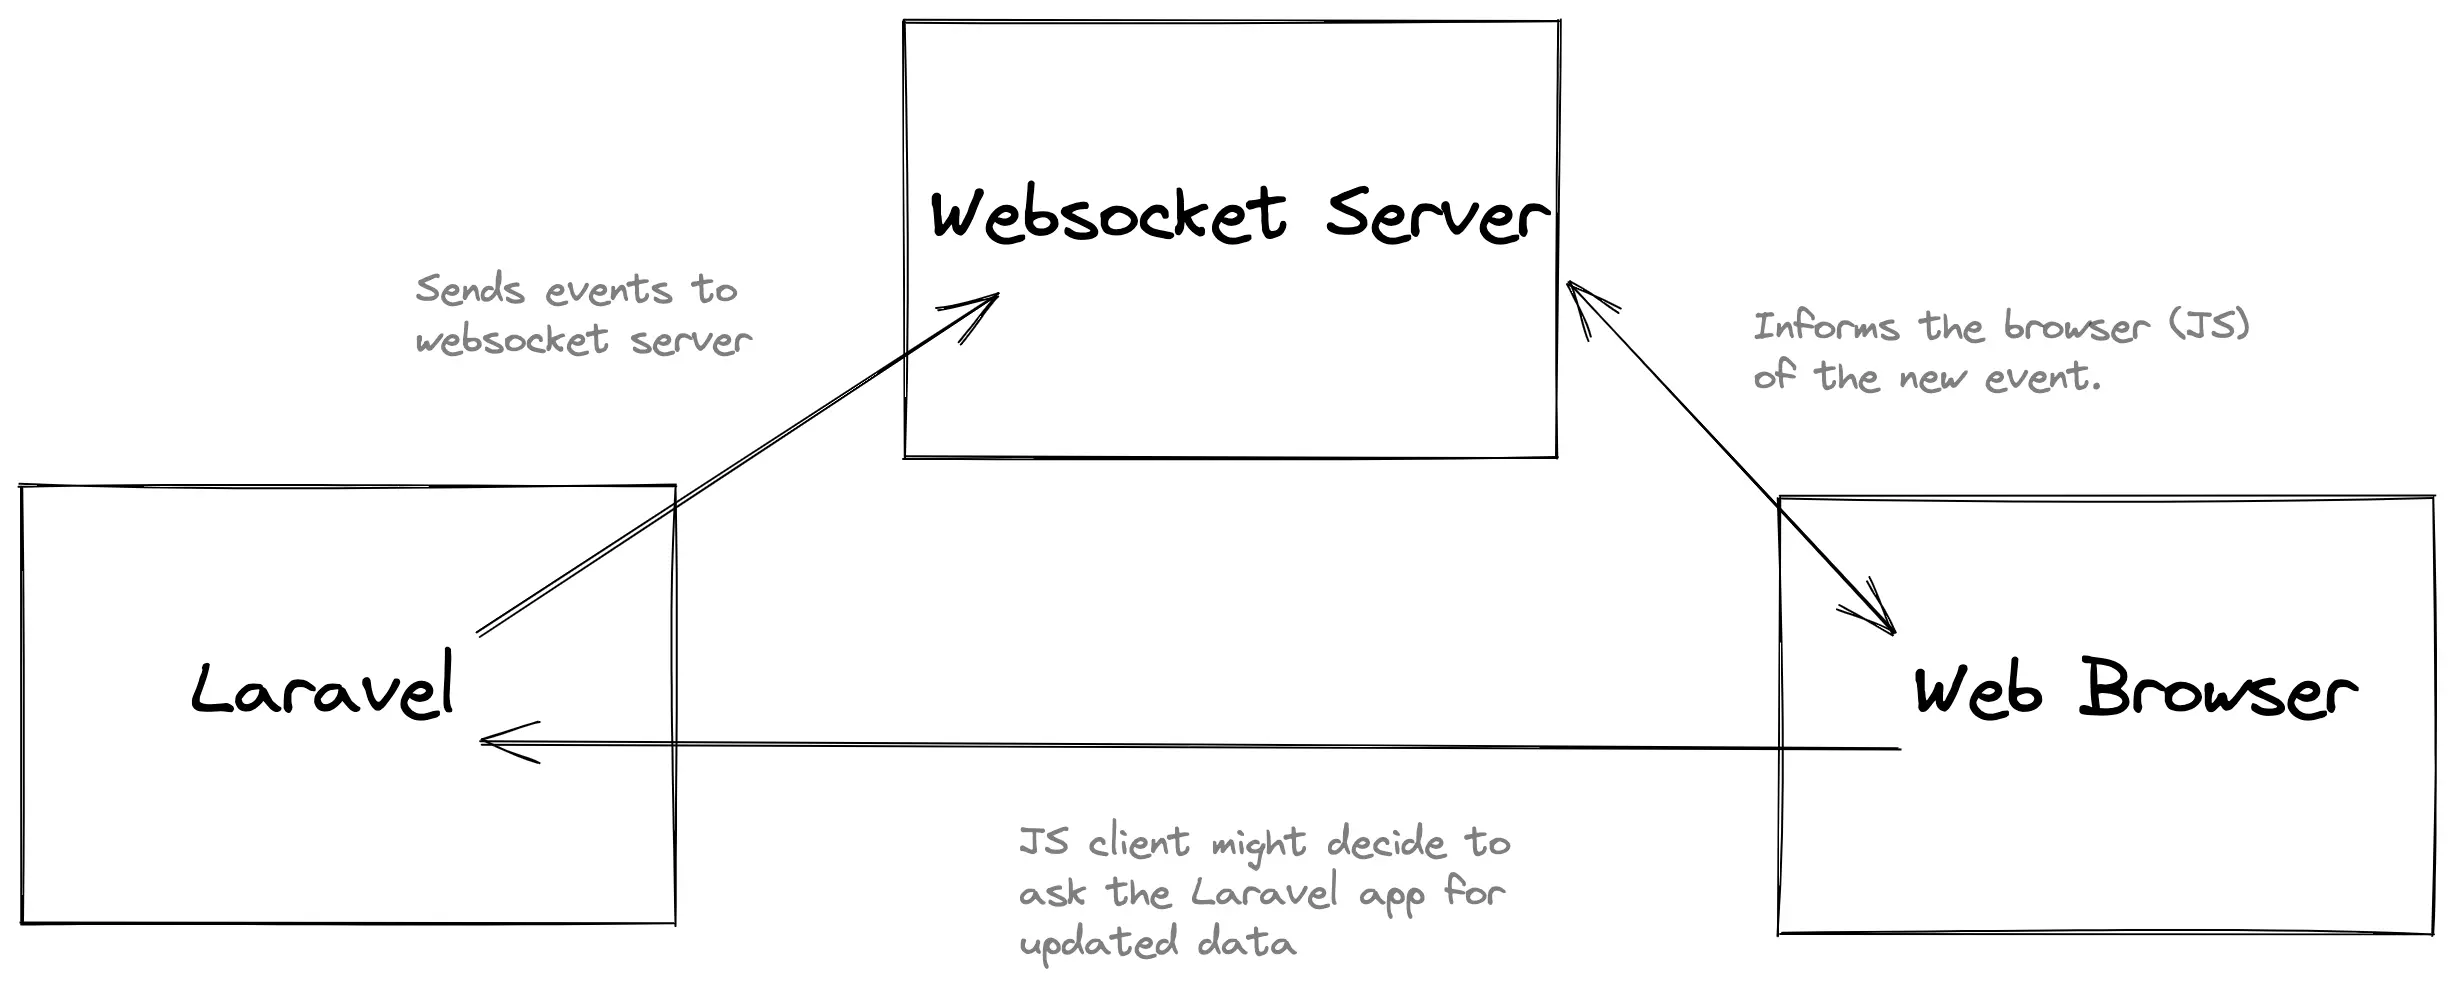
Here’s an example from Chipper CI, which runs “builds” when you push code to git. When a command is run (perhaps composer install), the build output is streamed back, in chunks.
Chipper’s code stores each chunk, and sends an event that tells your browser to retrieve the latest content.
From your point of view, the content is streamed to the browser in real-time!
Let’s see how we can build the same thing.
How it Works
There’s less magic than you may think (this is a good thing)!
Here’s whats up:
Imagine that some process is running a command. In our case, that command will be composer install.
Running composer install isn’t instant - it takes around 10 seconds to finish, and outputs its work as it goes.
To stream that output, we take each “chunk” of output as it’s given and “flush” each chunk (either periodically or when it gets large enough) into a queue job.
Laravel reads those queue jobs, stores the output, and broadcasts an event.
That event is received by the user’s browser, and informs the javascript to display the new content.
The Part That We Care About
For this article, we care about the part that streams the content to the browser.
We’ll take some sample command output, split it into chunks, and dispatch an event for each chunk. The browser will respond to these events by displaying the content it has so far.
To do this, we need the server (PHP) to be able to dispatch an event that the client (the browser) will see. The common way to do this is to use websockets + Laravel Echo (via Laravel’s Broadcasting feature).
Livewire has a great integration with Echo to make this super easy.
Here’s what we’re going to do:
- Setup Laravel, and a websocket server
- Configure Laravel to broadcast events over websockets
- Create an event to send chunks of command output
- Use Livewire to handle those events and display the content
Setup Broadcasting
Setting up the websocket server is actually the most work! To avoid setting up a websocket server yourself, I suggest using Pusher, which has a great free tier.
However, if you want to just run something locally, let’s see how to use the open source Laravel Websockets package instead.
That project is compatible with Pusher’s API, so our code will think it’s talking to Pusher.
We’ll start by creating a Laravel project, and installing the Laravel Websockets package:
# 1. Create a Laravel project
composer create-project laravel/laravel browser-stream

cd browser-stream

# 2. Install websockets
composer require beyondcode/laravel-websockets
php artisan vendor:publish \
    --provider="BeyondCode\LaravelWebSockets\WebSocketsServiceProvider" \
    --tag="migrations" \
    --tag="config"

# 3. Get a specific version of the Pusher SDK
composer require pusher/pusher-php-server:7.0.2

## A bug in beyondcode/laravel-websockets prevents
## us from using the latest pusher SDK
# composer require pusher/pusher-php-server

# 4. We also need Echo + Pusher client libraries
npm install --save-dev laravel-echo pusher-js
In addition to Pusher, Laravel Echo, and Laravel-Websockets, we’ll also install Breeze. Breeze gives us some view files and layout that are convenient for us to edit as a starting point.
# 1. Install Breeze
composer require laravel/breeze --dev
php artisan breeze:install

# 2. Migrate - Assuming your database is setup
php artisan migrate

# 3. Install and build static assets
npm install
npm run build
The Websocket library is compatible with Pusher’s API, so let’s keep lying to our code and make it feel like Pusher is being used.
We’ll therefore set Pusher’s configuration in our .env file:
# Set to pusher
BROADCAST_DRIVER=pusher

# Farther down the default .env
# are the Pusher variables:

# Use any value for these 3
PUSHER_APP_ID=123456
PUSHER_APP_KEY=xxx
PUSHER_APP_SECRET=yyy

# Our websocket will run locally
PUSHER_HOST=127.0.0.1
PUSHER_PORT=6001
PUSHER_SCHEME=http
You can use any value you want for Pusher app ID, key, and secret. The host and port will be pointing to the Laravel Websocket server we’ll run shortly, which defaults to localhost at port 6001. We’ll avoid TLS setup and use scheme http.
We’ll use Echo on the client-side. Echo is Laravel’s library that integrates with the Broadcasting feature. This also is made to believe that we are using Pusher.
Edit file resources/js/bootstrap.js file to uncomment the Pusher/Echo library stuff that’s already there for you. There’s literally no other adjustment to make:
import Echo from 'laravel-echo';

import Pusher from 'pusher-js';
window.Pusher = Pusher;

window.Echo = new Echo({
    broadcaster: 'pusher',
    key: import.meta.env.VITE_PUSHER_APP_KEY,
    wsHost: import.meta.env.VITE_PUSHER_HOST ? import.meta.env.VITE_PUSHER_HOST : `ws-${import.meta.env.VITE_PUSHER_APP_CLUSTER}.pusher.com`,
    wsPort: import.meta.env.VITE_PUSHER_PORT ?? 80,
    wssPort: import.meta.env.VITE_PUSHER_PORT ?? 443,
    forceTLS: (import.meta.env.VITE_PUSHER_SCHEME ?? 'https') === 'https',
    enabledTransports: ['ws', 'wss'],
});
Then compile static assets again (via the dev or build command):
# This starts a dev server that
# watches for file changes
# Use "npm run build" for a one-shot build
npm run dev
We’re just about setup with broadcasting with Echo and “Pusher” (Laravel-Websockets). Let’s test it out!
Create an Event
We’re going to create a new event that is broadcast to the browser via the websocket server.
The Event is a PHP class. Laravel’s Broadcasting library takes care of sending the event data to the websocket. The browser is also connected to the websocket, and thus our browser can see the event.
Let’s make that event - it’s just a standard Laravel event.
We’ll have it broadcast “publicly” (using a Channel instead of a PrivateChannel) so we don’t need to mess with channel authorization.
php artisan make:event ContentUpdated
That generates file app/Events/ContentUpdated.php. We make a few adjustments to that file:
<?php

namespace App\Events;

use Illuminate\Broadcasting\Channel;
use Illuminate\Broadcasting\InteractsWithSockets;
use Illuminate\Broadcasting\PresenceChannel;
use Illuminate\Broadcasting\PrivateChannel;
use Illuminate\Contracts\Broadcasting\ShouldBroadcast;
use Illuminate\Foundation\Events\Dispatchable;
use Illuminate\Queue\SerializesModels;

- class ContentUpdated
+ class ContentUpdated implements ShouldBroadcast
{
    use Dispatchable, InteractsWithSockets, SerializesModels;

    /**
     * Create a new event instance.
     *
     * @return void
     */
-    public function __construct() {}
+    public function __construct(public string $content) {}

    /**
     * Get the channels the event should broadcast on.
     *
     * @return \Illuminate\Broadcasting\Channel|array
     */
    public function broadcastOn()
    {
-       return new PrivateChannel();
+       return new Channel('content');
    }
}
Here’s what was added:
- The class implements
ShouldBroadcastso Laravel knows to broadcast it - We created attribute
public string $content - The class broadcasts on a public
Channelnamed'content'
Now we just need the frontend to do its thing.
Breeze generated a layout file resources/views/layouts/app.blade.php. This file already has our static assets (CSS/JS) loading:
@vite(['resources/css/app.css', 'resources/js/app.js'])
So we should have Echo available to us already! Let’s use it.
Fly.io ❤️ Laravel
Fly.io is a great way to run your Laravel Livewire app close to your users. Deploy globally on Fly in minutes!
Deploy your Laravel app! →
Test Out Broadcasting
Let’s broadcast that event and see if the browser receives it.
Go ahead and edit file resources/views/layouts/app.blade.php and add the following near the bottom, before the closing </body> tag:
<!-- type="module" is important here -->
<script type="module">
    Echo.channel('content')
        .listen('ContentUpdated', (e) => {
            console.log(e);
        });
</script>
This tells Echo to listen on channel content for an event named ContentUpdated. It will just console.log() the event data.
We'read ready to test that out!
Go ahead and start the websocket server:
# This is a long-running process,
# maybe run it in its own tab
php artisan websockets:serve
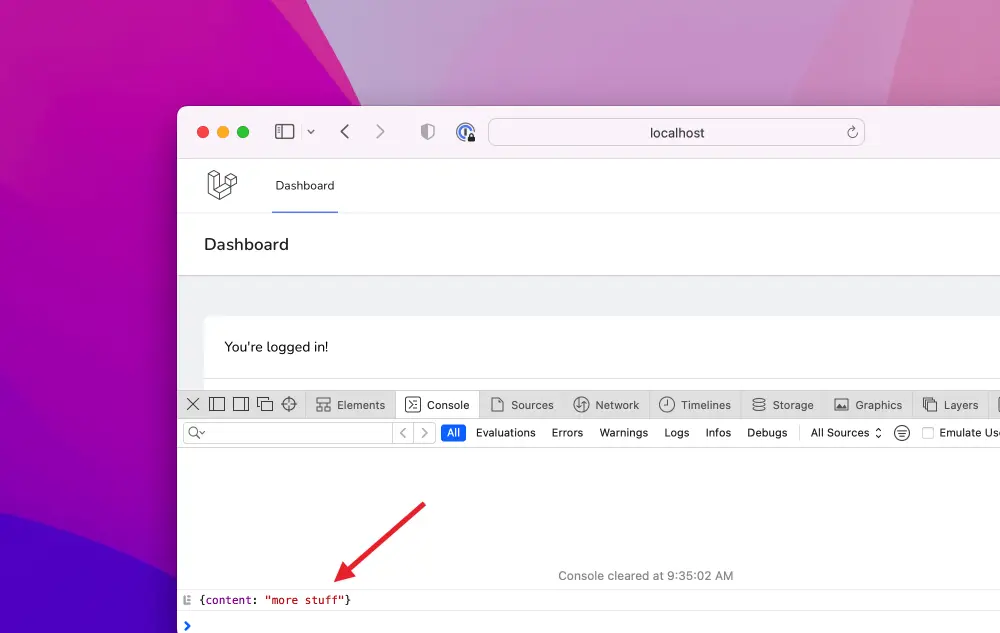
One easy way to fire the ContentUpdated event is to use a route.
Create a route /fire to dispatch the event:
# File routes/web.php

Route::get('/fire', function () {
    \App\Events\ContentUpdated::dispatch("more stuff");
    return "fired";
});
Going to that route (localhost:8888/fire for me) will dispatch the event. If all goes well, you should see the event logged to the console in your browser.
If all does not go well, be sure to check the contents of your .env and perhaps restart your services (re-run npm run build, restart your servers).
So, it works! Next we need to convert this to Livewire and then generate some content (perhaps in a console command) to pretend we have some data streaming in.
Using Livewire
Let’s add Livewire to our project. Setting it up is just 2 steps!
First, get Livewire:
composer require livewire/livewire
Then add its static assets to resources/views/layouts/app.blade.php:
...
    @vite(['resources/css/app.css', 'resources/js/app.js'])
    @livewireStyles
</head>
<body>
    ...

    @livewireScripts
</body>
</html>
Livewire is now setup. We can move onto making a Livewire component:
php artisan livewire:make Content
That command generates files:
app/Http/Livewire/Content.phpresources/views/livewire/content.blade.php
The Blade view file content.blade.php is pretty simple:
<div
  class="bg-gray-800 text-white p-6 rounded overflow-hidden
         font-mono text-sm whitespace-pre-wrap"
>{{ $content }}</div>
We added some Tailwind classes there to format the output to be a bit more like something you’d expect from running a command in a terminal.
Since we use class whitespace-pre-wrap, removing whitespace between the <div> tags and the $content becomes important for formatting.
Remember, we’re going to display the output from running command composer install. This output will have extra junk in it (ANSI color codes). Luckily there are packages we can use to help format and colorize the output:
composer require sensiolabs/ansi-to-html
We’ll use that package in the Content.php file to take our output and turn it into something that looks pretty:
<?php
namespace App\Http\Livewire;
use App\DraculaTheme;
use Livewire\Component;
use SensioLabs\AnsiConverter\AnsiToHtmlConverter;
class Content extends Component
{
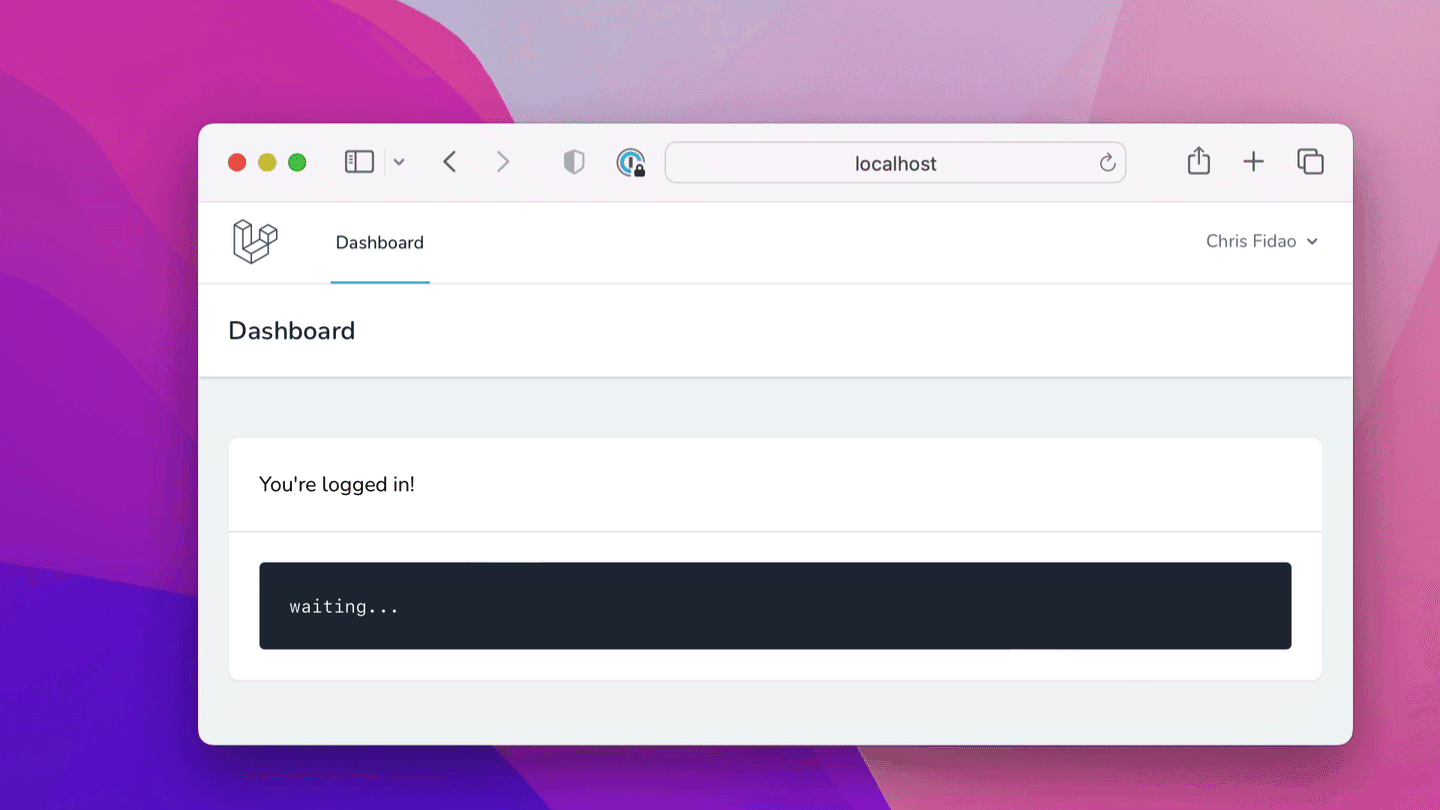
public $rawContent = '';
public $content = 'waiting...';
protected $listeners = [
'echo:content,ContentUpdated' => 'appendContent'
];
public function appendContent($event)
{
$this->rawContent .= $event['content'];
$theme = new DraculaTheme;
$ansiConverter = new AnsiToHtmlConverter($theme);
$this->content = $ansiConverter->convert($this->rawContent);
}
public function render()
{
return view('livewire.content');
}
}
OK, so what’s actually happening here!?
First, we have $rawContent and $content. The attribute $content is what the browser sees. Attribute $rawContent is the raw string. We transform the raw string into some HTML using the ANSI to HTML helper.
Second, we have $listeners. This is a built-in thing in Livewire to integrate with events, including Echo.
The code above listens for Echo events on the content channel, and specifically reacts to event ContentUpdated.When ContentUpdated is received, it calls method appendContent().
Third, method appendContent() appends the latest content, and updates $content to valid/styled HTML content via AnsiToHtmlConverter.
That helper has themes! The theme file (DraculaTheme) is this class.
Now that we have this, we can remove the <script> tag we added to the resources/views/layouts/app.blade.php file. Livewire will do the work for us!
Streaming Content
We’re not going to get into streaming content from running a command (that’d be a smallish book instead of an article).
Instead, what we’ll do fire off the ContentUpdated event every half-second to simulate command output being streamed into our app.
In our case, we’ll just append the content we get from the event to the browser output (we don’t need to handle the case of persisting output to permanent storage).
Let’s create a command to help is with this:
php artisan make:command --command content:run GenerateContentCommand
That will generate file app/Console/Commands/GenerateContentCommand.php. We can add some functionality to it:
<?php

namespace App\Console\Commands;

use App\Events\ContentUpdated;
use Illuminate\Console\Command;

class GenerateContentCommand extends Command
{
    protected $signature = 'content:run';

    protected $description = 'Stream sample output to the browser';

    protected $content = [
        'chunks of string content',
        'stored here within',
        'this array'
    ];

    public function handle()
    {
        collect($this->content)->each(function($chunk) {
            ContentUpdated::dispatch($chunk);
            usleep(500000); // half second
        });

        return Command::SUCCESS;
    }
}
The actual $content I used is sample command output that contains ANSI color codes. You can see that actual output here.
This takes the chunks of content (which I split up into chunks manually, roughly every 16 lines of output) and dispatches our ContentUpdated event with a chunk of content every half second. This simulates our application receiving content from a running process.
Run the Command
Finally we can run the command! If you run that and watch your browser, you should see the content streamed there, live and in color!
php artisan content:run
Review
The important thing to know here is that Livewire has integrations with Laravel’s broadcasting features. Livewire can listen for dispatched events!
We setup a Laravel application, installed Breeze (so we got some view files to work with), and finally installed Livewire.
We’ve setup a command that broadcasts an event every half second. The event has some content in it. Livewire listens for that event, and appends the content within it to a variable, which results in the frontend being updated with that content.
There’s not much to it, other than going through the motions of setting up Broadcasting via Pusher or Laravel-Websockets.