

We’re Fly.io, where apps run on Fly Machines—fast-starting VMs with a simple API—in 30+ regions around the world. This article is about Fly Machines storing their SQLite databases in a globally distributed Tigris bucket. If you haven’t tried Machines, take them for a spin! It’s fast to get started.
I got nerd-sniped by one of the ideas Jason brainstormed in his Phoenix Files article about Tigris, an S3-compatible globally synced object store. Tigris is, not coincidentally, built on Fly.io. (If you haven’t read Jason’s article, go read it! You’ll be fine! There’s hardly any Elixir in it.)
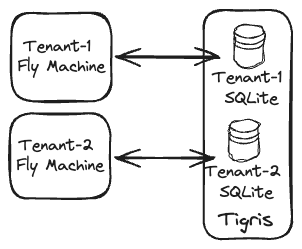
Here’s the idea I’m here to explore: multi-tenant applications with single-tenant SQLite databases stored in Tigris and run on single-tenant Fly Machines:
 |
|---|
| The multi-tenant architecture with single-tenant SQLite databases. |
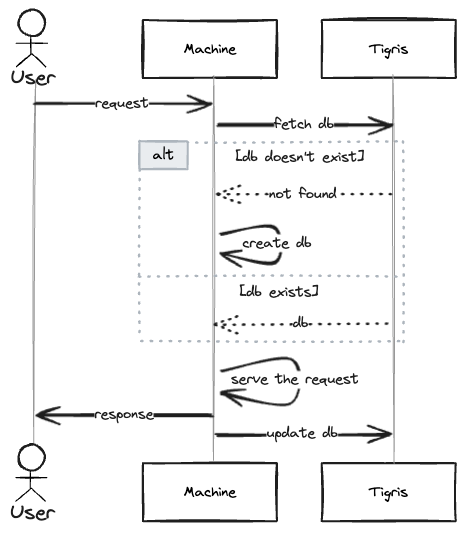
If we’re to handle a tenant request within this architecture, we’d route the request to its Machine, ensure its database is there, serve the request, update database file in the bucket… and potentially auto-stop the Machine if that was just a one-off request! (And yes, we can also wake it up if another request comes in.)
 |
|---|
| The sequence diagram |
However, there’s a caveat to this approach: if we allow more than one Machine concurrently access the tenants’ SQLite database, the Machine updating the database file in the bucket last would overwrite changes done by the other ones. Also, these Machines would work on snapshots of the data without knowledge of the changes applied in parallel.
That’s enough rambling about theory! Let’s bring this idea to life. In this post, we’ll build a Vanilla JavaScript app that keeps a counter in a SQLite database and increments it every time a user visits a web page. It’ll fetch the database file from Tigris on the app start-up and send it back on shutdown. At the end, we’ll make the app customizable so that an instance can be run per tenant and deploy a multi-tenant setup at Fly.io.
Actually, I’ve already build the app at: https://github.com/fly-apps/js-sqlite-in-tigris… let’s go through it step by step together!
If you want to run the examples, make sure you’ve got a Fly.io account.
Tigris setup
Issue fly storage create to create a Tigris project. This will output a bunch of environment variables that have to be available in the shell to run the following examples. The environment variables are important. If they’re not set, the following examples won’t work.
The simplest way to set them up is to issue a set of export statements in your shell:
export AWS_ACCESS_KEY_ID=<you-access-key-id>
export AWS_ENDPOINT_URL_S3=https://fly.storage.tigris.dev
export AWS_REGION=auto
export AWS_SECRET_ACCESS_KEY=<your-secret-access-key>
export BUCKET_NAME=<your-bucket-name>
To keep the variables handy, install a tool like dotenv and put the exports into a .envrc file. dotenv will make them available for the shell commands run inside the current directory.
Get the feel of Tigris with the AWS CLI:
aws s3api list-buckets  # you should see the bucket you've created on setup
aws s3api put-object --bucket $BUCKET_NAME --key mykey --body sampe-file # put a file into a bucket
aws s3api list-objects-v2 --bucket $BUCKET_NAME  # list objects in the bucket
aws s3api get-object --bucket $BUCKET_NAME --key mykey sample-file # download the file
fly storage dashboard $BUCKET_NAME # see the bucket in the Tigris console
Now, let’s switch gears and focus on the JS app and SQLite for a bit.
Node.js app with SQLite
The code corresponding with this step is available at 7303da9.
It’s pretty easy to start building with our Node generator. You can install it with npx --yes @flydotio/node-demo@latest (more on it here).
With that installed, if you run npx node-demo --esm --ejs --express --sqlite3 and make a few tweaks for our use case, you’ll get an example Vanilla JavaScript app running Express server with SQLite. To test it locally, start the server: npm install & npm run start
If you visit http://localhost:3000/ and start refreshing the page, you’ll see a counter incrementing. If you restart the app, the counter should pick up where it left off - we do persist our state to the database, great!
Nothing fancy here code-wise:
- we create and set up an SQLite database:
// server.js

process.env.DATABASE_PATH ||= './db.sqlite3'
const db = new sqlite3.Database(process.env.DATABASE_PATH)

...

db.run('CREATE TABLE IF NOT EXISTS "welcome" ( "count" INTEGER )')
- configure the Express server to listen at port 3000:
// server.js

const app = express()

...

// set up static content and ejs views
app.use(express.static('public'))
app.set('view engine', 'ejs')

...

app.listen(3000, () => {
  ...
})
- and expose a page to increment the counter in the database:
// server.js

app.get('/', async(_request, response) => {
  // increment count, creating table row if necessary
  await new Promise((resolve, reject) => {
    db.get('SELECT "count" from "welcome"', (err, row) => {
      let query = 'UPDATE "welcome" SET "count" = ?'

      if (err) {
        reject(err)
        return
      } else if (row) {
        count = row.count + 1
      } else {
        count = 1
        query = 'INSERT INTO "welcome" VALUES(?)'
      }

      db.run(query, [count], err => {
        err ? reject(err) : resolve()
      })
    })
  })

  // render HTML response
  response.render('index', { count });
})
And that’s the essence of the functionality our app will be providing to our users. Let’s see how we can store the database file in Tigris.
Store the tenant database file in Tigris!
The code corresponding with this step is available at d8496f6.
If you played with Tigris in one of the previous sections, you probably know what we’re going to do now: just grab the db.sqlite3 file and store it in our bucket! Not only that, but we’ll also parametrize the app so that it knows what tenant it is supposed to serve.
To make the latter work, we make the app read the CUSTOMER_ID environment variable and parametrize the route path with it:
// server.js

const customerId = process.env.CUSTOMER_ID || 0

...

app.get(`/customers/${customerId}`, async (request, response) => {
  // the counter logic
})
app.get(`/customers/:customerId`, async (request, response) => {
  response.status(403).send();
})
If we get a request to a CUSTOMER_ID that we’re not serving, 403 will be returned.
To talk to Tigris, we’ll use the @aws-sdk/client-s3 library - as with any other S3-compatible service. For this to work, we need to set up our S3 client to point at the Tigris endpoint:
// server.js

const S3 = new S3Client({
  region: "auto",
  endpoint: `https://fly.storage.tigris.dev`,
});
We also need to read our bucket name and construct the object key under which we’ll store a customer’s database file:
// server.js

const bucketName = process.env.BUCKET_NAME
const databaseKey = `/customer/${customerId}/db.sqlite3`;
On the server startup, we retrieve the database file from the bucket, or we’ll use the pre-created one:
// server.js

const db = new sqlite3.Database(databasePath) // that file gets overwritten

...

const checkDbInS3 = async () => {
  try {
    const { Body } = await S3.send(new GetObjectCommand({
      Bucket: bucketName,
      Key: databaseKey
    }));

    fs.writeFileSync(databasePath, await Body.transformToByteArray());
  } catch (error) {
    // error handling
  }
};

...

checkDbInS3();
On the server shutdown, we’ll be uploading the database file to the bucket:
const sendDbToS3 = async () => {
  try {
    const fileContent = fs.readFileSync(databasePath);

    await S3.send(new PutObjectCommand({
      Bucket: bucketName,
      Key: databaseKey,
      Body: fileContent
    }));

    process.exit(0);
  } catch (error) {
    process.exit(1);
  }
};

...

process.on("SIGINT", sendDbToS3);
process.on("SIGTERM", sendDbToS3);
And that’s it for storing our tenant’s database file in Tigris!
Little reminder: to be able to run the examples in this post, the environment variables mentioned in the Tigris setup section must be exported in the shell you run the examples in.
If you want to make your hands dirty, give it a try: npm install && CUSTOMER_ID=10 npm start run
Jump to http://localhost:3000/customers/10 to see it in action. The server logs should be telling us we fetch/store data from/in Tigris:
> start
> node server.js run

Server is listening on port 3000, serving customer_id: 10
Successfully downloaded the db file from S3.
[customer_id=0] Received request for customer: 10
[customer_id=0] Received request for customer: 10
[customer_id=0] Received request for customer: 10
^CSuccessfully sent the db file to S3. # NOTE that I'm sending Ctrl+C here
You can always fly storage dashboard $BUCKET_NAME to see the bucket on the Tigris console.
That’s great! Try to run the app as a different customer, that should start counting from the beginning; remember to remove the db.sqlite3 file: rm db.sqlite3 && CUSTOMER_ID=300 npm start run.
OK, you’ve got pretty far already… ready for a big thing?
The big thing #1: deploy to Fly.io
Actually…I should have said #2 since the #1 big thing was to set up Tigris and use it! But I guess it was easy enough not to notice! But let’s reflect on it: your SQLite database can now be served from servers close to your users since it will be automatically cached in the regions it will be accessed from.
Anyhow, let’s jump straight to the deployment part. If you want to follow the easy path, check out commit 87ab970 and:
Supply the app name in the
fly.toml:app = '<app-name>'Create the app at Fly.io:
fly apps create <app-name>(an app is just a bag of resources on our platform)Make the secrets available in the app’s Machines (this assumes you have the $AWS_* variables exported as described in the Tigris setup section):
fly secrets set AWS_ACCESS_KEY_ID=$AWS_ACCESS_KEY_ID
fly secrets set AWS_SECRET_ACCESS_KEY=$AWS_SECRET_ACCESS_KEY
Allocate an IP address for the app:
fly ips allocate-v4 --sharedRun a machine for a customer (single tenant):
fly machine run . --name customer10 --port 443:3000/tcp:http:tls \
--env CUSTOMER_ID=10 \
--env AWS_REGION=$AWS_REGION \
--env AWS_ENDPOINT_URL_S3=$AWS_ENDPOINT_URL_S3 \
--env BUCKET_NAME=$BUCKET_NAME
Fire up logs to see as things are happening:
fly logsVisit the
https://<app-name>.fly.dev/customers/10and celebrate 🎉Kill the Machine with
fly machine destroy --force
The slightly harder path involves generating the Dockerfile and fly.toml on your own. We’ll use fly launch for that and customize them a little. To the point:
- Check out the repo at commit d8496f6
- Issue
fly launch --build-only --no-deploy --name <app-name>and decline tweaking the settings - Clean up the generated files so that they reflect what’s in the repo at this commit
Then follow the easy path 3-7 steps and… Wow! We’re live now.
 |
|---|
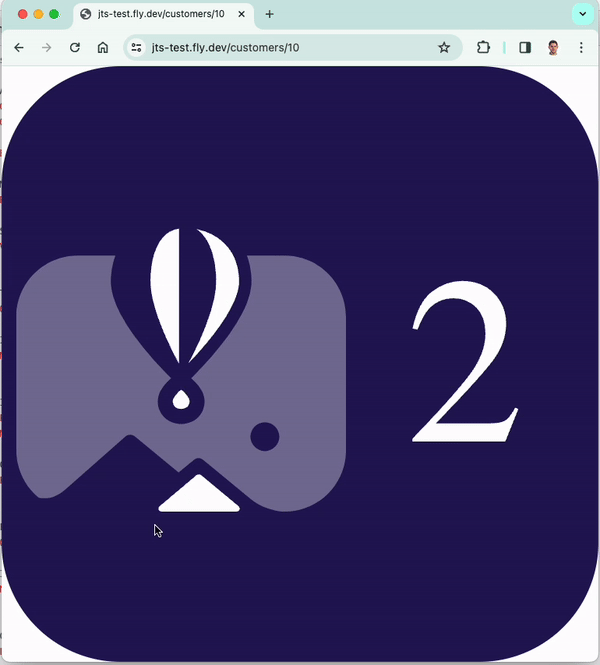
Refreshing the https://<app-name>.fly.dev/customers/10 |
Couldn’t we just go multi-tenant by spinning up multiple machines for our customers and call it a day? If you give it a try you’ll quickly bump into a routing/port assigning mess - and this is the big thing #2 we’ll tackle!
The big thing #2: multi-tenancy with fly-replay
For this to work, we’ll need:
- Dynamic Request Routing - to route requests to the tenants’ machines,
- Fly.io internal addressing - to lookup a Machine ID we want to route a request to,
- Machine’s metadata - to mark a machine with its
CUSTOMER_IDso we can easily discover them using our tenants’ IDs.
Wow, that was probably the most buzzword-intensive statement in this post, but bear with me - it will work, it will make sense, and life will be beautiful again ❤️. Anyhow, if you are curious, see our Globally Distributed Postgres post to see how powerful are the features we’re dealing with here.
If there’s more than one Machine exposing the same service, the Fly Proxy will load balance requests to our app across all of them (this is how our proxy works by default). This is not what we want since a request for a given customer must reach its machine.
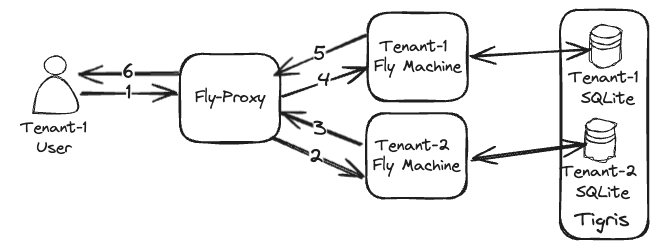
The way to achieve this is to make each machine execute business logic and act as a router for our app and replay requests that are not destined for it. For example, if a machine for customer 100 gets a request for customer 200, it will route the request to the customer’s 200 machine. If there’s no machine for a given customer, 404 will be returned. The following diagram depicts a request flow in which a Machine acts as a router:
 |
|---|
| Tenant-1 user gets load-balanced to a Tenant-2 Machine (2), which replays the request to Tenant-1 (3-4) machine, where it gets served. |
At the high level, we’ll have 2 Express routes: one for the CUSTOMER_ID the Machine is running for and the other one for the routing:
// server.js

const customerId = process.env.CUSTOMER_ID || 0

...

app.get(`/customers/${customerId}`, async (request, response) => {
  // business logic (the counter) for the CUSTOMER_ID this machine IS serving
});
app.get(`/customers/:customerId`, async (request, response) => {
  // routing logic for CUSTOMER_IDs this machine IS NOT serving
  let machineId = await get_machine_id(request.params.customerId);
  if (machineId) {
    response.set('fly-replay', `instance=${machineId}`).send();
  } else {
    response.status(404).send("Not found");
  }
})
If the get_machine_id(request.params.customerId) returns a valid machineId, we set the fly-replay HTTP header with that customer’s machineId and send a response back. Because of the header, the proxy won’t return the response to the caller but will replay the request to the given machine. That way, each tenant hits its instance.
Now, how does the get_machine_id(request.params.customerId) work? It relies on each machine having a CUSTOMER_ID metadata key being set. That allows us to make a DNS lookup to fetch a customer’s machine IPv6 via a special address: dig aaaa +short <CUSTOMER_ID>.customer_id.kv._metadata.<app-name>.internal. Having the IP address, we can do one more lookup (a reverse one) to fetch the machine ID that we need for the fly-replay header: dig +short -x fdaa:6:32a:a7b:23c8:3d9b:fe49:2 (the last argument is an example IPv6 address of a Machine).
The get_machine_id(customerId) function uses the node-dig-dns package to implement these queries in JS:
// server.js

const appName = process.env.FLY_APP_NAME;

const get_machine_id = async (customerId) => {
  // return a sample ID the app is not deployed on Fly.io
  if (!appName) { return "abcd1234" };

  try {
    const ip = await dig([`${customerId}.customer_id.kv._metadata.${appName}.internal`, 'aaaa', '+short'])
    const addr = await dig(['+short', '-x', ip]);
    return addr.split('.')[0];
  } catch (error) {
    // error handling
  }
};
node-dig-dns requires the dnsutils OS package, thus we install it in the Dockerfile.
You may have spotted the addr.split('.')[0]. This is to extract only the 1st segment of the returned string since the reverse lookup (the one with -x) returns an FQDN address, e.g.: 3d8dd15c1ed778.vm.jts.internal..
Finally, how do we set that metadata? There are a few ways to do that, like with an API, but we will do that at the machine startup as fly machine run ... --metadata customer_id=100.
Lastly, let’s put the cherry on the cake and deploy the whole thing for 3 customers. Take it easy, check out the main branch, and providing you’ve set up the <app-name>, secrets, and the IPv4 address as described in The big thing #1, then just execute the following:
for i in `seq 1 3`; do
    fly machine run . --name customer${i}00 --port 443:3000/tcp:http:tls \
    --env CUSTOMER_ID=${i}00 \
    --env AWS_REGION=$AWS_REGION \
    --env AWS_ENDPOINT_URL_S3=$AWS_ENDPOINT_URL_S3 \
    --env BUCKET_NAME=$BUCKET_NAME \
    --metadata customer_id=${i}00
done
That will spin up Machines for customers with IDs 100, 200 and 300 and make your app available at https://<app-name>.fly.io/customer/<CUSTOMER_ID>.
That’s is it! We’ve made it - we have a demo multi-tenant application with exclusive computing with Machines and data storage with SQLite database hosted at Tigris.
Conclusion
There are a number of things that we could elaborate on here, but let me focus on just two things: automating tenant provisioning and scalability aspects of the app we’ve built.
I will start with the former because it’s simpler: we have all the tooling to automate tenant provisioning and its lifecycle management. The Machines API makes it possible to programmatically create and manage the lifecycle of the machines. Also, by tweaking the machines config appropriately, we can instruct the proxy on things like automatic shutdown or wake-up. That’s probably a big topic for another post, so I will just stop here.
When it comes to scalability, our approach is far from perfect since if we had more than one customer Machine (i.e., if we attempted to scale horizontally), we’d end up mutating the SQLite database in parallel, which would result in overwrites. One possible solution to this problem would be to transactionally create a machine.lock file in a customer bucket containing the Machine’s ID that performs the DB mutations at the current moment. That would possibly allow a Machine failing to acquire the lock to fly-replay the request to the one holding it. Once the “mutator” is done, the lock will be released by removing the file.
Tigris allows for Conditional Operations, which would help ensure that only one request creates the lock file and all the other concurrent ones would fail.
Happy multi-tenanting!