

In this post we reduce the load on the database and improve the overall performance of our Django app by caching with Redis. Django on Fly.io is pretty sweet! Check it out: you can be up and running on Fly.io in just minutes.
Web servers are math wizards 🧙🏽♂️ that can perform complex calculations to build the final - or partial - response that our user sees. Those calculations can vary from expensive queries to the database to rendering the template.
For most of small/medium-sized apps, building those pages feel instantaneous to users: bellow 100ms response time is our magic 🪄 number. However, ‘with growth usually comes more complexity’. More features, more users, more traffic… that’s when we start thinking about strategies on how to improve the overall performance and user experience of our app. Today, we discuss one of them: caching.
Caching is the process of storing frequently accessed or really expensive data temporarily in cache. Cache refers to a high-speed temporary storage mechanism for this quick access. Think of this as having a data storage closer to the users - and we really like that!
And how does that work in Django, you might ask?
Django ❤️ Redis
Redis - stands for Remote Dictionary Server - is an open-source, in-memory data structure store that can be used as a database, cache, and message broker. It’s known for its high performance, scalability, and versatility, making it a popular choice for many applications.
Redis stores data primarily in memory, allowing for fast read and write operations.
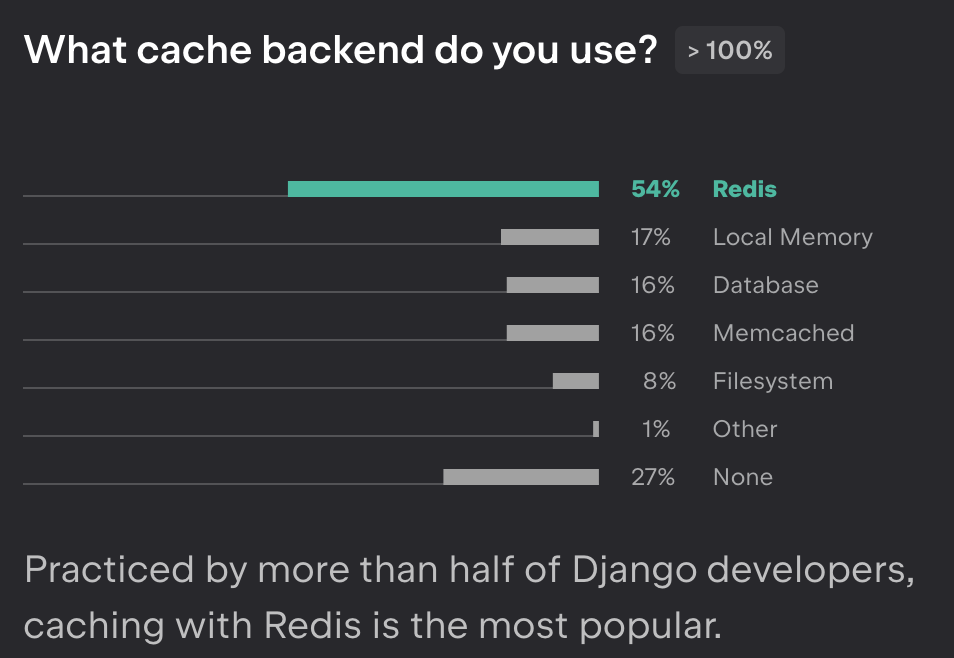
Django 4.0 introduced a built-in support for caching with Redis. The documentation can be found here. As no surprise, Redis is the most popular cache backend the Django developers use, as it’s shown in the Django Developers Survey 2022.
So, that’s what we are choosing to use today. Let’s explore further how we can try Redis locally.
Running Redis Locally
If you don’t have Redis installed, you can do so by running:
# For macOS
brew install redis
# For Linux
sudo apt-get install redis
For Windows: Redis is not officially supported on Windows, but you can follow these steps to install Redis for development.
You can check the documentation here for more details.
For macOS users, you can test your Redis installation by running redis-server:
redis-server
42980:C 14 Jun 2023 12:07:11.089 # oO0OoO0OoO0Oo Redis is starting oO0OoO0OoO0Oo
42980:C 14 Jun 2023 12:07:11.089 # Redis version=7.0.9, bits=64, commit=00000000, modified=0, pid=42980, just started
42980:C 14 Jun 2023 12:07:11.089 # Warning: no config file specified, using the default config. In order to specify a config file use redis-server /path/to/redis.conf
42980:M 14 Jun 2023 12:07:11.089 * Increased maximum number of open files to 10032 (it was originally set to 256).
42980:M 14 Jun 2023 12:07:11.089 * monotonic clock: POSIX clock_gettime
                _._
           _.-``__ ''-._
      _.-``    `.  `_.  ''-._           Redis 7.0.9 (00000000/0) 64 bit
  .-`` .-```.  ```\/    _.,_ ''-._
 (    '      ,       .-`  | `,    )     Running in standalone mode
 |`-._`-...-` __...-.``-._|'` _.-'|     Port: 6379
 |    `-._   `._    /     _.-'    |     PID: 42980
  `-._    `-._  `-./  _.-'    _.-'
 |`-._`-._    `-.__.-'    _.-'_.-'|
 |    `-._`-._        _.-'_.-'    |           https://redis.io
  `-._    `-._`-.__.-'_.-'    _.-'
 |`-._`-._    `-.__.-'    _.-'_.-'|
 |    `-._`-._        _.-'_.-'    |
  `-._    `-._`-.__.-'_.-'    _.-'
      `-._    `-.__.-'    _.-'
          `-._        _.-'
              `-.__.-'

42980:M 14 Jun 2023 12:07:11.091 * Loading RDB produced by version 7.0.9
42980:M 14 Jun 2023 12:07:11.091 * RDB age 7858749 seconds
42980:M 14 Jun 2023 12:07:11.091 * RDB memory usage when created 1.04 Mb
42980:M 14 Jun 2023 12:07:11.091 * Done loading RDB, keys loaded: 0, keys expired: 0.
42980:M 14 Jun 2023 12:07:11.091 * DB loaded from disk: 0.000 seconds
42980:M 14 Jun 2023 12:07:11.091 * Ready to accept connections
Another alternative is to start/stop the process in the background. Let’s try that:
# For macOS via Homebrew
brew services start redis  # start
brew services stop redis  # stop
# For Linux/Windows
sudo service redis-server start
By default, the Redis server runs at the address 127.0.0.1 (or localhost) with port 6379.
Everything is up and running! Let’s try it out in interactive mode using the Redis CLI:
redis-cli
127.0.0.1:6379> PING
PONG
Caching Our App 🛠
We assume you already have an existing Django application. If not, you can follow the django-imdb we are using as an example for this guide. In this app, we can search our favourite movies, TV shows and games - which are all represented by the Title model.
We are using Django 4.2.2 and redis-py 4.5.5. It’s also recommended to install redis with hiredis support for faster performance, which we will do next:
python3 -m pip install "redis[hiredis]"
python3 -m pip install "redis[hiredis]" explicitly invokes the Python 3.x interpreter. It ensures the use of Python 3.x and it’s recommended, specially if you have both Python 2.x and Python 3.x installed in your system.
The next step is to set up the CACHES setting in our settings.py:
# settings.py
CACHES = {
    "default": {
        "BACKEND": "django.core.cache.backends.redis.RedisCache",
        "LOCATION": env.str("REDIS_URL", "redis://localhost:6379/"),
        "KEY_PREFIX": "imdb",
        "TIMEOUT": 60 * 15,  # in seconds: 60 * 15 (15 minutes)
    }
}
We are using django-environ to set LOCATION using env.str. You can see more details here.
Our local Redis instance is running on redis://localhost:6379/. django-environ takes environment variables from the .env file. Let’s set the environment variable REDIS_URL in our .env file:
# .env
REDIS_URL=redis://localhost:6379/
Note that we set TIMEOUT to 15 minutes (900 seconds). If not set, the default value is 5 minutes (300 seconds). If set to None, cache keys never expire. Setting 0 will expire the cache immediately - in other words, “don’t cache”. Set a default value that it’s appropriate for your application.
Displaying Queries with django-debug-toolbar
Optionally, we can check the cache information for our requests using django-debug-toolbar. That’s what we are using here:
python3 -m pip install django-debug-toolbar
Let’s go ahead and add the necessary configuration:
# settings.py
if DEBUG:
    INTERNAL_IPS = ["127.0.0.1"]  # <-- Updated!

INSTALLED_APPS = [
    # ...
    "django.contrib.staticfiles",
    # ...
    # 3rd party apps
    "debug_toolbar",  # <-- Updated!
]

MIDDLEWARE = [
    "debug_toolbar.middleware.DebugToolbarMiddleware",  # <-- Updated!
    # ...
]
The Debug Toolbar is displayed only if our IP address is listed in INTERNAL_IPS - in our case, only if we are in DEBUG mode (DEBUG=True for local development). We should make sure that django.contrib.staticfiles is in our INSTALLED_APPS and also add debug_toolbar. Most of the implementation is done in a middleware, let’s add it to the MIDDLEWARE list as early as possible - the order is important.
Last but not least, add the django-debug-toolbar‘s URL to our project’s urls.py:
# urls.py
urlpatterns = [
    ...
    path("__debug__/", include("debug_toolbar.urls")),
]
Let’s explore some examples on how we can apply that in our django-imdb project’s views.
The Per-View Cache
Title model has the ordering by rating and we want to display the title with the highest rating in our home page. Let’s consider that we will update our database - add new titles and update the ratings for existing titles - every day or even every hour, we can assume that this page won’t change that often, that’s a good candidate for the per-view cache:
# catalogue/views.py
@cache_page(timeout=60 * 30)  # cache for 30 minutes
def home(request):
    # Display the title with the highest rating in the home page
    title = Title.objects.prefetch_related("genre").first()
    return render(
        request=request,
        template_name="home.html",  # base template
        context={"title": title},
    )
The per-view will cache the output of individual views.
We add the @cache_page decorator to our view and customize the timeout (60 * 30).
If you configured the django-debug-tollbar, you can check the information in the panel. Once you access the home page for the first time, two queries are executed in our database to fetch the highest rating title, you can check that on SQL panel:
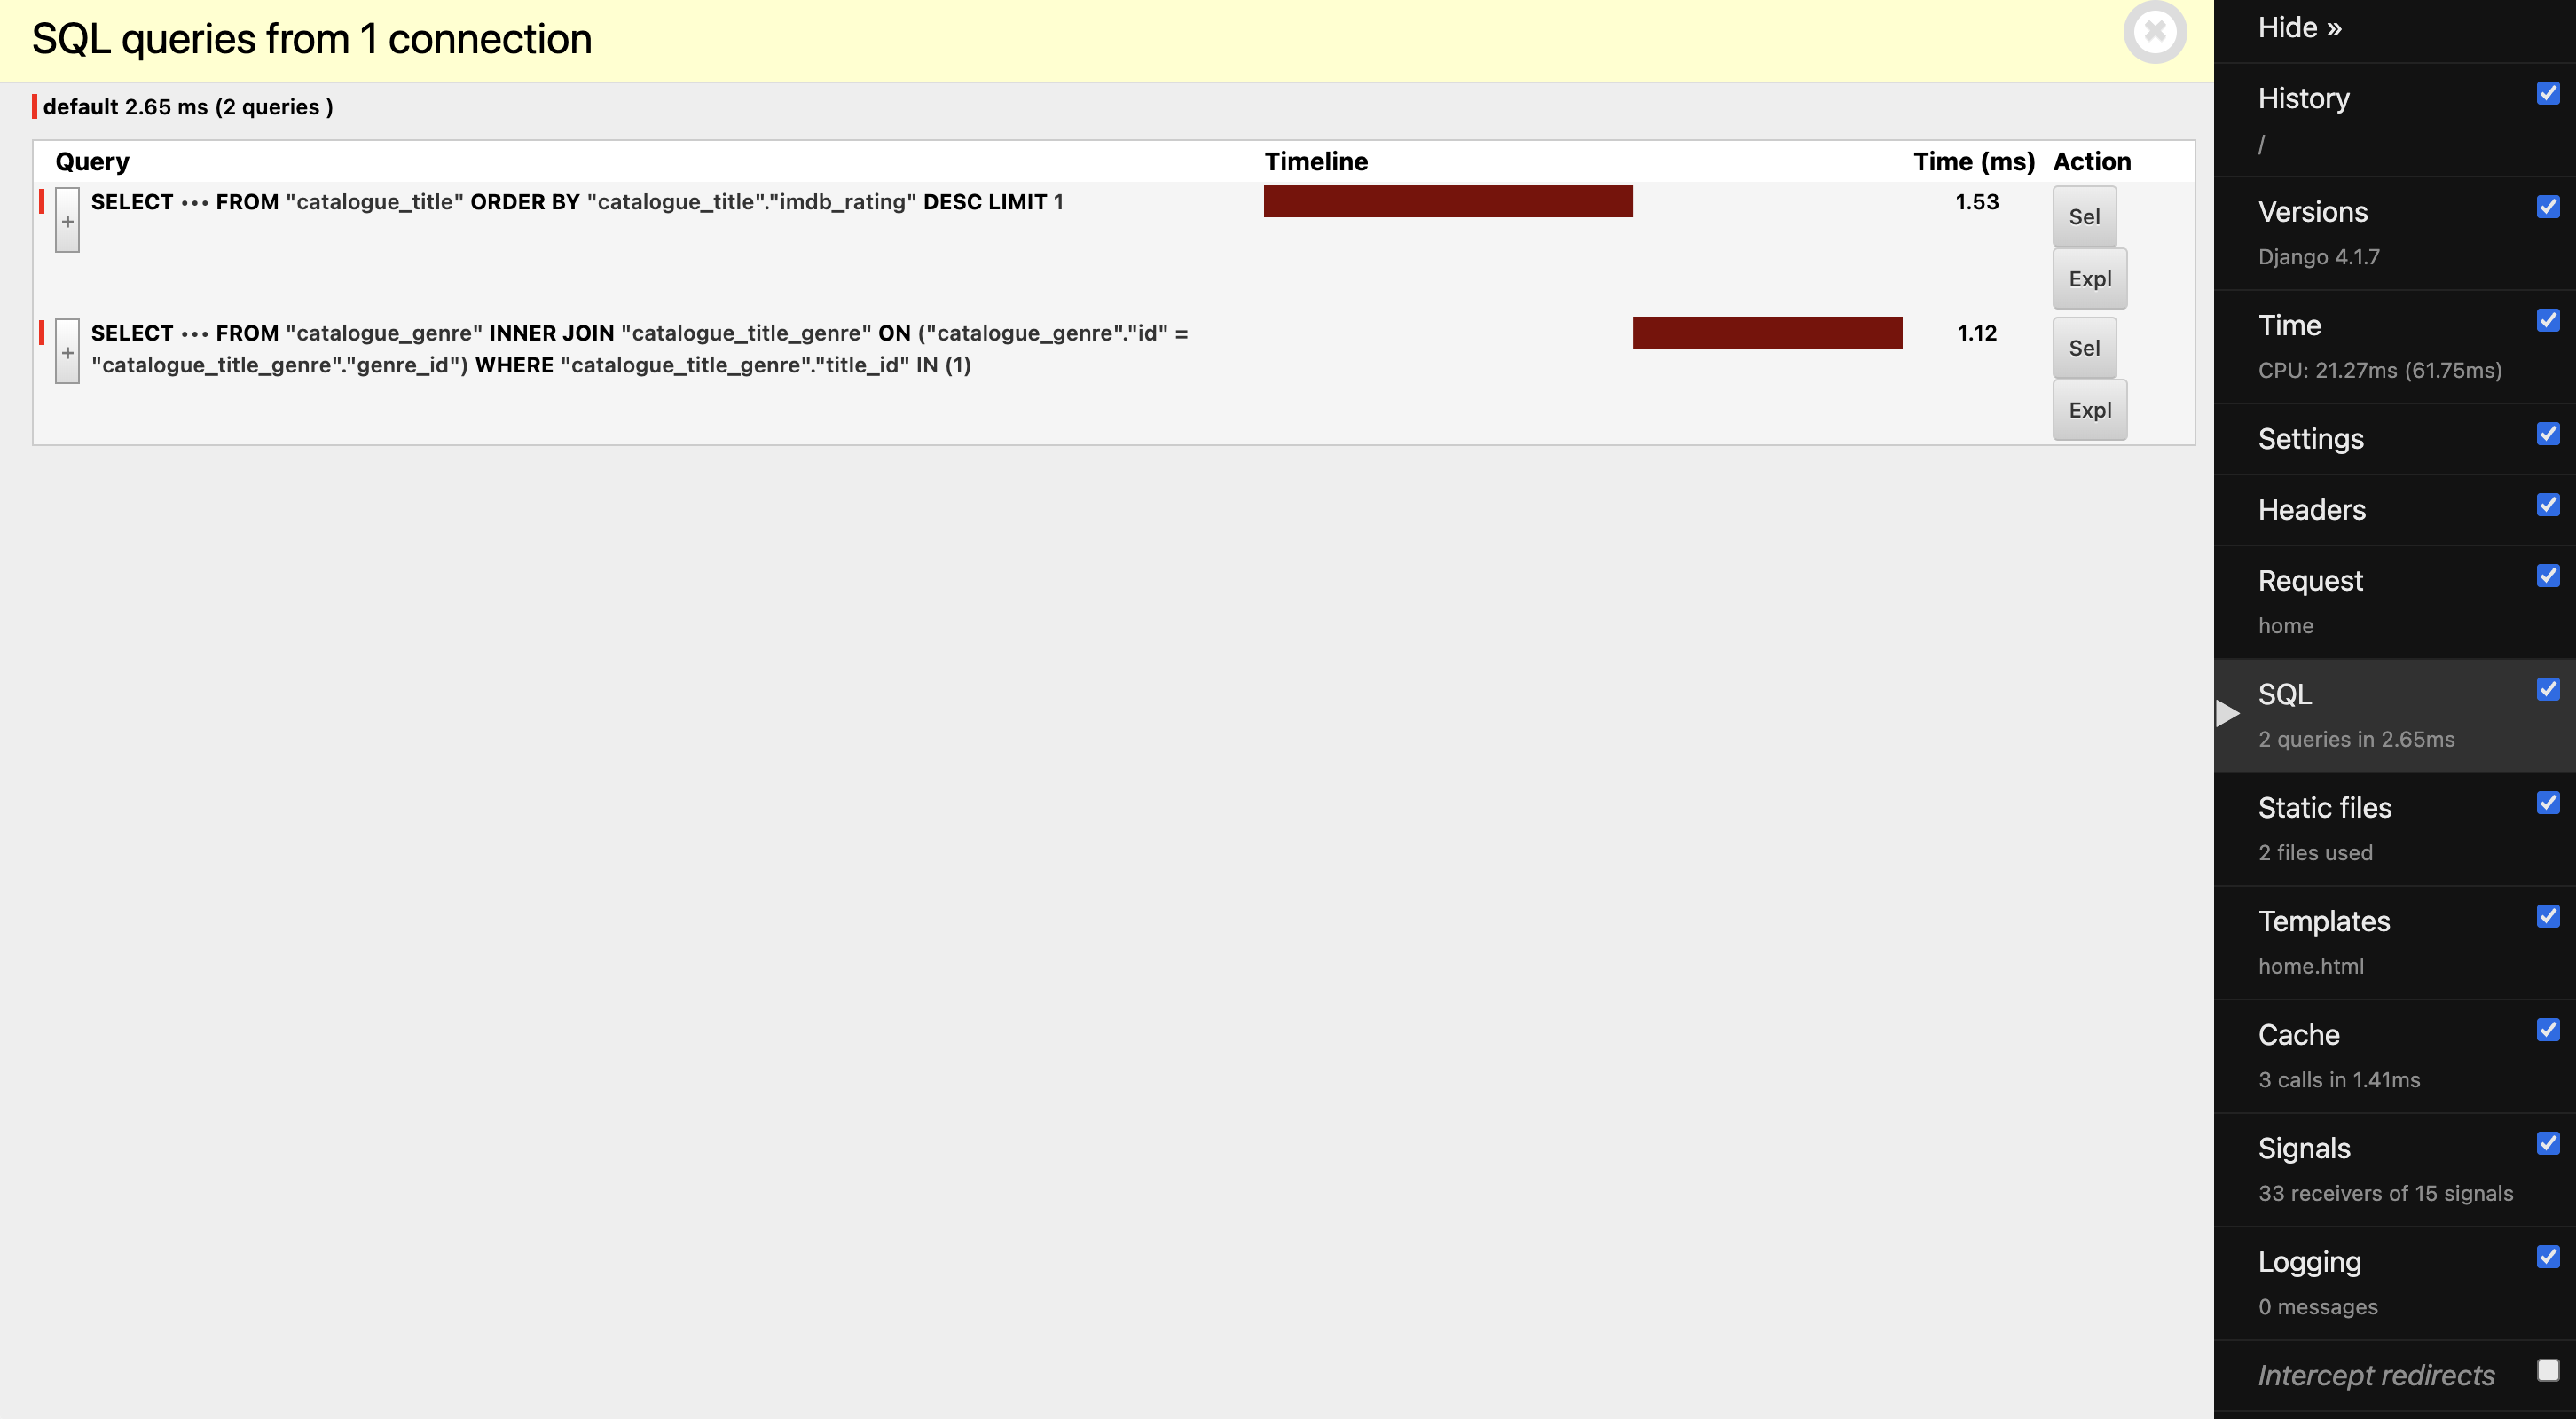
If we move to the Cache panel, we notice that this request cached two components: cache_header and cache_page. As the name already implies, the first one caches the headers in the HTTP response and the second, caches the content of the view itself.

Let’s refresh the page and observe what happens:
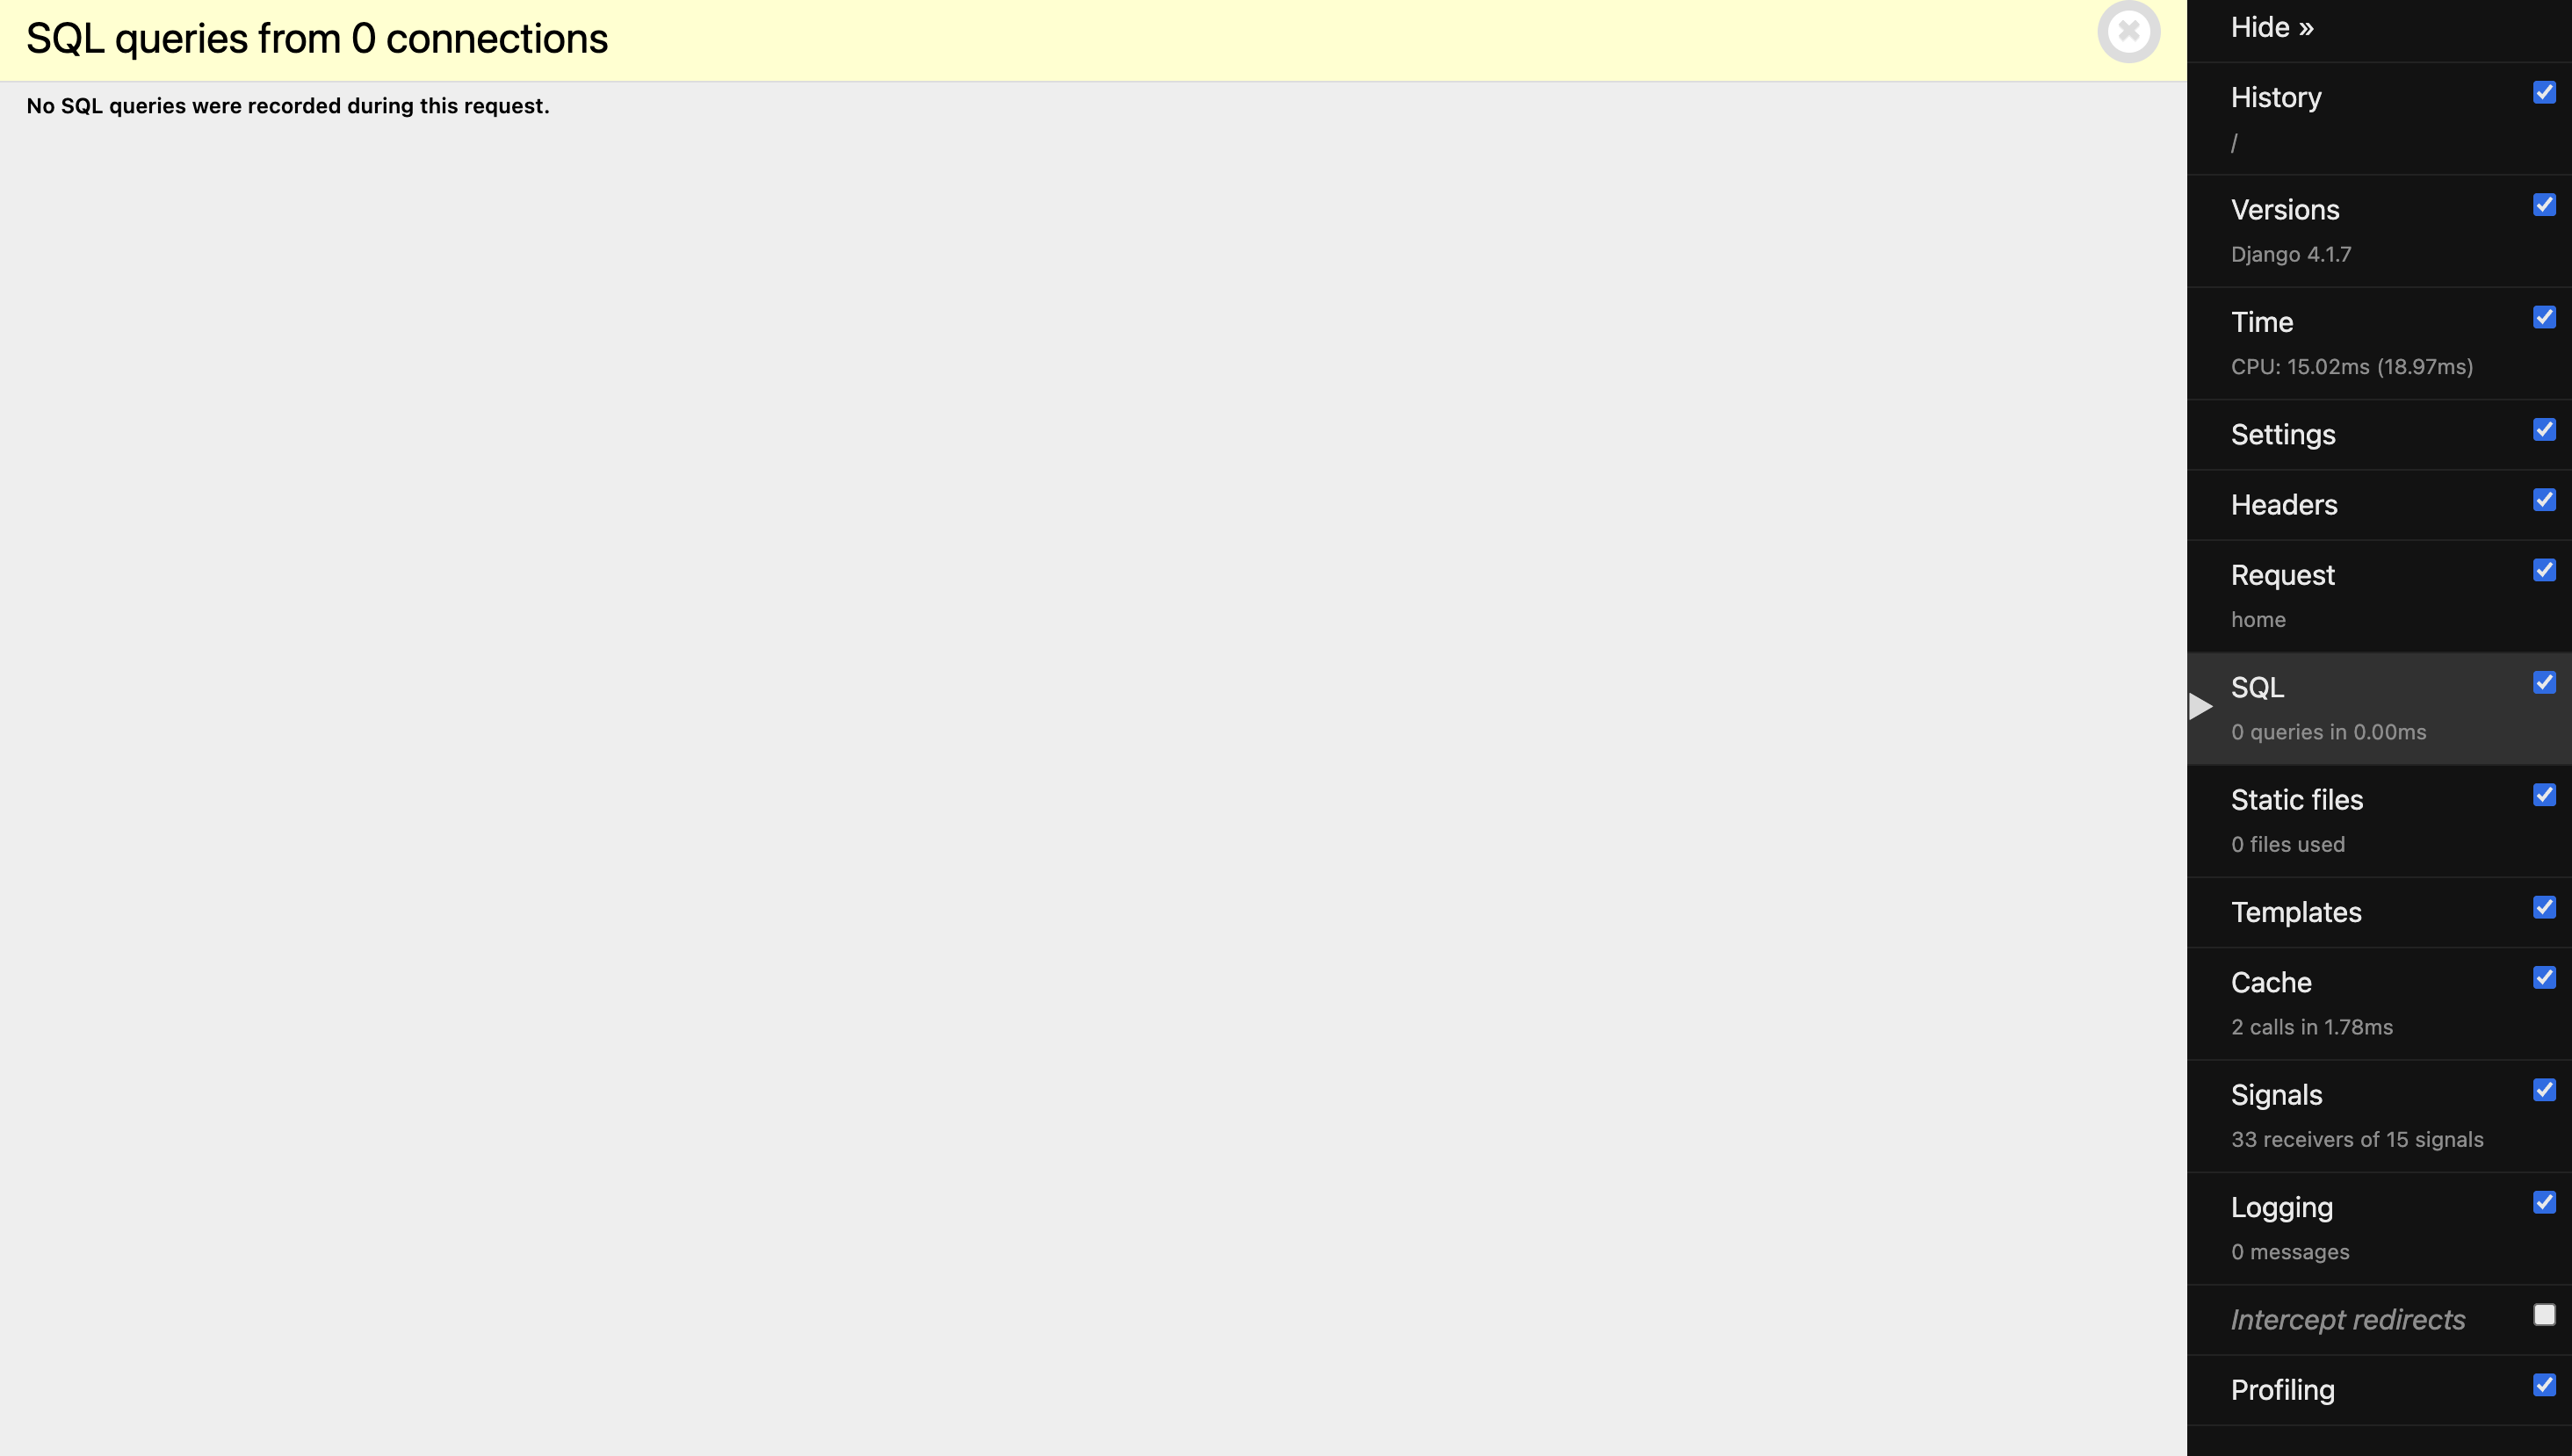
Ta-da! 🥳 No queries were performed in the database!
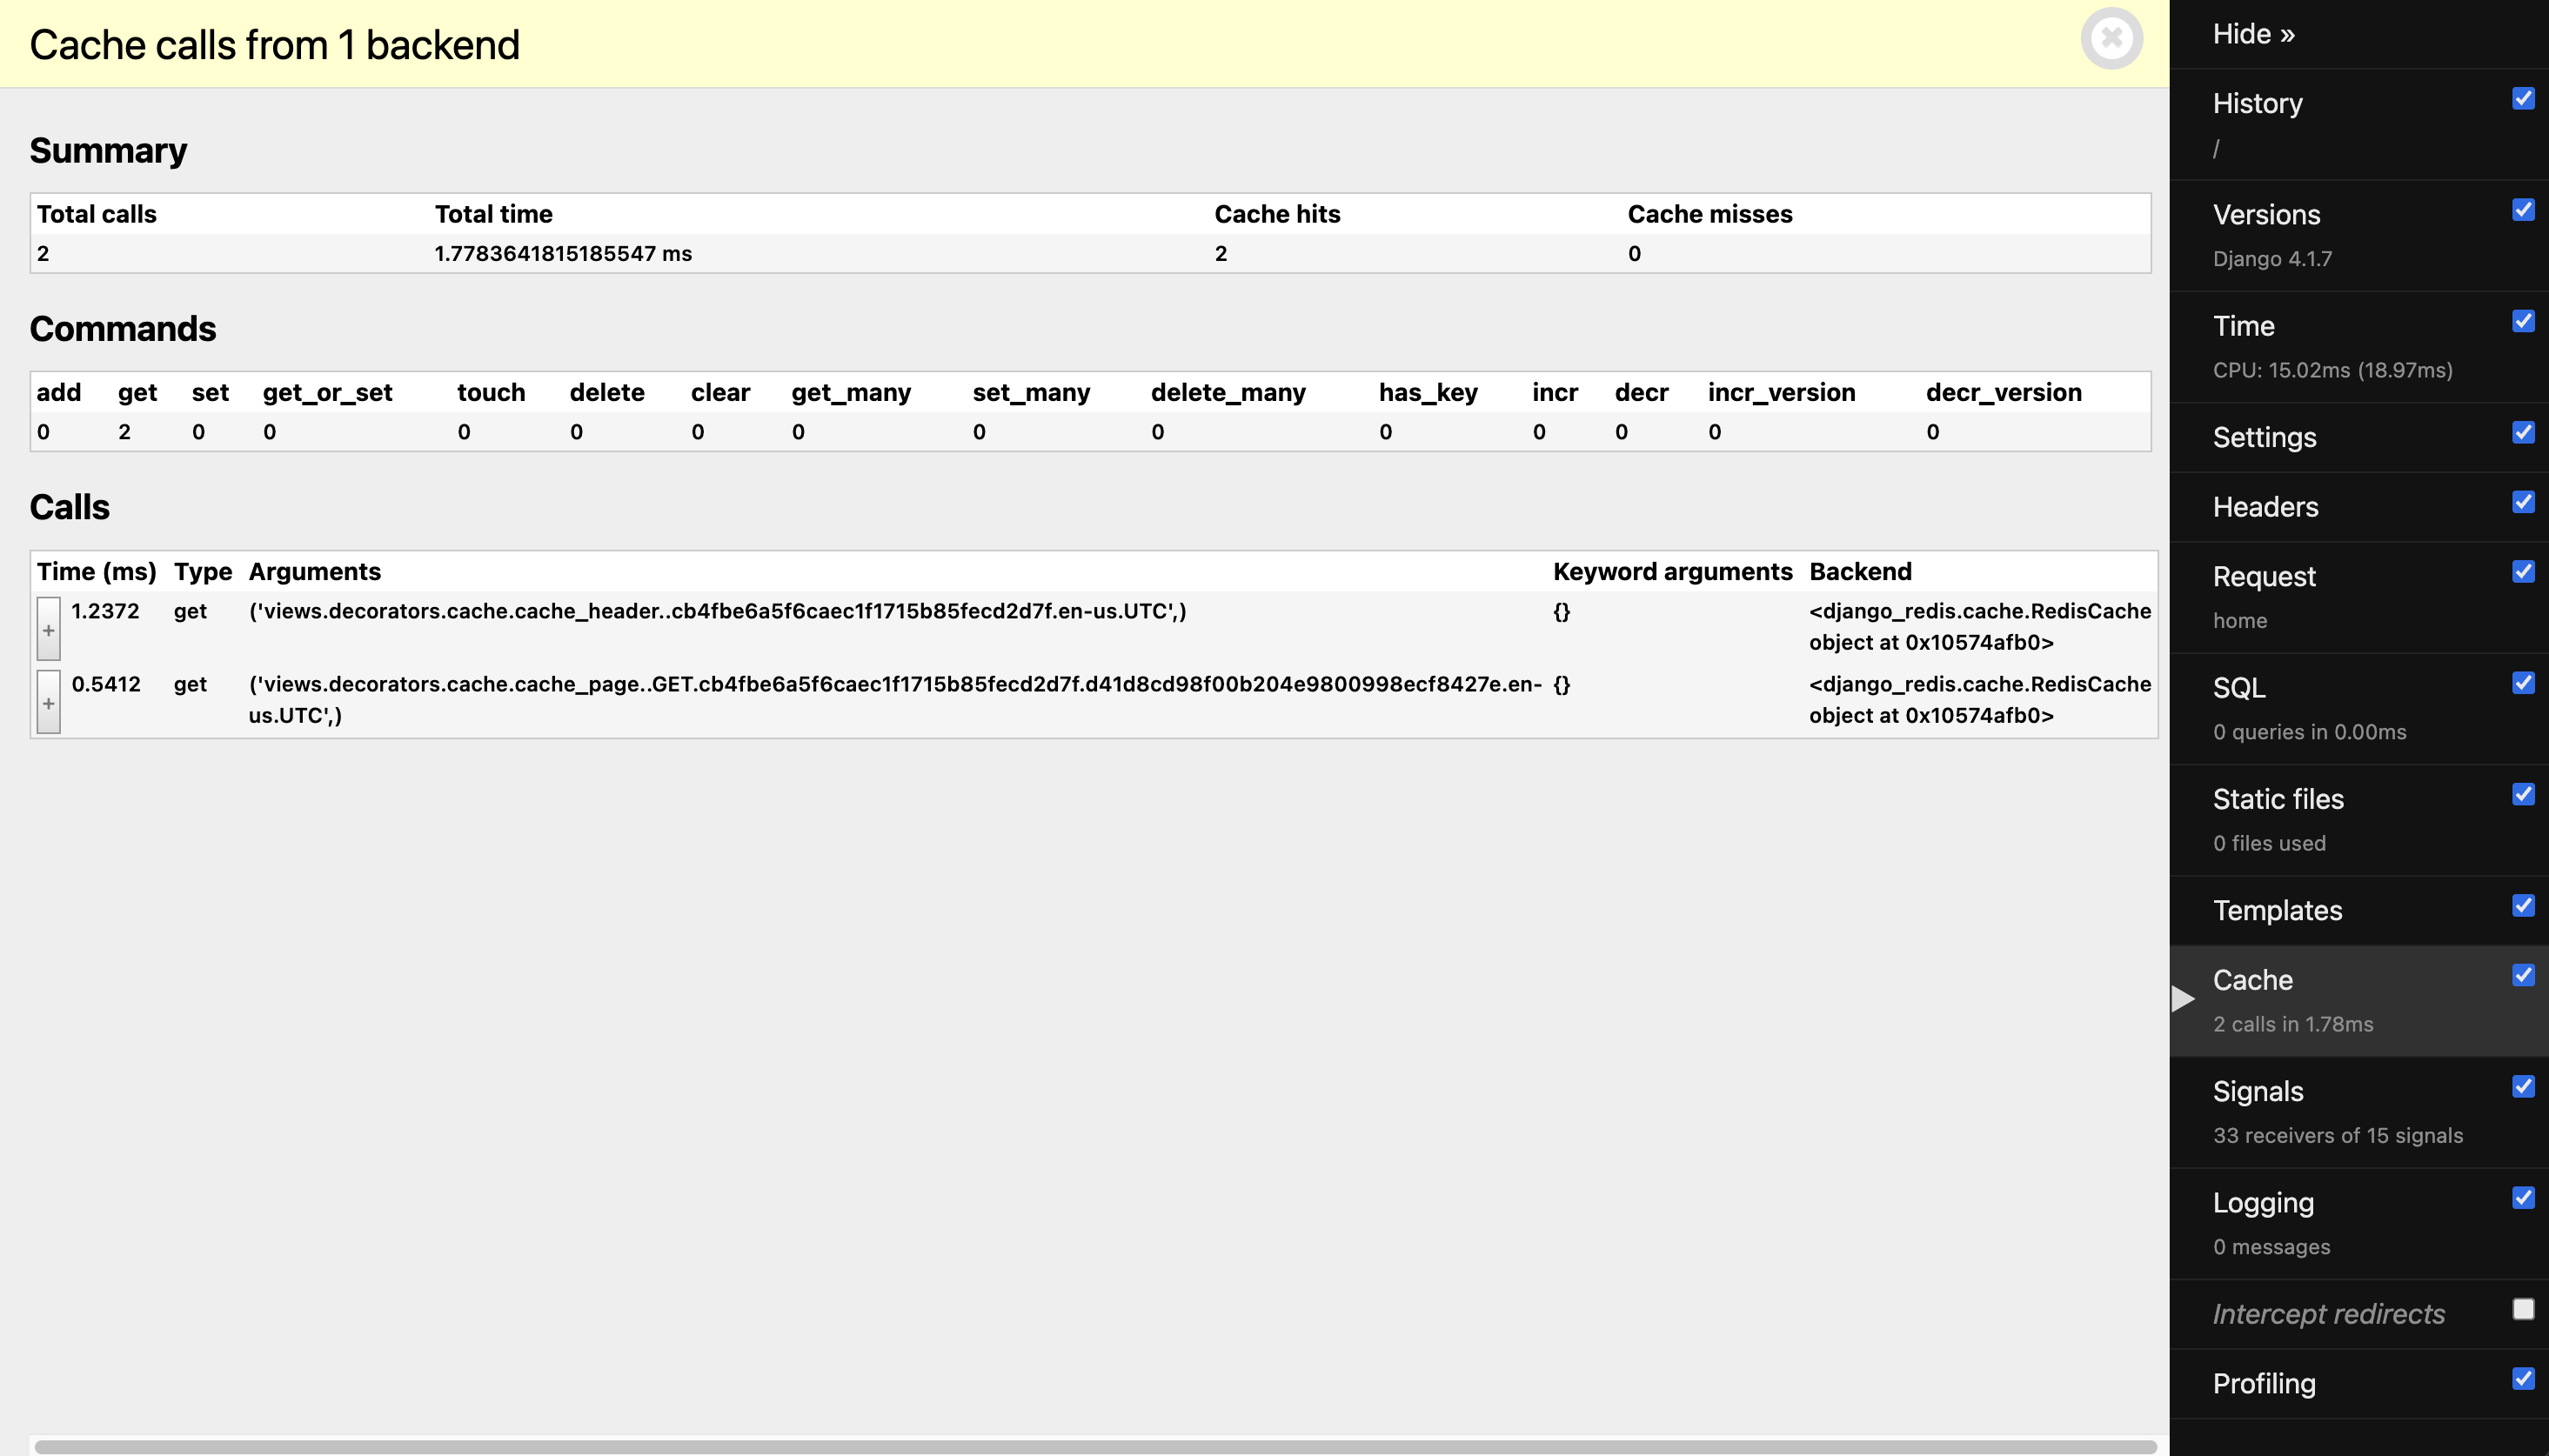
And we can verify that our cached data was retrieved, performing two get calls to fetch the header and page content.
Alternatively, we can retrieve all the keys with the KEY_PREFIX prefix - for our example, imdb - we defined in the settings.py using redis-cli:
redis-cli
127.0.0.1:6379> keys imdb:*
1) "imdb:1:views.decorators.cache.cache_header..592d38382.en-us.UTC"
2) "imdb:1:views.decorators.cache.cache_page..GET.592d38382.d4cf8427e.en-us.UTC"
If you prefer using a Graphic User Interface (GUI), you can check RedisInsight out.
There are other caching levels you can explore such as per-site cache, and template fragment caching which we won’t cover in this article. Check them out and see what fits best in your case.
Now that we’re are familiar with the workings, let’s take our search view into the next example. For most situations, the results for an specific search value can change - new titles can be added, updated or removed. But most apps like ours do not require real-time updates.
Per-view cache is effective for static or semi-static views that don’t depend on user-specific or dynamic data - like our home page. Sometimes, caching the entire page can be excessive. So, how can we leverage the use of caching for dynamic views like our search page?
The Low-Level Cache API
The low-level cache API provides more fine-grained control over caching. It allow us to cache specific function calls, database queries - yeah, those expensive ones! -, or even fragments of our template.
This approach is suitable when we need more control to cache reusable components or dynamic data and it’s beneficial when dealing with more complex views.
That’s one way how we could apply it to our search view, caching the queryset results and avoiding hitting our database:
# catalogue/views.py
def search(request):
    query = request.GET.get("q", "")
    page_num = request.GET.get("page", 1)

    cache_key = f"search_{query}" if query else "search_all"
    titles = cache.get(key=cache_key)
    if titles is None:
        titles = Title.objects.prefetch_related("genre")
        if query:
            titles = titles.filter(title__icontains=query)
        cache.set(
            key=cache_key,
            value=titles,
            timeout=60 * 15,  # in seconds (900s or 15min)
        )
    page = Paginator(object_list=titles, per_page=5).get_page(page_num)

    return render(request=request, template_name="search.html", context={"page": page})
Let’s break this code down.
cache_key = f"search_{query}" if query else "search_all"
titles = cache.get(key=cache_key)
cache.get() returns None if the object with the specific key doesn’t exist in cache. in this scenario, we query the database and then save the result of the queryset in cache, so the next search with the same query term will fetch results from the cache:
if titles is None:
    titles = Title.objects.prefetch_related("genre")
    if query:
        titles = titles.filter(title__icontains=query)
    cache.set(
        key=cache_key,
        value=titles,
        timeout=60 * 15,  # in seconds (900s or 15min)
    )
For demonstration purposes, we are setting a new timeout of 15 minutes (900 seconds). Keep the timeout value in mind and set according to your use case.
The low-level cache API can store objects in cache with any level of granularity. We can cache any Python objects that can be pickled 🥒 safely: strings, dictionaries and lists of model objects are just a few examples.
Cool! Everything is working on my local machine. How do I deploy my app to Fly.io?
Deploying to Fly.io 🚀
flyctl is the command-line utility provided by Fly.io.
If not installed yet, follow these instructions, sign up and log in to Fly.io.
Before the deployment, we need to create the Redis instance for our production environment.
Upstash Redis
Fly.io offers a fully-managed, Redis-compatible database service. That’s what we are using for this guide. Let’s go ahead and create it:
fly redis create
? Select Organization: django-imdb (django-imdb)
? Choose a Redis database name (leave blank to generate one): django-imdb-redis
? Choose a primary region (can't be changed later) Amsterdam, Netherlands (ams)

Upstash Redis can evict objects when memory is full. This is useful when caching in Redis. This setting can be changed later.
Learn more at https://fly.io/docs/reference/redis/#memory-limits-and-object-eviction-policies
? Would you like to enable eviction? No
Some regions require a paid plan (fra, maa).
See https://fly.io/plans to set up a plan.

? Optionally, choose one or more replica regions (can be changed later):
? Select an Upstash Redis plan Free: 100 MB Max Data Size

Your Upstash Redis database django-imdb-redis is ready.
Apps in the django-imdb org can connect to at redis://default:<your-redis-password>@django-imdb-redis.upstash.io
If you have redis-cli installed, use fly redis connect to connect to your database.
Once provisioned, the primary region can’t be changed, so be alert!
If you plan to deploy in a single region, ensure that your database is deployed in the same region as your application.
Once, created, you can check the list of Redis databases:
fly redis list
NAME                    ORG             PLAN    EVICTION        PRIMARY REGION  READ REGIONS
django-imdb-redis       django-imdb     Free    Disabled        ams
You can also check more detailed information, including the Redis URL in case you didn’t take note:
fly redis status django-imdb-redis
Redis
  ID             = MA8qB9aAn8oLVHZ8qAw
  Name           = django-imdb-redis
  Plan           = Free
  Primary Region = ams
  Read Regions   = None
  Eviction       = Disabled
  Private URL    = redis://default:<your-redis-password>@django-imdb-redis.upstash.io
By connecting a database, you can run Redis commands on redis-cli:
fly redis connect
? Select a database to connect to django-imdb-redis (ams) django-imdb
Proxying local port 16379 to remote [fdaa:1:8519:0:1::3]:6379
127.0.0.1:16379> set foo bar
OK
127.0.0.1:16379> get foo
"bar"
127.0.0.1:16379>
It’s possible to access the Upstash web console by running:
fly redis dashboard <your-org-slug>
Secrets
Now that we got the Redis URL, we can set the environment variables to be used in our production deployment. Starting with REDIS_URL:
fly secrets set REDIS_URL=redis://default:<your-redis-password>@django-imdb-redis.upstash.io
Or wherever your Redis server is running:
fly secrets set REDIS_URL=redis://<your-redis-username>:<your-redis-password>@<your-redis-host>
Everything is prepped! Let’s deploy our application.
fly deploy
It’s time! 🚀 We can run:
fly deploy
...
Running django-imdb release_command: python manage.py migrate
  release_command e2865079c61e08 completed successfully
Updating existing machines in 'django-imdb' with rolling strategy
  [1/2] Machine e784e903fd9078 [app] update finished: success
  [2/2] Machine 5683076c791e28 [app] update finished: success
  Finished deploying

Visit your newly deployed app at https://django-imdb.fly.dev/
Our app is now running and caching data! ⚙️ We can check it out:
fly open
Our app is running on https://django-imdb.fly.dev/ if you want to check the final results!
What’s Next?
There are multiple factors that can affect performance of our Django apps. Caching is just one of the strategies but as any other strategy, it doesn’t fit all cases. We should be aware of what to cache and what not. Remember to carefully consider what data to cache and set appropriate timeouts to ensure freshness of the cached data.
This isn’t a solution, it’s a process! It’s important to monitor 👀 our application and adjust our caching strategy along the way! Explore frequent access data and expensive operations, and start from there.
Remember: not everything is cache-worthy!
Django really flies on Fly.io
You already know Django makes it easier to build better apps. Well now Fly.io makes it easier to _deploy_ those apps and move them closer to your users making it faster for them too!
Deploy a Django app today! →