

This post is about providing some guidance on how to make your simple Django app production-ready and deploying to Fly.io. Django on Fly.io is pretty sweet! Check it out: you can be up and running on Fly.io in just minutes.
The first Django app I ever created was a simple Blog back in 2015, during a Django Girls event in Brazil. Ever since then, I’ve created and deployed many other Django applications but the deployment process was never so easy as it was with Fly.io! I’m super excited to share it with you, let’s go? ✨
What I can find here?
This post has two main sections:
- Setting up: steps on how to make your local Django app ready for going to production on any hosting platform.
- Deploying to Fly.io: deploying your production-ready Django app to Fly.io.
For reference, we'are using Python 3.10.9 and Django 4.1.6.
For this guide, I’ll be updating the Django Girls Tutorial, a server-rendered Blog, to exemplify how we can transform any Django app to be a production-ready application independent of the hosting provider.
Then, we’ll go through the deployment process to Fly.io. If you already have a production-ready app, that’s great! You might want to jump to the “Deploying to Fly.io” section.
With all that said, let’s start at the beginning…
Setting up ⚒️
We assume the initial setup is already done, you have Python installed and a virtual environment created and activated to manage our dependencies. We’ll be using venv for this project:
# Unix/macOS
$ python3 -m venv .venv
$ source .venv/bin/activate
(.venv) $

# Windows
$ python -m venv .venv
$ .venv\Scripts\activate
(.venv) $
From this point on, the commands won’t be displayed with (.venv) $ but we assume you have your Python virtual environment activated.
Database
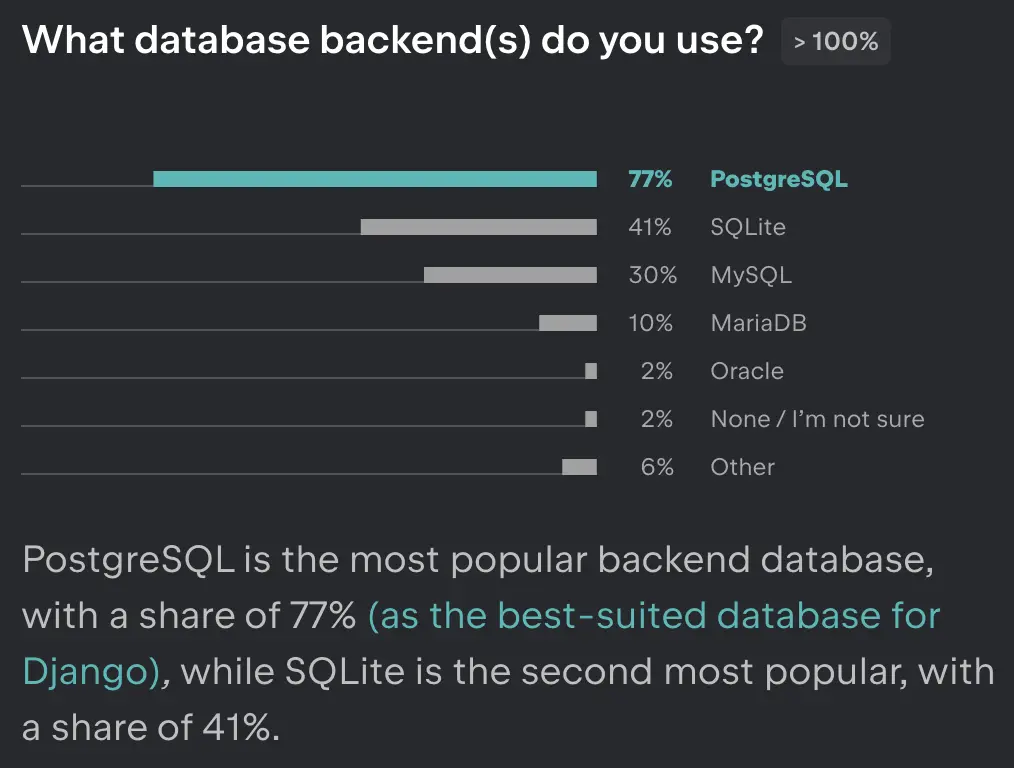
Django uses SQLite by default and this is the easiest way to start once no other packages are required to support this database. However, we want a more scalable database so we decide to use PostgreSQL on production. According to the official documentation, PostgreSQL is the best-suited and supported database for Django and also the most used database by Django developers, as reported by the official annual Django Developers Survey 2021.
The great thing is that Fly.io provides a single-node/high availability PostgreSQL cluster out of the box for us to use. It’s also easy to set it up when configuring your deployment. We’ll go over how in the next steps.
For now, make sure to download and install PostgreSQL. You can go ahead and create your local database. For my app, the database is called blog.
The config updates required to change our database are explained in the next steps.
Environment Variables
First of all, we want to store the configuration separate from our code and load them at runtime. This allow us to keep one settings.py file and still have multiple environments (i.e. local/staging/production).
One popular options is the usage of the environs package. Another option is the python-decouple package, which was originally designed for Django, but it’s recommended to be used with dj-database-url to configure the database. For this guide we’ll use django-environ to configure our Django application, which allows us to use the 12factor approach.
Make sure your Python virtual environment is activated and let’s install the django-environ:
python -m pip install django-environ==0.9.0
In our settings.py file, we can define the casting and default values for specific variables, for example, setting DEBUG to False by default.
# settings.py
from pathlib import Path
import environ  # <-- Updated!

env = environ.Env(  # <-- Updated!
    # set casting, default value
    DEBUG=(bool, False),
)
django-environ (and also the other mentioned packages) can take environment variables from the .env file. Go ahead and create this file in your root directory and also don’t forget to add it to your .gitignore in case you are using Git for version control (you should!). We don’t want those variables to be public, this will be used for the local environment and be set separately in our production environment.
Make sure you are taking the environment variables from your .env file:
# settings.py
# Build paths inside the project like this: BASE_DIR / 'subdir'.
BASE_DIR = Path(__file__).resolve().parent.parent

# Take environment variables from .env file
environ.Env.read_env(BASE_DIR / '.env')  # <-- Updated!
We can now set the specific environment variables in the .env file:
# .env
SECRET_KEY=3ohiu^m1su%906rf#mws)xt=1u#!xdj+l_ahdh0r#$(k_=e7lb
DEBUG=True
Check that there are no quotations around strings neither spaces around the =.
Coming back to our settings.py, we can then read SECRET_KEY and DEBUG from our environment variables:
# settings.py
# SECURITY WARNING: keep the secret key used in production secret!
SECRET_KEY = env('SECRET_KEY')  # <-- Updated!

# SECURITY WARNING: don't run with debug turned on in production!
DEBUG = env('DEBUG')  # <-- Updated!
The last environment variable to be set is the DATABASE_URL. env.db() will read from the DATABASE_URL variable.
# settings.py
DATABASES = {
    # read os.environ['DATABASE_URL']
    'default': env.db()  # <-- Updated!
}
Here we can define our local database, adding it to the .env file:
# .env
SECRET_KEY=3ohiu^m1su%906rf#mws)xt=1u#!xdj+l_ahdh0r#$(k_=e7lb
DEBUG=True
DATABASE_URL=postgres://postgres:postgres@localhost:5432/blog  # <-- Updated!
If you prefer to keep using SQLite on your local environment, that’s where you should specify:
# .env
SECRET_KEY=3ohiu^m1su%906rf#mws)xt=1u#!xdj+l_ahdh0r#$(k_=e7lb
DEBUG=True
DATABASE_URL=sqlite:///db.sqlite  # <-- Updated!
⚠️ However, it’s highly recommended to use the same database for development and production to avoid inconsistent behavior between different environments.
Psycopg
To interact with our Postgres database, we’ll use the most popular PostgreSQL database adapter for Python, the psycopg package. With your virtual environment activated, go ahead and installed it:
python -m pip install psycopg2==2.9.5
⚠️ For production, it’s advised to use the source distribution instead of the binary package (psycopg2-binary).
Gunicorn
When starting a Django project (with startproject management command), we get a minimal WSGI configuration set up out of the box. However, this default webserver is not recommended for production. Gunicorn (Green Unicorn) is a Python WSGI HTTP Server for Unix and one of the easiest to start with. It can be installed using pip:
python -m pip install gunicorn==20.1.0
Static Files
Handling static files in production is a bit more complex than in development. One of the easiest and most popular ways to serve our static files in production is using the WhiteNoise package, which serves them directly from our WSGI Server (Gunicorn). Install it with:
python -m pip install whitenoise==6.3.0
A few changes to our settings.py are necessary.
- Add the WhiteNoise to the
MIDDLEWARElist right after theSecurityMiddleware. - Set the
STATIC_ROOTto the directory where thecollectstaticmanagement command will collect the static files for deployment. - (Optional) Set
STATICFILES_STORAGEtoCompressedManifestStaticFilesStorageto have compression and caching support.
# settings.py
MIDDLEWARE = [
    'django.middleware.security.SecurityMiddleware',
    'whitenoise.middleware.WhiteNoiseMiddleware',  # <-- Updated!
    ...
]

...
STATIC_ROOT = BASE_DIR / 'staticfiles'  # <-- Updated!

STATICFILES_STORAGE = 'whitenoise.storage.CompressedManifestStaticFilesStorage'  # <-- Updated!
It’s recommended to use WhiteNoise also in development to keep consistent behavior between development and production environments. The easiest way to do that is to add whitenoise.runserver_nostatic to our INSTALLED_APPS right before the built-in staticfiles app:
# settings.py
INSTALLED_APPS = [
    ...
    'whitenoise.runserver_nostatic',  # <-- Updated!
    'django.contrib.staticfiles',
    ...
]
ALLOWED_HOSTS and CSRF_TRUSTED_ORIGINS
As a security measure, we should set in ALLOWED_HOSTS, a list of host/domain names that our Django website can serve. For development we might include localhost and 127.0.0.1 and for our production we can start with .fly.dev (or the provider’s subdomain you chose) and update for the dedicated URL once your app is deployed to the hosting platform.
CSRF_TRUSTED_ORIGINS should also be defined with a list of origins to perform unsafe requests (e.g. POST). We can set the subdomain https://*.fly.dev (or the provider’s subdomain you chose) until our deployment is done and we have the proper domain for our website.
# settings.py
ALLOWED_HOSTS = ['localhost', '127.0.0.1', '.fly.dev']  # <-- Updated!

CSRF_TRUSTED_ORIGINS = ['https://*.fly.dev']  # <-- Updated!
Installed packages
Make sure you have all necessary installed packages tracked and listed in your requirements.txt by running:
pip freeze > requirements.txt
This command generates the requirements.txt file if it doesn’t exist.
# requirements.txt
asgiref==3.6.0
Django==4.1.6
django-environ==0.9.0
gunicorn==20.1.0
psycopg2==2.9.5
sqlparse==0.4.3
whitenoise==6.3.0
With our Django application prepped and ready for production hosting, we’ll take the next step and deploy our app to Fly.io!
Deploying to Fly.io 🚀
flyctl is the command-line utility provided by Fly.io.
If not installed yet, follow these instructions, sign up and log in to Fly.io.
Launching our App
Fly.io allows us to deploy our Django app as long as it’s packaged in a Docker image. However, we don’t need to define our Dockerfile manually. Fly.io detects our Django app and automatically generates all the necessary files for our deployment. Those are:
Dockerfilecontain commands to build our image..dockerignorelist of files or directories Docker will ignore during the build process.fly.tomlconfiguration for deployment on Fly.io.
All of those files are templates for a simple Django app and can be modified according to your needs.
Before deploying our app, first we need to configure and launch our app to Fly.io by using the flyctl command fly launch. During the process, we will:
- Choose an app name: this will be your dedicated fly.dev subdomain.
- Select the organization: you can create a new organization or deploy to your
personalaccount (connect to your Fly account, visible only to you). - Choose the region for deployment: Fly.io initially suggests the closest to you, you can choose another region if you prefer.
- Set up a Postgres database cluster:
flyctloffers a single node “Development” config that is designed so we can turn it into a high-availability cluster by adding a second instance in the same region. Fly Postgres is a regular app you deploy on Fly.io, not a managed database.
This is what it looks like when we run fly launch:
fly launch
Creating app in ../flyio/katias-blog
Scanning source code
Detected a Django app
? Choose an app name (leave blank to generate one): katias-blog
? Select Organization: Kátia Nakamura (personal)
Some regions require a paid plan (bom, fra, maa).
See https://fly.io/plans to set up a plan.

? Choose a region for deployment: Frankfurt, Germany (fra)
App will use ‘fra’ region as primary

Created app ‘katias-blog‘ in organization ‘personal‘
Admin URL: https://fly.io/apps/katias-blog
Hostname: katias-blog.fly.dev
Set secrets on katias-blog: SECRET_KEY  <-- # SECRET_KEY is set here!
? Would you like to set up a Postgresql database now? Yes
? Select configuration: Development - Single node, 1x shared CPU, 256MB RAM, 1GB disk
Creating postgres cluster in organization personal
Creating app...
Setting secrets on app katias-blog-db...
Provisioning 1 of 1 machines with image flyio/postgres:14.6
Waiting for machine to start...
Machine 32874445c04218 is created
==> Monitoring health checks
  Waiting for 32874445c04218 to become healthy (started, 3/3)

Postgres cluster katias-blog-db created
  Username:    postgres
  Password:    <your-internal-postgres-password>
  Hostname:    katias-blog-db.internal
  Proxy port:  5432
  Postgres port:  5433
  Connection string: postgres://postgres:<your-internal-postgres-password>@katias-blog-db.internal:5432

Save your credentials in a secure place -- you won't be able to see them again!

Connect to postgres
Any app within the Kátia Nakamura organization can connect to this Postgres using the above connection string

Now that you've set up Postgres, here's what you need to understand: https://fly.io/docs/postgres/getting-started/what-you-should-know/
Checking for existing attachments
Registering attachment
Creating database
Creating user

Postgres cluster katias-blog-db is now attached to katias-blog
The following secret was added to katias-blog:  <-- # DATABASE_URL is set here!
  DATABASE_URL=postgres://katias_blog:<your-postgres-password>@top2.nearest.of.katias-blog-db.internal:5432/katias_blog?sslmode=disable
Postgres cluster katias-blog-db is now attached to katias-blog
? Would you like to set up an Upstash Redis database now? No
Creating database migrations
Wrote config file fly.toml

[INFO] Python 3.10.12 was detected. ‘python:3.10-slim-buster’ image will be set in the Dockerfile.

Validating .../flyio/katias-blog/fly.toml
Platform: machines
✓ Configuration is valid

‘STATIC_ROOT’ setting was detected in website/settings.py’!
Static files will be collected during build time by running ‘python manage.py collectstatic’ on Dockerfile.

Your Django app is ready to deploy!

For detailed documentation, see https://fly.dev/docs/django/
During the process, the SECRET_KEY and DATABASE_URL will be automatically set to be used on your production deployment. Those are the only ones we need at the moment but if you have any other secrets, check here how to set them. You can also list all your application secret names:
fly secrets list
NAME            DIGEST                  CREATED AT
DATABASE_URL    cc999c17fa021988        2023-02-07T19:48:55Z
SECRET_KEY      e0a6dbbd078004f7        2023-02-07T19:47:33Z
fly launch sets up a running app, creating the necessary files: Dockerfile, .dockerignore and fly.toml.
During the fly launch, your wsgi file should have been detected automatically. If not, don’t forget to replace demo.wsgi in your Dockerfile with your Django project’s name:
# Dockefile
...
# replace demo.wsgi with <project_name>.wsgi
CMD ["gunicorn", "--bind", ":8000", "--workers", "2", "website.wsgi"]  # <-- Updated!
For production, it’s advised to use psycopg2 package (instead of the psycopg2-binary) built from source but it requires external packages to work properly: libpq-dev is a very light package and provides all requirements for building psycopg2 and gcc is a compiler used to install psycopg2. Let’s install them:
# Dockerfile
...
WORKDIR /code

# install psycopg2 dependencies
RUN apt-get update && apt-get install -y \
    libpq-dev \
    gcc \
    && rm -rf /var/lib/apt/lists/*  # <-- Updated!

COPY requirements.txt /tmp/requirements.txt
...
For security reasons, we’ll add .env to our .dockerignore file - so Docker doesn’t include our secrets during the build process.
# .dockerignore
fly.toml
.git/
*.sqlite3
.env  # <-- Updated!
This means the environment variables (i.e. SECRET_KEY) stored in the .env file won’t be available at build time, neither the secrets automatically set by Fly.io on your application during the fly launch process.
We have two options here:
Set a default SECRET_KEY using the get_random_secret_key function provided by Django that will be used at build time. At runtime, we’ll use the SECRET_KEY set by Fly.io, i.e. the default value only applies to the build process.
# settings.py
from django.core.management.utils import get_random_secret_key
...
# SECURITY WARNING: keep the secret key used in production secret!
SECRET_KEY = env.str('SECRET_KEY', default=get_random_secret_key())  # <-- Updated!
Another option is to set a “non-secret” dummy SECRET_KEY on Dockerfile only for building purposes:
# Dockerfile

# Set SECRET_KEY for building purposes
ENV SECRET_KEY "non-secret-key-for-building-purposes"  # <-- Updated!
RUN python manage.py collectstatic --noinput
This keeps our environment variables safe and makes sure they will be set for the different environments.
In case your app contains static files such as images, CSS or Javascript files, we need to collect all the static files into a single location and make them accessible to be served in production. This process needs to happen at build time (so they are persisted when building our image) by running collectstatic command on Dockerfile.
If you noticed a similar output:
...
‘STATIC_ROOT’ setting was detected in website/settings.py’!
Static files will be collected during build time by running ‘python manage.py collectstatic’ on Dockerfile.
your Dockerfile was already updated to run the collectstatic command.
On the other hand, if STATIC_ROOT wasn’t detected automatically in your settings.py file and your app contains static files to be served, make sure to collect them during the build time by adding this step to the Dockerfile:
# Dockerfile
...
RUN python manage.py collectstatic --noinput
Now that we have set our app name, we can update our settings.py with the dedicated subdomain we chose (or that was generated for us):
# settings.py
ALLOWED_HOSTS = ['localhost', '127.0.0.1', 'katias-blog.fly.dev']  # <-- Updated!

CSRF_TRUSTED_ORIGINS = ['https://katias-blog.fly.dev']  # <-- Updated!
Finally, in the [[statics]] section on fly.toml file, we define the guest_path, which is the path inside our container where the files will be served directly to the users, bypassing our web server. In the settings.py we defined the STATIC_ROOT:
# settings.py
STATIC_ROOT = BASE_DIR / 'staticfiles'  # <-- Updated!
The Dockerfile generated by fly launch defines our WORKDIR as /code. That’s where our static files will be collected: /code/staticfiles. Let’s go ahead and update our fly.toml to serve those files directly:
# fly.toml
...
[[statics]]
  guest_path = "/code/staticfiles"  # <-- Updated!
  url_prefix = "/static"
Deploying our App
Great! All ready and it’s finally time to deploy our app:
fly deploy
...
  Finished deploying

Visit your newly deployed app at https://katias-blog.fly.dev/
Our app is now up and running! ⚙️ Try:
fly open
💾 By the way, you can find the example code used in this guide here.
YAY! 🎉 We just deployed our Django app to production! How great is that?
What’s next?
Make sure to check the official deployment checklist provided by Django docs with more details on specific settings we might not have covered in this guide. You can also check the Fly.io Docs - we’re currently working on the Django on Fly.io docs!
If you have any question or comments, reach out on the Fly.io Community. That’s a great place to share knowledge, help and get help!
📢 Now, tell me… What are your go-to packages 📦 to make your Django app production-ready?
Django really flies on Fly.io
You already know Django makes it easier to build better apps. Well now Fly.io makes it easier to _deploy_ those apps and move them closer to your users making it faster for them too!
Deploy a Django app today! →