
We recently added a guide to Continuous Deployment with Fly and GitHub Actions to the Fly documentation and almost immediately, I was asked if we could do the same for GitLab. Of course! Better still, let’s make this an example for other platforms.
Starting with Continuous Deployment to Fly
To deploy to Fly you essentially need four things
- The application you want to deploy.
- A runnable copy of flyctl.
- A fly.toml file.
- Your Fly API Token.
For this example, we’ll deploy hellofly, our small Go application which says hello - GitLab can import the repository for you.
On GitLab, the CI/CD system takes care of the first requirement for you. The CI/CD process is all driven by a .gitlab-ci.yml file. Lets walk through the .gitlab-ci.yml I used to deploy from GitLab to Fly:
default:
  image: golang:1.13
The default section does the essential preparation. It selects an image to use for the virtual machine - or “Runner” to use GitLab terminology - that will be used run the CI/CD process. A simple option is to use the same image as you use in the Fly app - our example is a Go app so we use the golang:1.13 image, but you could use any image which has sufficient toolchain components to build it.
With Fly, the deployment process runs in its own container, locally or remotely. That means only a minimal set of the components from a typical toolchain is needed to build the application.
Once you have selected your image and the deploy process begins, GitLab’s CI/CD engine will automatically copy the contents of the repository over to the Runner image. And that’s requirement one met.
Next up is getting a runnable copy of flyctl into our Runner. For GitLab, we want to do this before it runs our deployment scripts, so we’ll add it to the default section as the before_script.
  before_script:
    - apt-get update -qq && apt-get install -y curl
    - curl -L https://fly.io/install.sh | sh
This does two things. It installs curl from the package repository (after making sure its indexes are up to date). Then it uses curl to download the flyctl install script and runs that. Using the script should ensure that the right version of flyctl is installed. This covers requirement two.
Now, we are going to quickly skip to the end, as the rest of the .gitlab-ci.yml is just this:
deploy:
  script:
    - flyctl deploy
That will run the flyctl deploy command. That will then build and deploy the fly application. If we committed .gitlab-ci.yml at this point though, it would fail as it lacks two things.
Configuring for Fly
The things needed are a fly.toml file and an auth token. The fly.toml file will need to be created using fly init so you’ll likely do this locally and then add the file to the repository so it will be there for flyctl to find when it’s run in the deployment container. Add that to the repository (do remove the filename from the .gitignore file first) and that’s requirement three handled.
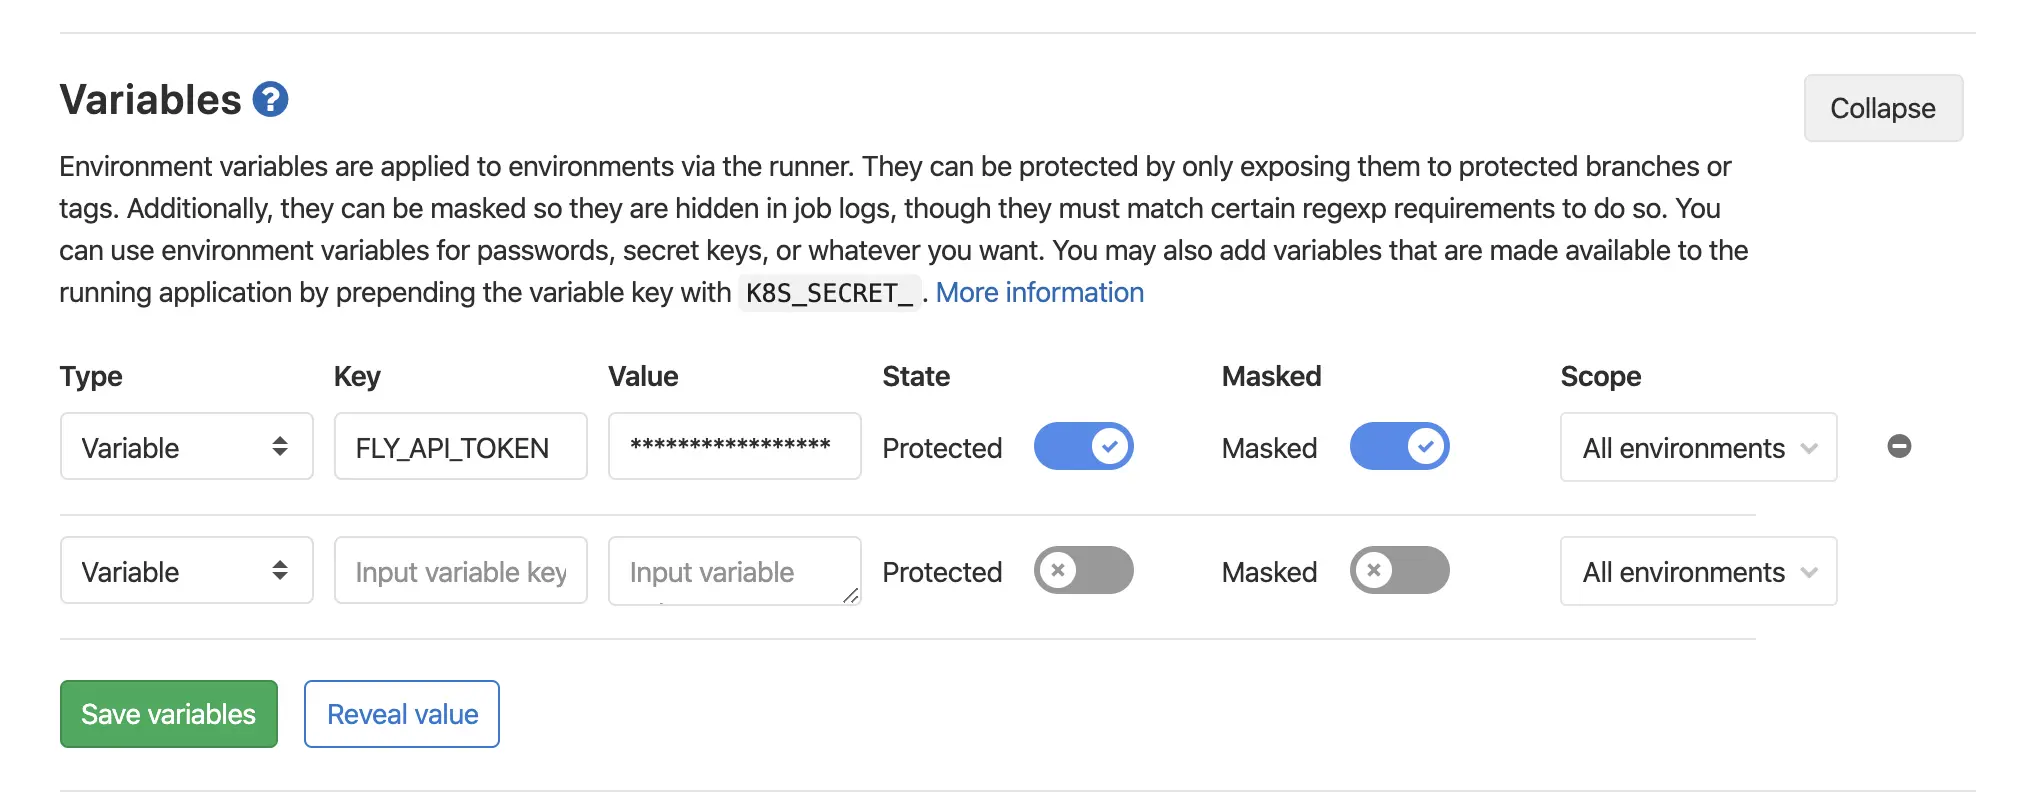
For the API token, you’ll want to use flyctl again, this time to reuse the token you were issued when you logged in. Run flyctl auth token and it will display the API token your session is currently using. Now you’ll need to turn this token value into the value of the FLY_API_TOKEN environment variable inside the deployment container. For GitLab, you’ll need to go to the repositories settings, select CI/CD, then expand the Variables section. Create a new variable called FLY_API_TOKEN and copy the auth token value into the Value field. Then turn on the Protected and Masked switches so that it is not leaked through the logs. Save the new variable. It should look like this:
Ready to Deploy
Now we are ready to commit the .gitlab-ci.yml to the repository and install our CD pipeline. Here’s the whole file:
default:
  image: golang:1.13
  before_script:
    - apt-get update -qq && apt-get install -y curl
    - curl -L https://fly.io/install.sh | sh

deploy:
  script:
    - flyctl deploy
Commit and push that up to GitLab and the deployment process will begin almost immediately. On the GitLab web UI, head to CI/CD and then Jobs and you should see the deployment job running. Click on the running badge to watch its progress.
Job’s Done
And that’s pretty much it for deploying with GitLab’s CI/CD system. There’s a lot more functionality in there allowing you to structure the pipeline as you want and trigger different jobs at different times. We’ve just touched on the simple case of wanting to deploy when an update is pushed. The principles here are applicable to most CI/CD platforms and should let you incorporate Fly into your workflows today.