

In this post we demonstrate how to use Fly Machines to run Serverless Functions using Django custom commands. Django on Fly.io is pretty sweet! Check it out: you can be up and running on Fly.io in just minutes.
In the Serverless model, despite the name, there are still servers under the hood.
Serverless is a broader concept that encompasses various cloud computing services where we don’t manage the infrastructure. Instead, it’s abstracted away from us - and we like that! The cloud provider executes the code and shuts down the resources when they are no longer needed - aka “scale to zero”. That lets us focus on the application code instead of managing the infrastructure. That’s the case if you are running your Django app on Fly.io, more specifically on Machines Platform and your app is configured to stop and start automatically.
In this post, we will use the power of Fly Machines to run a long-running task as a serverless function using Django custom commands.
Let’s dive right in.
Serverless Functions 🚀
Serverless functions - aka Function-as-a-Service (FaaS) - are a key component of Serverless architecture. The cloud provider dynamically manages the allocation and execution of server resources.
But here is the catch.
Those edge function services from your favorite cloud provider usually require managing functions in a separate manner. Meaning, a lot of additional configuration - yes, I’m talking to you “permissions and policies”. On top of that, functions are often tied to specific cloud providers, which can make porting to other platforms difficult.
Like any other technology, serverless functions have other disadvantages like:
- Cold Starts: the first request after idle time usually has a higher latency due to the time it takes to initialize a function instance.
- Statelessness: maintaining application state can be challenging and often requires external services.
- Limited Execution Time: most platforms impose a maximum execution time for each function invocation.
But they also have their advantages:
- Cost Efficiency: we only pay for the time our functions are running, not for the idle server time.
- No Server Management: there is no need to provision or maintain servers.
- Scalability: automatically scales with the application’s needs.
- Quick Deployments: we can deploy and update functions more rapidly compared to traditional applications.
Those are valid points for most of the cloud providers.
The question is: how is the Django community using Serverless Functions nowadays?
Serverless Functions in Django
When we talk about integrating Serverless Functions into our Django app, we are typically discussing about one of the two scenarios:
- Replacing Traditional Server Infrastructure: the entire Django application, or significant parts of it, are hosted on a serverless platform. This approach can be complex due to the stateless nature of serverless functions and the typically stateful nature of web applications like those built with Django.
- Hybrid Approach with Serverless Components: Certain components or aspects of the Django application are offloaded to serverless functions. Common use cases include handling file uploads, sending emails, or performing other resource-intensive tasks. This approach allows for scaling those parts of the application that require it without needing to scale the entire infrastructure.
One popular package used in the 1st scenario is Zappa. Zappa simplifies the deployment of Python web applications, like those built in Django, on AWS Lambda and API Gateway. In a nutshell, Zappa packages our Django app, along with its dependencies, into a format compatible with AWS Lambda. Zappa then deploys this package, setting up API Gateway to handle web requests and route them to AWS Lambda.
Yet, in this post, we focus on the 2nd scenario and demonstrate how we can leverage Fly Machines to offload the work to serverless functions using Django commands.
But first, do you know about Fly Machines?
Fly Machines 🤖
Fly Machines - sometimes mentioned as just Machines around here - are lightweight VMs based on Firecracker that can boot instances in about 300ms. Machines are the building blocks for the V2 Fly Apps Platform.
Machines deployed by Fly Launch are managed as a group and run from the same image and configuration.
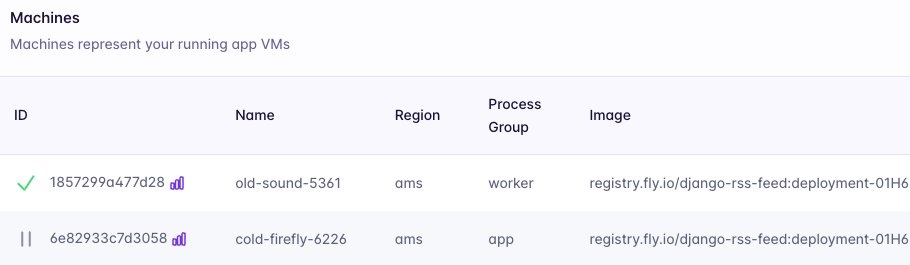
In a previous article, we deployed our Django app and Celery worker processes on Fly Machines running multiple process groups in an App:
This implementation works as expected. Our web app stops when there is no traffic, as a result of the following configuration:
# fly.toml

[http_service]
  ...
  auto_stop_machines = true
  auto_start_machines = true
  min_machines_running = 0
  processes = ["app"]
And our Celery worker is running in its own process with dedicated resources and possibility of scaling independently. Essentially, our worker stays active even when no tasks are being executed.
But what if we want to start/stop other processes the same way we do for our web server? You might ask.
Well, unfortunately this is not a trivial task since this feature relies on an HTTP service - it automatically starts and stops existing Machines based on incoming requests. This is also true if we want to spin up any other non-HTTP process alongside our app.
So, how can we leverage the “scale to zero” feature of Fly.io to spin up processes to be used in our Django app?
Fly Machines API to the Rescue
We got you covered!
Fly Machines provides a REST API to interact with our Machines. That’s exactly what we need! With that, we have more control over our Machines.
The easiest and recommended way to connect to the Machines API is to use public API https://api.machines.dev/.
It’s also possible to use the private Machines API over a Wireguard VPN. This requires more setup.
For now, we will stick to the public Machines API.
Django Commands as Serverless Functions ✨
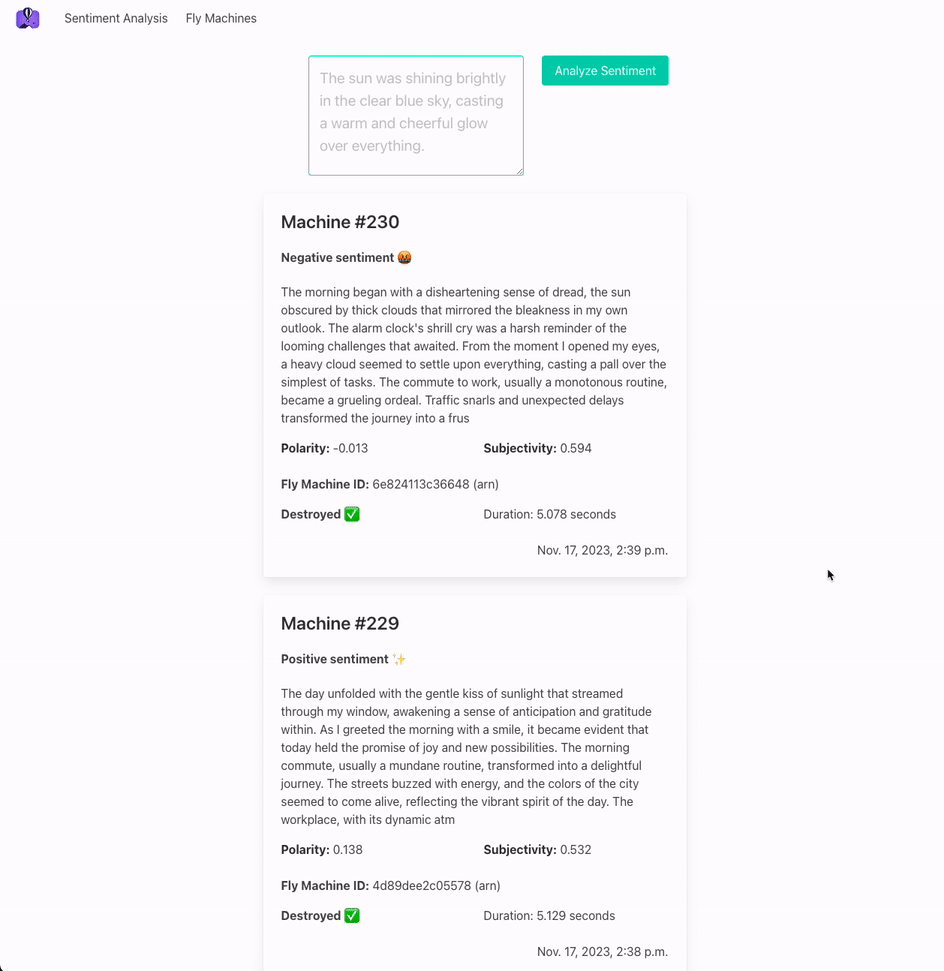
For the purpose of this post, we are building a simple app that analyzes the sentiment of a given English text, returning the polarity and subjectivity values and based on that if the text has a positive, negative or neutral sentiment:

These are the steps we want to achieve:
- Client calls our API
POST /analyze-sentiment; - Our view calls
FlyMachine.run(<cmd>); FlyMachine.run(<cmd>)calls Machines APIPOST /apps/<app_name>/machines, spins up a new Machine (e.g.Machine #1) by running the specified Django command, for our example,python manage.py sentiment <text_id> <fly_machine_id>;Machine #1start its own process, executes the function (sentimentcommand) and Machine is then destroyed when the process is complete;- Client calls our API
GET /get-analysis/<machine_id>to get the analysis info; - Our view calls
FlyMachine.get_or_update_state(); FlyMachine.get_or_update_state()calls Machines APIGET /apps/<app_name>/machines/<machine_id>(if Machine is not destroyed yet) to get the state and update our machine object.
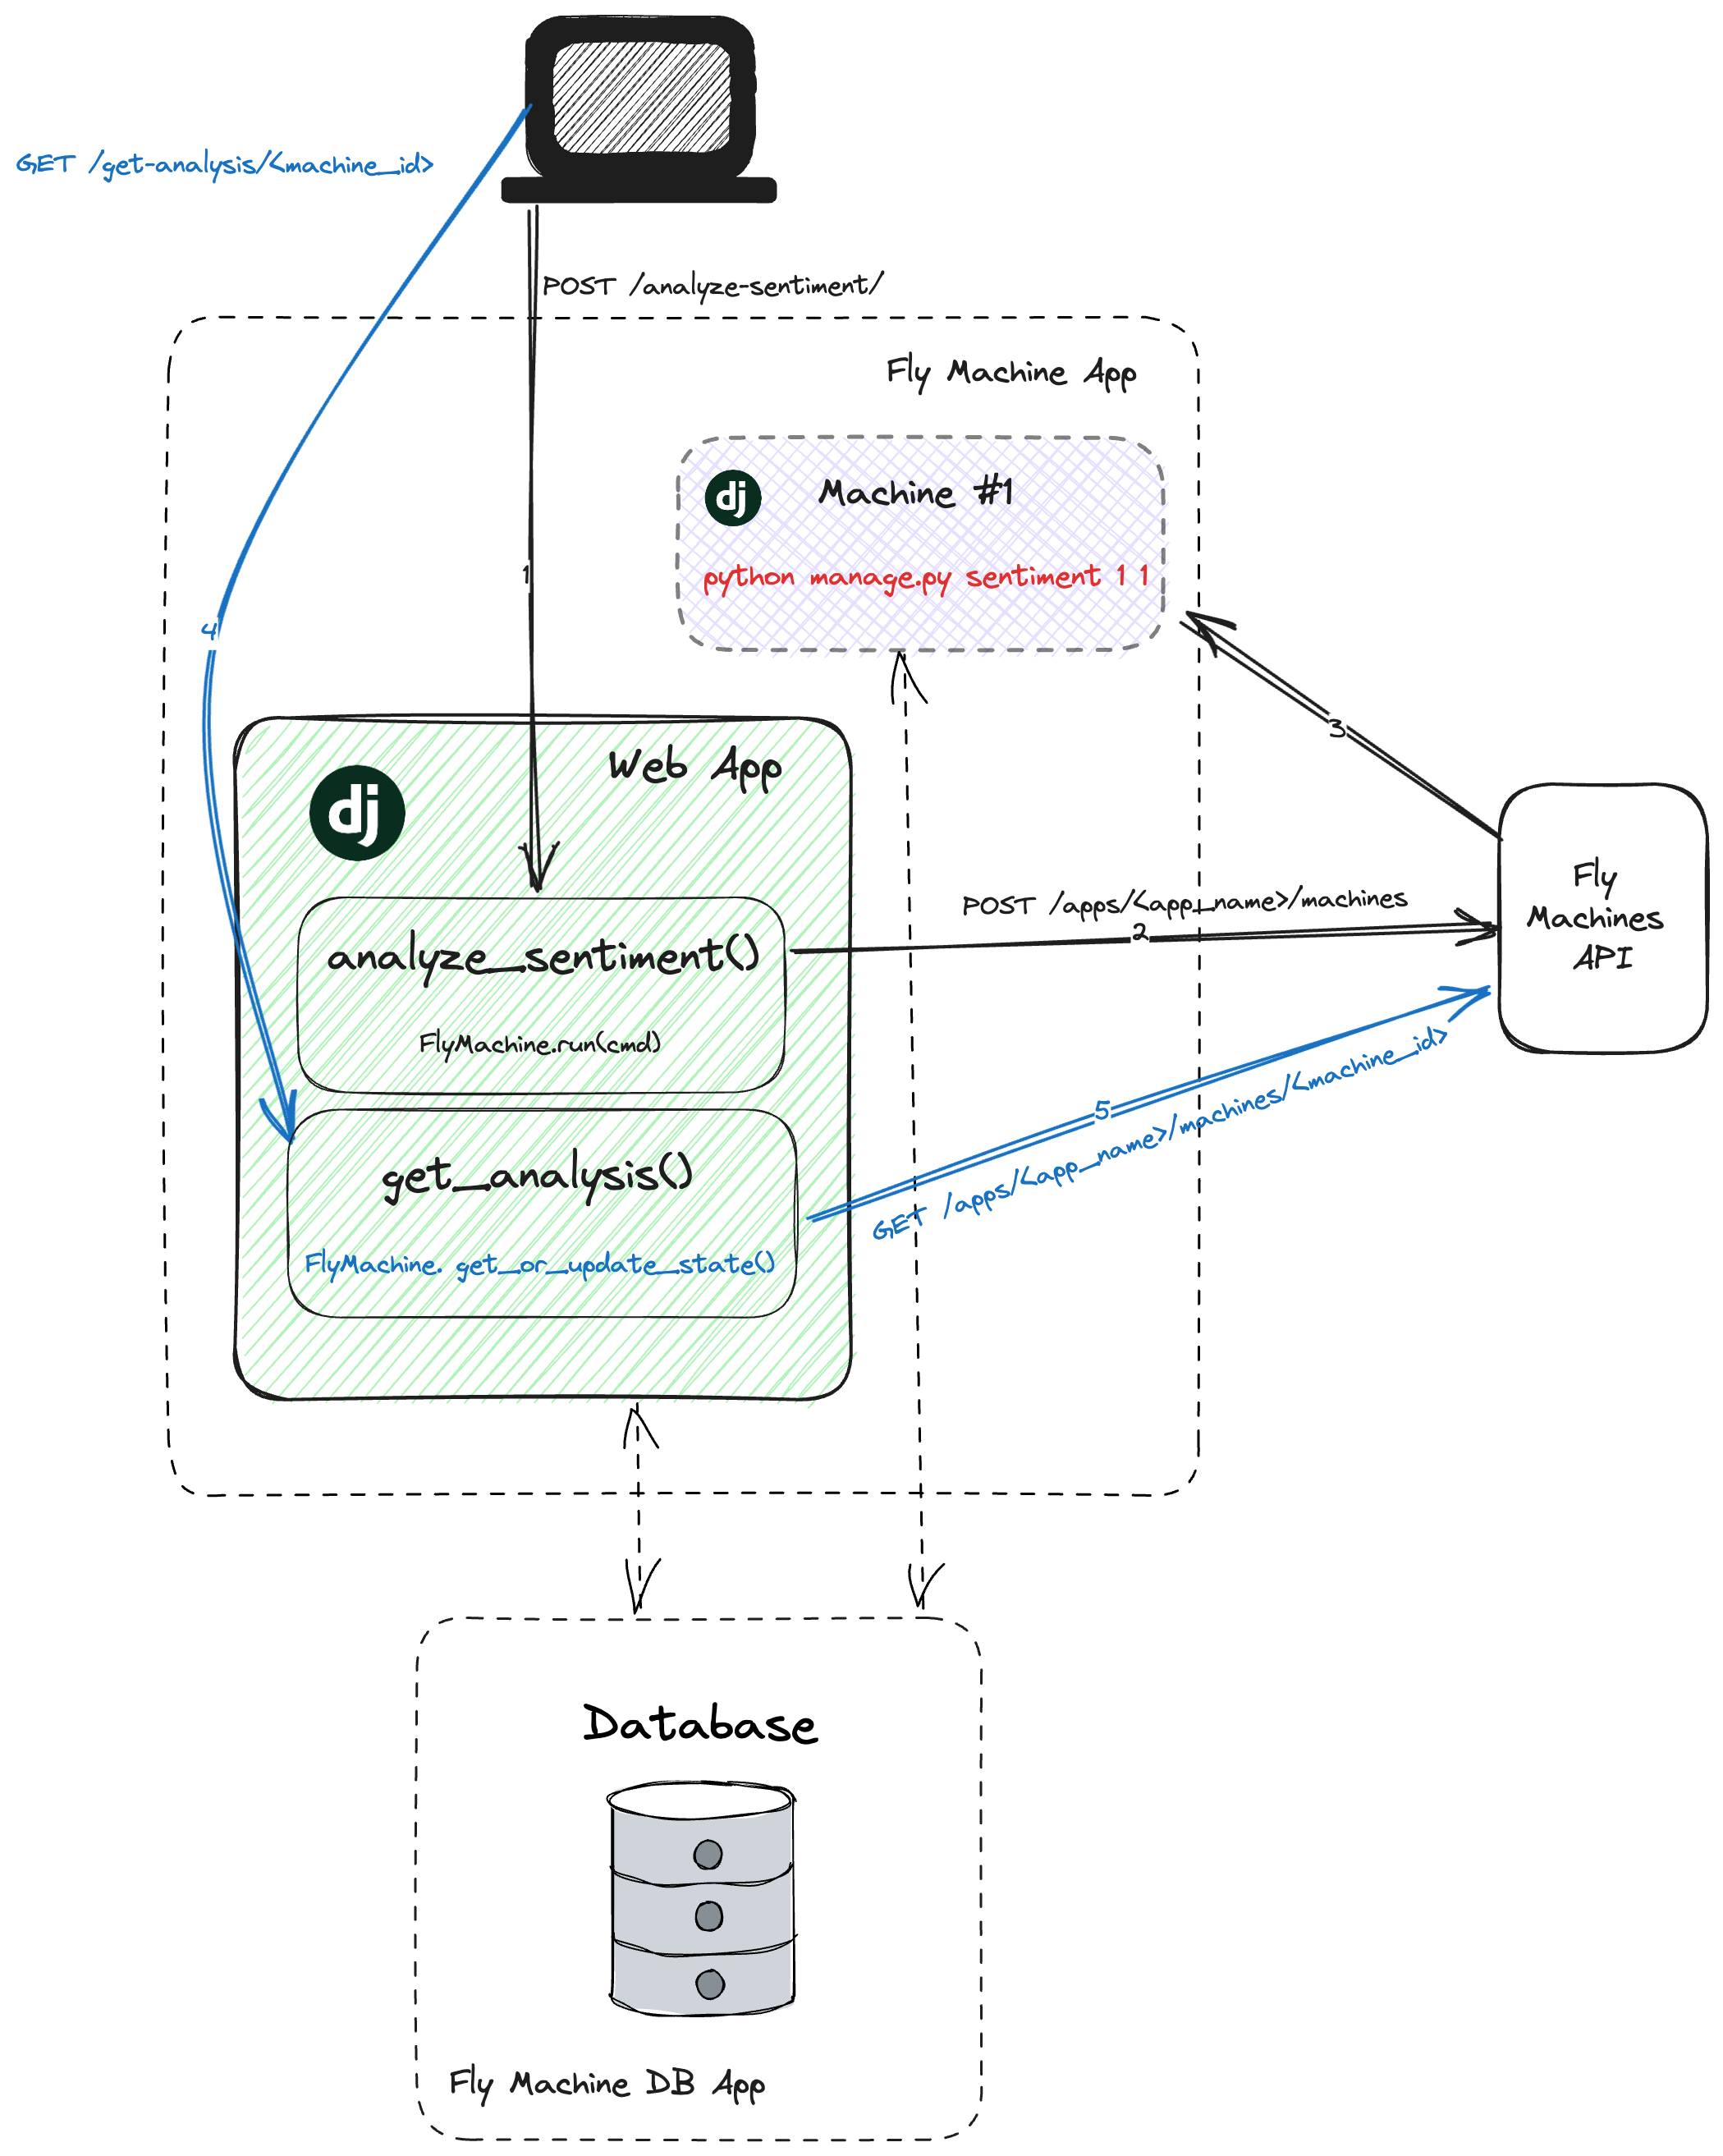
Note that when creating a new machine, the only required parameter is the Docker image to run. When our app is deployed on Fly.io, information about the runtime environment is available to us. One of them is the FLY_IMAGE_REF which is the Docker image running in the current container. This is particularly interesting for us since we want to use the same image to create a Machine to scale up-or-down.
Let’s check how we can implement it.
Fly Machine via Machines API
We assume you’ve already set up your Fly.io account, so go ahead and sign in. If you haven’t done that yet, you can sign up to Fly.io.
We need an access token (FLY_API_TOKEN) in order to access the Machines API. For local development, your can access the token used by flyctl using:
fly auth token
It’s also possible to create a new auth token in your Fly.io dashboard.
Before our app is deployed to Fly.io, we need to make the token available as a secret:
fly secrets set FLY_API_TOKEN=$(fly auth token)
or
fly secrets set FLY_API_TOKEN=<your_newly_created_access_token>
Machines App
Our project relies on a Django machines app.
The machines app has all the logic around Fly Machines and where all the Machines’ information lives.
We start by defining the FlyMachine model:
# machines/models.py

class FlyMachine(models.Model):
    class MachineState(models.IntegerChoices):
        UNCREATED = 0, _("uncreated")
        CREATED = 1, _("created")
        STARTING = 2, _("starting")
        STARTED = 3, _("started")
        STOPPING = 4, _("stopping")
        STOPPED = 5, _("stopped")
        REPLACING = 6, _("replacing")
        DESTROYING = 7, _("destroying")
        DESTROYED = 8, _("destroyed")

    machine_id = models.CharField(
        max_length=20, null=True, blank=True
    )
    instance_id = models.CharField(
        max_length=30, null=True, blank=True
    )
    app_name = models.CharField(max_length=100)
    image_ref = models.CharField(max_length=80)
    region_id = models.CharField(
        max_length=3, null=True, blank=True
    )
    state = models.IntegerField(
        choices=MachineState.choices,
        default=MachineState.UNCREATED,
    )
    created_at = models.DateTimeField(auto_now_add=True)

    class Meta:
        ordering = ['-created_at']

    def __str__(self):
        return f"Machine #{self.id}"
The app_name and image_ref are the only required fields. app_name is the unique application name on Fly.io (e.g. fly-machines-django) and it’s necessary to define in which Fly App the Machine will be created at. The image_ref is the Docker image used to boot our machine.
We implement run() and get_or_update_state() methods in FlyMachine:
# machines/models.py

class FlyMachine(models.Model):
    ...

    def run(self, cmd):
        try:
            data = FlyMachinesAPIService.create_machine(
                self.app_name, self.image_ref, cmd
            )
        except requests.exceptions.HTTPError as err:
            logger.error("HTTPError: %s", err)
            raise
        self.result = data
        self.machine_id = data.get("id")
        self.instance_id = data.get("instance_id")
        self.region_id = data.get("region")
        machine_state = data.get("events")[0][
            "status"
        ]  # last event's status
        self.state = next(
            state
            for state in FlyMachine.MachineState
            if state.label == machine_state
        )
        self.save()

    def get_or_update_state(self):
        if self.state != FlyMachine.MachineState.DESTROYED:
            try:
                data = FlyMachinesAPIService.get_machine(
                    self.app_name, self.machine_id
                )
            except requests.exceptions.HTTPError as err:
                logger.error("HTTP error occurred: %s", err)
                raise
            self.result = data
            machine_state = data.get("events")[0][
                "status"
            ]  # last event's status
            self.state = next(
                state
                for state in FlyMachine.MachineState
                if state.label == machine_state
            )
            self.save()
        return self.state
The run() method calls Machines API to create a new Machine and save the appropriate results into our FlyMachine instance.
The get_or_update_state() method will be responsible to fetch and update the latest state of the Machine.
For our example, the FlyMachinesAPIService class handles the HTTP request logic:
# machines/services.py

FLY_API_HOSTNAME = os.environ.get("FLY_API_HOSTNAME", "https://api.machines.dev")
FLY_API_TOKEN = os.environ.get("FLY_API_TOKEN")

headers = {
    "Authorization": f"Bearer {FLY_API_TOKEN}",
    "Content-Type": "application/json",
}


class FlyMachinesAPIService:
    @staticmethod
    def create_machine(app_name, image_ref, cmd):
        config = {
            "config": {
                "image": image_ref,
                "auto_destroy": True,
                "processes": [{"cmd": cmd.split(" ")}],
            }
        }
        url = f"{FLY_API_HOSTNAME}/v1/apps/{app_name}/machines"
        response = requests.post(
            url, headers=headers, json=config
        )
        if response.ok:
            return response.json()
        else:
            response.raise_for_status()

    @staticmethod
    def get_machine(app_name, machine_id):
        url = f"{FLY_API_HOSTNAME}/v1/apps/{app_name}/machines/{machine_id}"
        response = requests.get(url, headers=headers)
        if response.ok:
            return response.json()
        else:
            response.raise_for_status()
All requests to Machines API must include the Fly API Token in the HTTP Header by adding the Authorization to the headers:
Authorization: Bearer <FLY_API_TOKEN>
When a FlyMachine instance is created:
machine = FlyMachine.objects.create(
    app_name=FLY_APP_NAME,
    image_ref=FLY_IMAGE_REF,
)
a unique id is assigned to it. At this point we have all the necessary information to create a new Machine: app_name, image_ref and cmd. cmd is then passed as a parameter to the run method:
machine.run(
    cmd=f"python manage.py sentiment {text.id} {machine.id}"
)
In create_machine(), we create a new Machine by calling POST /apps/{app_name}/machines. A config object defines the Machine’s configuration:
config = {
    "config": {
        "image": image_ref,
        "auto_destroy": True,
        "processes": [{"cmd": cmd.split(" ")}],
    }
}
image: Docker image to run (required)auto_destroy: ifTrue, the Machine will be destroyed once its process is complete. Default isFalse.cmd: an array of strings. These will be the arguments passed to the entrypoint to be run.
These properties are enough to run our Django command in a new Machine. You can learn about other properties here.
Besides that, in get_machine(), we fetch the information about a Machine by calling GET /apps/{app_name}/machines/{machine_id}. Once the Machine’s state is DESTROYED, it no longer exists. If state is anything but DESTROYED, we fetch the Machine info and update its state.
Sentiment App
Now, let’s create a sentiment app:
# sentiment/models.py

class TextAnalysisForm(forms.ModelForm):
    class Meta:
        model = TextAnalysis
        fields = ['text']


class TextAnalysis(models.Model):
    text = models.TextField()
    polarity = models.FloatField(null=True, blank=True)
    subjectivity = models.FloatField(null=True, blank=True)
    machine = models.OneToOneField(
        FlyMachine,
        on_delete=models.SET_NULL,
        related_name="text_analysis",
        null=True,
        blank=True,
    )

    class Meta:
        ordering = ["-id"]

    def __str__(self):
        return f"Text #{self.id}"
Our model have a OneToOneField to our FlyMachine. For our demo, each analysis (“task”) runs on one Machine but you can implement it in a way that multiple analysis (“tasks”) are executed in a single Machine.
Our view might look like this:
# sentiment/views.py

FLY_APP_NAME = os.environ.get("FLY_APP_NAME")
FLY_IMAGE_REF = os.environ.get("FLY_IMAGE_REF")


@require_http_methods(["GET", "POST"])
def analyze_sentiment(request):
    if request.method == "POST":
        form = TextAnalysisForm(request.POST)
        if form.is_valid():
            try:
                with transaction.atomic():
                    text_analysis = form.save()
                    machine = FlyMachine.objects.create(
                        app_name=FLY_APP_NAME,
                        image_ref=FLY_IMAGE_REF,
                    )
                    machine.run(
                        cmd=f"python manage.py sentiment {text_analysis.id} {machine.id}"
                    )
                    text_analysis.machine = machine
                    text_analysis.save()
                    template_name = "partials/analysis.html"
                    context = {"texts": [text_analysis]}
            except requests.exceptions.HTTPError:
                template_name = "partials/machine_error.html"
                context = {
                    "error_message": "An error occurred: Machine was not created."
                }
    else:
        text_analysis = TextAnalysis.objects.all()[:10]
        form = TextAnalysisForm()
        template_name = "analyze_sentiment.html"
        context = {"form": form, "texts": text_analysis}

    return render(request, template_name, context)


@require_GET
def get_analysis(request, machine_id):
    machine = FlyMachine.objects.get(machine_id=machine_id)
    machine_destroyed = FlyMachine.MachineState.DESTROYED
    if machine.state != machine_destroyed:
        try:
            if machine.get_or_update_state() != machine_destroyed:
                return render(
                    request,
                    "partials/analysis_running.html",
                    {"text": machine.text_analysis},
                )
        except requests.exceptions.HTTPError:
            return render(
                request,
                "partials/machine_error.html",
                {
                    "error_message": "An error occurred: Machine was not updated."
                },
            )
    return render(
        request,
        "partials/analysis_done.html",
        {"text": machine.text_analysis},
    )
Finally, let’s implement our sentiment custom command that serves as our Serverless function. Add a new sentiment.py file to the sentiment/management/commands/ folder:
# sentiment/management/commands/sentiment.py

from django.core.management.base import BaseCommand

from sentiment.helpers import sentiment_analysis


class Command(BaseCommand):
    help = "Analyze sentiment from a TextAnalysis' blob of text."

    def add_arguments(self, parser):
        parser.add_argument(
            "text_id",
            type=int,
            help="TextAnalysis id where text is analyzed.",
        )
        parser.add_argument(
            "fly_machine_id",
            type=int,
            help="FlyMachine id where the task is performed.",
        )

    def handle(self, *args, **kwargs):
        text_id = kwargs["text_id"]
        fly_machine_id = kwargs["fly_machine_id"]

        sentiment_analysis(text_id)  # run the sentiment analysis

        self.stdout.write(
            self.style.SUCCESS(
                f" Task FlyMachine ID {fly_machine_id} is complete!"
            )
        )
Tada! 🚀 We’ve spin up a new Machine, run our python manage.py sentiment command and the machine was destroyed right after the command was complete. No extra configuration, just the good and old Django code we all know and love! 💓
The app is available here if you want to try it out!
Note that we’re using django-htmx to fetch and update the status of the machine dynamically. Partial rendering is not in the scope of this post but you can learn more about it on this blog post.
Do you have any interesting use cases? Share with us at the Fly Community.
Final Thoughts: Limitations and Flaws
⚠️ This approach might not be the solution you’ve been waiting for that project, so consider this section as a heads-up!
The primary design of Django revolves around being a monolithic web framework. It enables rapid development by providing a set of ready-to-use tools and conventions. In addition to that, maintenance and updates are more straightforward. This serverless approach keeps your Django project as it is, monolithic, and not a “separate service” and one more thing to manage.
But not everything is sunshine and rainbows. ☀️ 🌈
This approach may pose challenges in terms of scalability and flexibility as our application evolves. The Machine’s boot time depends on the size of our image, thus complex and large images can be a lot slower to start. In this approach, a single “task” might not be the ideal use-case but if you have multiple long-running tasks to be executed once a day, once a week, etc. you might have much better results.
Additionally, you should take into account potential denial of service (DoS) attacks, especially when dealing with anonymous users. A DoS attack can occur when a user overwhelms the application’s resources or exploits vulnerabilities to disrupt its normal functioning. Consider mitigation strategies such as implementing rate limiting, optimizing database queries, using cache mechanisms, always monitoring your application for unusual traffic patterns and keeping your project upgraded to address potential vulnerabilities.
This is still a proof-of-concept and a very minimal example. There are a lot more to cover for more complex cases. Let’s keep the discussions up!
Django really flies on Fly.io
You already know Django makes it easier to build better apps. Well now Fly.io makes it easier to deploy those apps and move them closer to your users making it faster for them too!
Deploy a Django app today! →