
How do you make an online map that tracks a Marathon runner from a mobile device? And how do you deploy that to the world using Fly? Well, we just did that and here’s the whole story.
Marathons, long and hard. Personally, I wouldn’t be caught doing one, but I’m always up to help someone who is, especially when I can use a bit of Fly to do it. Steve, our global infrastructure whiz, asked if I could think of a good way to track Mark, a friend of his, as he did his own personal London Marathon, the Markathon
You see, we’re not always hammering away at the keyboards at Fly fulfilling our mission to deploy apps globally with the lowest latency. Sometimes we’re hammering away on keyboards at Fly on side projects. And this was a fun one.
Map Making
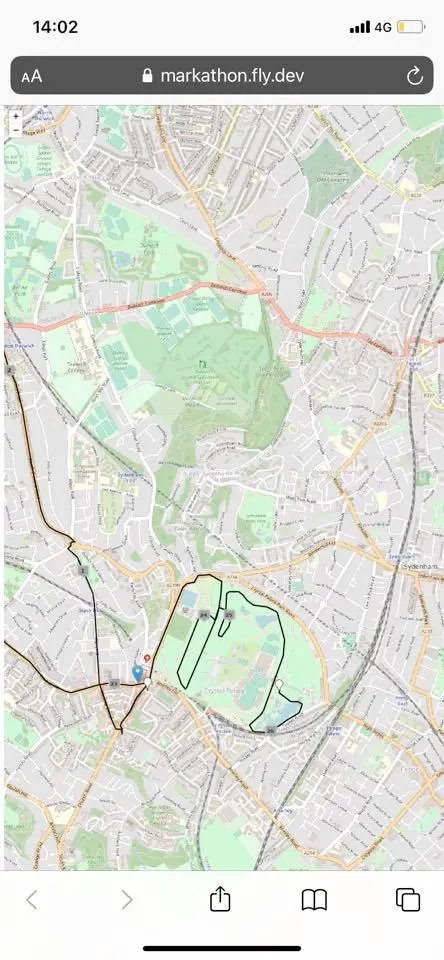
Let’s start with the route. This is likely to be the fiddliest bit of getting an app like this set up as you’ll need to draw out your exact route. There are apps like OnTheGoMap.com which will let you create the route. From there Steve exported Mark’s route to GPX format. Then it was over to Google Maps, specifically the Your Places/My Maps view, which could load in the GPX format data. It was there that Steve added mile markers in and exported the file as KML. We now had data to work with, stored as Markathon.kml - if you want to follow along, you’ll find all the code and assets in the Markathon Github Repository.
markathon+
         |
         + mappages - assets - Markathon.kml
For displaying the map, we went with Leaflet.js, the rightly popular interactive JavaScript map viewer. While Leaflet has a range of plugins, we found it easiest to work with leaflet-kml, a branch of the official KML plugin, nicely isolated for better maintenance. All we needed to do was copy the L.KML.js file into our mappages directory.
Next up, we had to pull this all into a web page, index.html. For this, we took our cues from the leaflet-kml package’s README example. It’s a simple minimal map displayer:
<head>
        <link rel="stylesheet" href="https://unpkg.com/leaflet@1.4.0/dist/leaflet.css" />
        <script src="https://unpkg.com/leaflet@1.4.0/dist/leaflet.js"></script>
        <script src="/L.KML.js"></script>
        <script src="/mark.js"></script>
    </head>
    <body>
        <div style="width: 100vw; height: 100vh" id="map"></div>
        <script type="text/javascript">
            // Make basemap
            const map = new L.Map('map', { center: new L.LatLng(58.4, 43.0), zoom: 11 });
            const osm = new L.TileLayer('https://{s}.tile.openstreetmap.org/{z}/{x}/{y}.webp');

            map.addLayer(osm);

            // Load kml file
            fetch('assets/Markathon.kml')
                .then(res => res.text())
                .then(kmltext => {
                    // Create new kml overlay
                    const parser = new DOMParser();
                    const kml = parser.parseFromString(kmltext, 'text/xml');
                    const track = new L.KML(kml);
                    map.addLayer(track);

                    // Adjust map to show the kml
                    const bounds = track.getBounds();
                    map.fitBounds(bounds);
                });
        </script>
    </body>
</html>
The only change is the name of the asset we’re using. With that in place, we’re ready to show some maps. Head back to the markathon directory:
markathon+
         |
         + mappages + assets - Markathon.kml
                    |- index.html
                    +- L.KML.js
Now, we need to serve that up locally. I recommend serve for that. It’s a neat little node server you can install with npm install -g serve. Once installed, run serve mappages and head to localhost:5000 in your browser and you should see a map. It’ll appear to be covered with broken image icons though because we have no images for those mile-markers. Looking in the KML file, we find lots of <href>images/icon-1.webp</href> defining those mile-marker images, so we found a set and after renaming them appropriately, popped them in the images directory.
Tracking Down Mark
There’s an elephant in the room at this point. We haven’t talked about how we track Mark as he does his run. We really don’t want to get into writing our own mobile app; ideally we want nothing to do with that. Well, the good news is that OwnTracks exists.
OwnTracks is an open source app you can install on iOS or Android and it can be configured to send your location to an MQTT server, or as in our case, an HTTP endpoint. You can read about configuring OwnTracks HTTP settings in its booklet. We’ll come back to that though because right now, we need a server.
Services Noted
While the map view is static, we need to be able to collect Mark’s location data and display it to people viewing the map. We’re using Node and Express here, so first, we have to set that up. Run npm init and hit return for the default for most answers except for the entry point, which you should set to server.js. Then run:
npm install express body-parser
We can now create server.js . There’s a bit of preamble in the server.js to bring those packages in:
const express = require('express')
const bodyParser = require("body-parser");
const app = express()
const port = process.env.PORT || 3000
app.use(bodyParser.urlencoded({ extended: false }));
app.use(bodyParser.json());
On to the business of the app. We need to set up an endpoint for the OwnTracks app to POST location data to. This is the /log/ endpoint:
sharedlat=0;
sharedlon=0;
matchtopic='owntracks/mark/Markphone1';

app.post('/log/', (req, res) => {
  owt=req.body;
  if(owt._type=="location") {
    if(owt.topic==matchtopic) {
      sharedlat=owt.lat;
      sharedlon=owt.lon;
      console.log(`Saved ${sharedlat},${sharedlon}`)
    }
  } else {
    console.log(`Not the one ${owt._type}`)
    console.log(owt)
  }
  res.json([])
})
In this version, for simplicity, we’re going to keep Mark’s latitude and longitude in memory; in sharedlat and sharedlon. Note that when we need it, we can use a Redis cache on Fly which can not only save the data but also let us share it between instances of our app in case thousands start to view.
We’re only tracking one runner in this app so the matchtopic is hard coded to Mark. When Mark sets up his OwnTracks, that matchtopic is his id to post his location. When someone (we assume Mark, but note we haven’t turned on any authentication) posts to the /log endpoint, the posted JSON is parsed. If the type is “location” and the topic is the same as matchtopic, then the lat and lon are extracted from the POST body and stored in our sharedlat and sharedlon variables. Oh yes, and do, do respond to that POST with something.
How do other users find out where Mark is? Simply by asking where:
app.get('/where/',(req,res) => {
  res.json({ lat:sharedlat,lon:sharedlon})
})
There are two other tasks for this server, serving our mappages directory up, and listening on our selected port:
app.use(express.static('mappages'))

app.listen(port, () => {
  console.log(`Service listening on ${port}`)
})
Our directory now looks like this:
markathon+
         | server.js
         + node_modules
         | package.json
         | package-lock.json
         + mappages + assets - Markathon.kml
                    |- index.html
                    |- images - icon-[99].webp
                    +- L.KML.js
Services Rendered
Now we need to go back to the mappages directory and enable the map to get, and update with, the stored coordinates in the server. Most of this work is done in a mark.js file:
var mymarker=null

async function updateMark() {
  try {
    marklocation=fetch("/where/").then(response =>
      response.json().then(data => {
        marklocation=data
        if(mymarker==null) {
          mymarker=L.marker([marklocation.lat,marklocation.lon]).addTo(map);
        } else {
          var newLatLng = new L.LatLng(marklocation.lat, marklocation.lon);
          mymarker.setLatLng(newLatLng);
        }
    }));
  } catch(err) {
    console.log(err); // Failed to fetch
  }
}
This is a simple function that queries the /where endpoint, parses the JSON response and, first time through, puts a marker on the map. Subsequent queries will move that marker on the map. We now need to hook in that function so it gets run regularly. First, add it to the <script> includes at the start of index.html:
<script src="/mark.js"></script>
Then, after the fetch...then chain further down add:
                .then(any => {
                    updateMark();
                    window.setInterval(updateMark,30*1000);
                });
Now the browser will query every 30 seconds for a location.
Let’s test this. First run the app locally with npm start and it should come up on port 3000. Navigate to http://localhost:3000/ to view the map.
Now pop this into a test-local.sh file:
#!/bin/sh
payload=$(jo _type=location \
   t=u \
   batt=11 \
   lat=51.419891 \
   lon=-0.078449 \
   tid=SB \
   tst=$(date +%s) \
   topic="owntracks/mark/Markphone1")
curl --data "${payload}" -H "Content-Type: application/json" http://localhost:3000/log/
This shell script makes a JSON object which will emulate the OwnTracks app calling into the server. Run sh ./test-local.sh and if it all works, you should see a marker pop up around the start marker within a minute or so.
Fly To The Finish Line
To make this into a Fly app, first download and install the Fly CLI tool flyctl and run fly auth signup to get a Fly account.
Now we can initialize the app to run on Fly by running fly init in the markathon directory.
Hit return to get a generated app name, hit return to use your personal organization and then select node to use Fly’s node builtin builder. Finally hit return to use the default port. Fly will now write out a configuration file for the app.
Oh, yes, and then run fly deploy to put it online into a region near you. Then run fly open to view the app in your browser. You’ll have to set up OwnTracks to send its location to this server’s /log endpoint, at which point you should be able to see yourself on the map.
If you can’t set up OwnTracks to test it, copy your test-local.sh to test-remote.sh and change the last line to:
curl --data "${payload}" -H "Content-Type: application/json" https://$(fly info --host)/log/
That automatically gets the hostname of your Fly app and posts the mock location data up.
We’ve set this up for London, but if you create a route for anywhere in the world, the map viewer should automatically focus on the new route.
Next…
There’s plenty that could be added to this app: basic authentication for the HTTP post from OwnTracks, Redis backing support, or more ambitiously, support for multiple runners.
We’ve been able to concentrate on building our app instead of working out how to get it into the cloud. That meant that Mark could run his Marathon and raise money for his chosen charity. And we all got to know how to make a tracking map that runs on Fly.