

Fly takes a Docker image, converts it to a VM, and runs that VM anywhere around the world. Run a Laravel app in minutes!
How many of you remember the launch of Oneplus’ first product? It was called the Oneplus One and it was marketed as the flagship killer. The name was warranted: It had flagship specs for a lower price than the flagships that time. I remember buying one for $350!
But with the launch of its first phone, Oneplus had some issues to overcome: they were a new company so they didn’t have the brand awareness their competitors had, and their production wasn’t up to scale when they launched the phone. So, they created an invite system: they’d send invites to the first number of people on the waiting list, and activate the invite whenever their phone was manufactured and ready to ship. When the customers received their phones, they also received one invite to give to a friend or family member. This turned the group of Oneplus One owners into an exclusive club where you needed an invite to get in. They created hype and permitted them to stagger the release over the time it took to ramp up production. Great stuff!
What if we wanted to create an app with a similar invite system, like a social network maybe, or a subscription-based application? Today, we’re taking a look at how such invite-based registration might work in a Laravel app. We’re going to pick up where the user levels, policies and enums article ended, and here’s the github repository.
The Goal
We want to prevent users from registering the default way, and instead send them an invite. The invite will be an email that contains a link where the user can then register, and fill out extra information.
We’ll continue to use the user levels that we already have: Only admins will be allowed to send out invites, and the admin will pick the user level for the invited user. We’ll also make sure that users that register using the link in their email inbox won’t need to verify their email.
Along the way, we’ll learn about these Laravel topics:
- Middleware
- Throwing Exceptions
- Notifications
- User Feedback
- Signed URLs
Setting it up
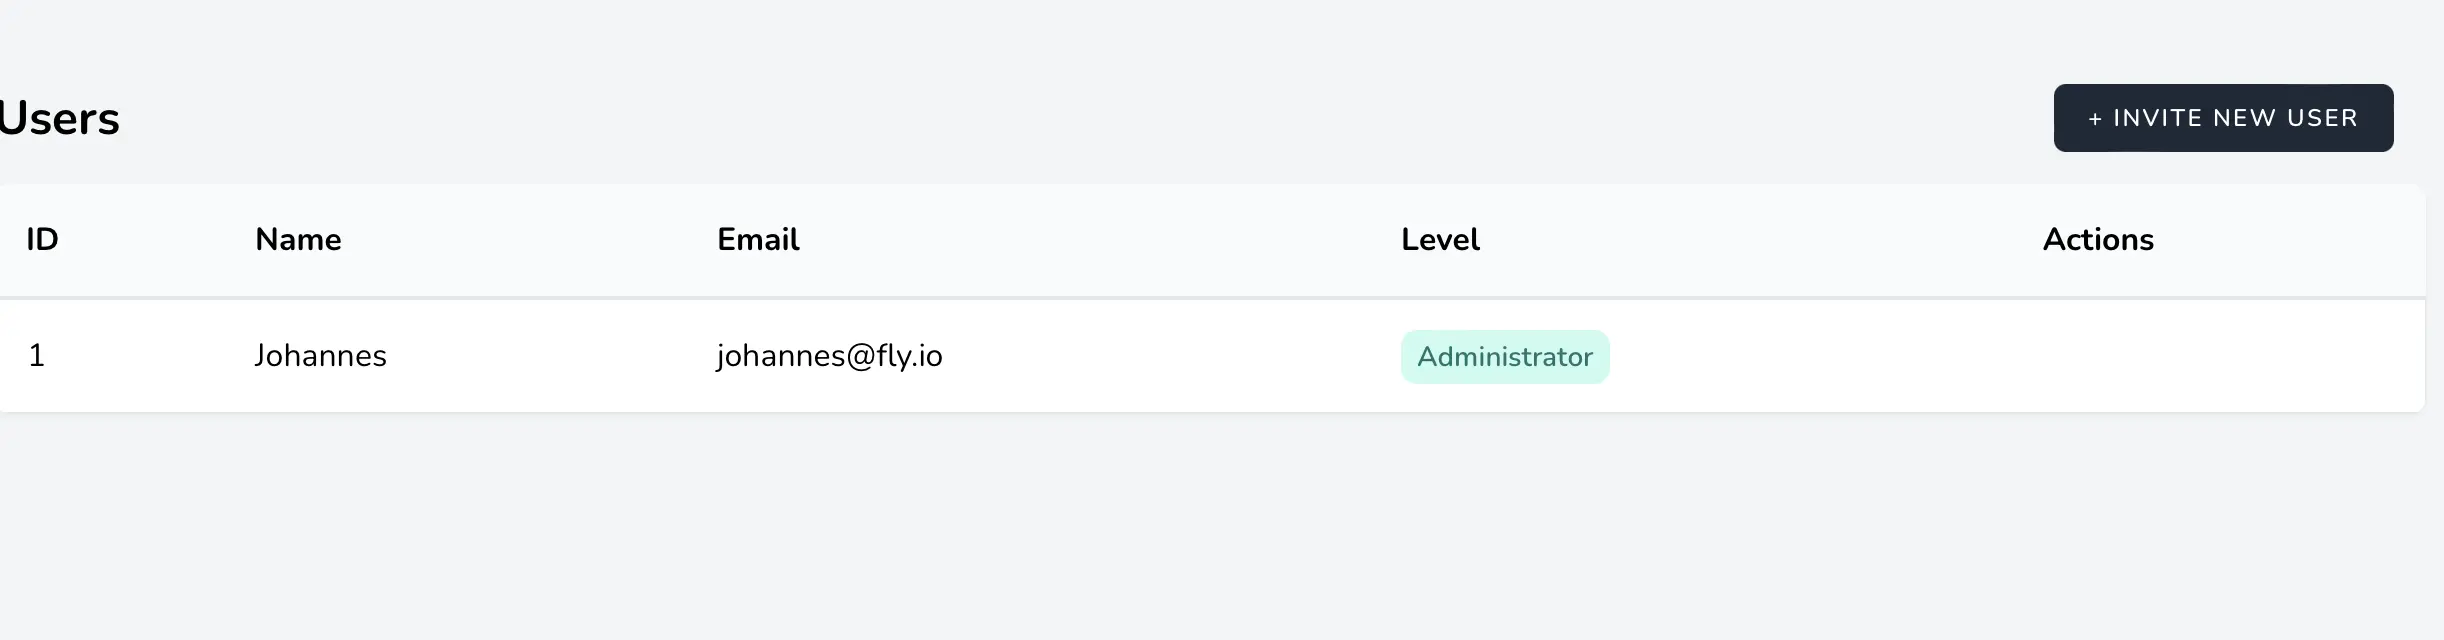
Let’s set up the app: Get the code form the github repository, run it and run the migrations. Register an account and go to the users page. Notice something? The only user, the one we’ve just created, is not an admin! We want all our users to register using an invite, but who will send the first invite?
Let’s make it so the first user can register the default way and gets assigned the admin User Level. Once the first user has registered, we should then close that door after them. The door being the register route, of course.
Making sure the first user gets the ‘admin’ user level
Let’s begin with tackling the first issue: make the first user always an admin. Since they are the only user to use the register route, we can say that any user that registers this way can be an admin. Let’s look up that route in web.php to see what controller it uses! Can you find it? Because I sure can’t. That’s because it’s in auth.php in the same directory, you can see the import for it in web.php at the bottom:
require __DIR__.'/auth.php';
In auth.php we can see that the register route uses the RegisteredUserController, and that the post request will hit the store method. Makes sense, right? So, let’s make sure new users that register are always registered as admin:
// app/Http/Controllers/Auth/RegisteredUserController.php

+ use App\Enums\UserLevel;

...

public function store(Request $request)
  {
    $request->validate([
      'name' => ['required', 'string', 'max:255'],
      'email' => ['required', 'string', 'email',
                  'max:255', 'unique:'.User::class],
      'password' => ['required', 'confirmed', Rules\Password::defaults()],
    ]);

    $user = User::create([
      'name' => $request->name,
      'email' => $request->email,
      'password' => Hash::make($request->password),
+     'level' => UserLevel::Administrator,
    ]);

    event(new Registered($user));

    Auth::login($user);

    return redirect(RouteServiceProvider::HOME);
  }
So, let’s see if it works now, shall we? Refresh your database with php artisan migrate:fresh or if you are using Sail, use sail artisan migrate:fresh. Then, register again and now you should see you’re an admin!
Closing the door after the first user
The second issue is that we need to disable the register route if there is already a registered user. Closing off a part of our application based on a condition just screams middleware, so that’s what we’re going to add!
use php artisan make:middleware FirstUser to make a new middleware. In there, change the handle method like this:
+ use App\Models\User;
  use Closure;
  use Illuminate\Http\Request;

class FirstUser
{
  /**
   * Handle an incoming request.
   *
   * @param  \Illuminate\Http\Request  $request
   * @param  \Closure(\Illuminate\Http\Request): (\Illuminate\Http\Response|\Illuminate\Http\RedirectResponse)  $next
   * @return \Illuminate\Http\Response|\Illuminate\Http\RedirectResponse
   */
  public function handle(Request $request, Closure $next)
  {
-   return $next($request)
+   if (User::all()->count() == 0) return $next($request);
+   else return redirect('/');
  }
}
We’ll check if there are no users yet, and if so we’ll allow the request to go through. If there are users already, we’ll redirect the request to the home page using RouteServiceProvider::HOME. Now we can add the middleware to our register routes in routes/auth.php, for both the create and store methods:
Route::middleware('guest')->group(function () {
  Route::get('register', [RegisteredUserController::class, 'create'])
-         ->name('register');
+         ->name('register')
+         ->middleware('firstUser');

- Route::post('register', [RegisteredUserController::class, 'store']);
+ Route::post('register', [RegisteredUserController::class, 'store'])
+         ->middleware('firstUser');
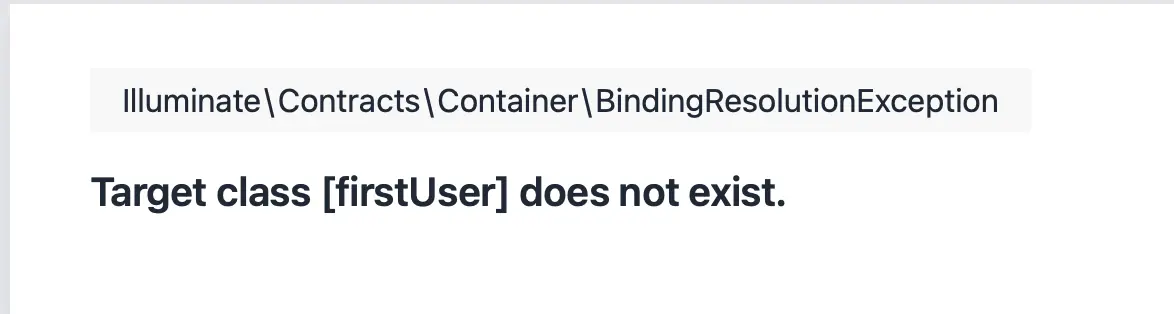
Try it out now and see if you can register another user. If you get an error like the one below, don’t worry!
We also need to let Laravel know how to link the middleware('firstUser') to the FirstUser middleware class. That’s done in app/http/Kernel.php , more specifically in the $routemiddleware array. Add the new middleware there:
protected $routeMiddleware = [
    ... Other middlewares here
    'verified' => \Illuminate\Auth\Middleware\EnsureEmailIsVerified::class,
+   'firstUser' => \App\Http\Middleware\FirstUser::class
];
Now, if we try again we’ll see that we’re being redirected to the default '/' page.
Now, I can see users getting frustrated to be redirected to another page without knowing why. This is where Laravel’s HTTP exceptions come in. We can easily throw HTTP exceptions from anywhere in our app using the abort() method. If we look in the list of HTTP messages, 403 seems to fit the bill the best. So let’s change the else clause in the FirstUser.php middleware class:
public function handle(Request $request, Closure $next)
  {
    if (User::all()->count() == 0) return $next($request);
-   else return redirect('/');
+   else abort(403, "There already is a registered user for this domain. Ask them for an invite to create your account.");
  }
The abort() method will use the status (403 in our case) to show the vendor/laravel/framework/src/Illuminate/Foundation/Exceptions/views/403.blade.php view. It will also display the message that we passed as the second argument of the abort() method, like this:

This at least explains what’s happening to the user. I’d agree it could use a little more ✨design sparkle✨, but I’ll leave that up to you. Let’s now look at how we’re going to invite users number two and up, shall we?
Creating Invites
To get the next users on board, we’ll create a new view where the admin can send an invite that contains a form with an email field and a UserLevel dropdown. We’ll try to keep everything cruddy by design, so you could look at it like this: we’re creating and storing a ‘userinvite’. I’ve found there’s no need for a custom Model here, but the controller and views can be setup thinking there is. If this doesn’t make sense to you, go watch Adam’s video linked above, he explains it in great detail.
To do this, create a new directory resources/views/userinvites and while you’re in there, create a create.blade.php file. The code should look like this:
@php use App\Enums\UserLevel; @endphp
<x-app-layout>
    <x-slot name="header">
        <h2 class="font-semibold text-xl text-gray-800 leading-tight">
            {{ __('Invite Users') }}
        </h2>
    </x-slot>

    <div class="flex flex-col sm:justify-center items-center pt-6 sm:pt-0 bg-gray-100">

        <div class=" w-full sm:max-w-md mt-24 px-6 py-4 bg-white shadow-md overflow-hidden sm:rounded-lg">
            <form method="POST" action="{{ url('/users/invite') }}">
                @csrf

                <!-- Email Address -->
                <div class="mt-4">
                    <x-input-label for="email" :value="__('Email')"/>

                    <x-text-input id="email" class="block mt-1 w-full" type="email" name="email" :value="old('email')" required autofocus/>

                    <x-input-error :messages="$errors->get('email')" class="mt-2"/>
                </div>

                <!-- User Level -->
                <div class="mt-4">
                    <x-input-label for="level" :value="__('User Level')"/>

                    <select name="level" id="level" class="w-full rounded-md shadow-sm border-gray-300 focus:border-indigo-300 focus:ring focus:ring-indigo-200 focus:ring-opacity-50">
                        @foreach(UserLevel::cases() as $levelOption)
                            <option value="{{$levelOption}}" @if ($levelOption == old('level')) selected="selected" @endif>
                                {{$levelOption->name}}
                            </option>
                        @endforeach
                    </select>

                    <x-input-error :messages="$errors->get('level')" class="mt-2"/>
                </div>

                <div class="flex items-center justify-end mt-6">
                    {{-- back button --}}
                    <a href="{{url()->previous()}}" class="inline-flex items-center px-4 py-2 bg-gray-300 border border-transparent rounded-md font-semibold text-xs text-gray-800 uppercase
                        tracking-widest hover:bg-gray-400 active:bg-gray-100 focus:outline-none focus:border-gray-100 focus:ring ring-gray-900 disabled:opacity-25 transition ease-in-out
                        duration-150">
                        Go Back
                    </a>

                    <x-primary-button class="ml-4">
                        {{ __('Invite') }}
                    </x-primary-button>
                </div>
            </form>
        </div>
    </div>
</x-app-layout>
Now, to show this view we’ll need 2 things: a controller to display it (and later to process the form submit) and a button on the users table to navigate to this page. Let’s do the controller first: use php artisan make:controller UserInviteController and in there, add 2 methods: create and store. Leave the store method empty for now, but we can already set up the create method, like this:
+ use App\Models\User;

class UserInviteController extends Controller
{
+ public function create()
+ {
+   $this->authorize('invite', User::class);
+   return view('userinvites.create');
+ }

+ public function store()
+ {
+
+ }
}
As you can see, I added the authorize method to check if the current user is allowed to invite new users, which we will have to add in the userPolicy.php class. Add a method invite in the class like this:
class UserPolicy
{
  ... other methods here

+  /**
+  * Determine whether the user can invite new users.
+  *
+  * @param  \App\Models\User  $loggedInUser the user that's trying to invite a new user
+  * @return \Illuminate\Auth\Access\Response|bool
+  */
+ public function invite(User $loggedInUser)
+ {
+   // only administrators are allowed to invite new users
+   return (UserLevel::Administrator == $loggedInUser->level);
+ }
}
Now, all that’s left to do is to link the controller and the methods together by adding two routes in web.php, like this:
Route::get('/users/invite', [UserInviteController::class, 'create'])
    ->middleware(['auth'])
    ->name('userinvites.create');

Route::post('/users/invite', [UserInviteController::class, 'store'])
    ->middleware(['auth'])
    ->name('userinvites.store');
And to add a button in the users view, like this:
<div class="py-12">
  <div class="max-w-7xl mx-auto sm:px-6 lg:px-8">
+   <div class="flex items-center">
+     <h1 class="text-2xl font-extrabold flex-1">Users</h1>
+     @can('invite', App\Models\User::class)
+       <a href="{{route('userinvites.create')}}"
+          class="inline-flex items-center m-4 px-4 py-2 bg-gray-800 border border-transparent rounded-md font-semibold text-xs text-white uppercase
+       tracking-widest hover:bg-gray-700 active:bg-gray-900 focus:outline-none focus:border-gray-900 focus:ring ring-gray-300 disabled:opacity-25 transition ease-in-out
+       duration-150">
+         + Invite New User
+       </a>
+     @endcan
+   </div>

    <div class="bg-white overflow-hidden shadow-sm sm:rounded-lg">
      <table class="w-full table-auto">
        <thead class="font-bold bg-gray-50 border-b-2">
        <tr>
We are leveraging the @can blade directive, just like in the previous blog post. Feel free to refresh your knowledge about polices there 😉.
Now, navigate back to UserInviteController.php . Remember there’s an empty store method in there? This is where we will send out an email to the email address that the admin specified. But first, a small coffee/tea break!
Fly.io ❤️ Laravel
Fly.io is a great way to run your Laravel app close to your users. Deploy globally on Fly in minutes!
Deploy your Laravel app! →
Notifying new Users
After an admin has invited a user, what happens? The user should receive an email, with a link to register. When they click the link, their email and user level should already be filled in (because the admin already did this for them) and they should be able to set up their account. A common practice is to have a time limit on the URL as well, so the user can’t use it after a certain time.
Normally, Notifications are sent in response to an Event, like receiving a like on a tweet sends out a dopamine hit notification. But they can also be sent out without an Event, if there’s no need for one. This is the case right here.
So we can just ignore the Event and send out the Notification from the controller. Create a Notification with php artisan make:notification UserInvited. You’ll see that out of the box the notification is set up to be sent by mail, as there is via method that returns ['mail'] and a toMail() method. Let’s quickly change to toMail a bit:
public function toMail($notifiable)
  {
    $appName = env('APP_NAME');

    return (new MailMessage)
        ->subject('Personal Invitation')
        ->greeting('Hello!')
        ->line("You have been invited to join the {$appName} application!")
        ->action('Click here to register your account', url('/'))
        ->line('Note: this link expires after 24 hours.');
  }
All we’re doing here is taking the appName from the .env variables, and just creating a simple mail with an action button. Now, we need to send that invite. Remember the store() method on the UserInviteController ? We’ll use a FormRequest here for validation and if it’s all good, we’ll send the UserInvited notification here. Use php artisan make:request StoreUserInviteRequest to make the request and add the following:
+ use App\Enums\UserLevel;
+ use App\Models\User;
use Illuminate\Foundation\Http\FormRequest;
+ use Illuminate\Validation\Rules\Enum;

class StoreUserInviteRequest extends FormRequest
{
  /**
   * Determine if the user is authorized to make this request.
   *
   * @return bool
   */
  public function authorize()
  {
-   return false;
+   return $this->user()->can('invite', User::class);
  }

  /**
   * Get the validation rules that apply to the request.
   *
   * @return array<string, mixed>
   */
  public function rules()
  {
    return [
+       'email' => ['required', 'string', 'email', 'max:255', 'unique:users'],
+       'level' => ['required', new Enum(UserLevel::class)]
    ];
  }
}
Now, use that form request in the UserInviteController :
- public function store()
+ public function store(StoreUserInviteRequest $request)
  {
+   $validated = $request->validated();

+   // The enum validation will check if the chosen level can be cast to a UserLevel, but won't do the casting itself. So we do it here
+   $userLevel = UserLevel::from($validated['level']);
+   $email = $validated['email'];

+   // send mail to invite the new user with the given user level.
+   Notification::route('mail', $email)->notify(new UserInvited());

+   return redirect('/users');
  }
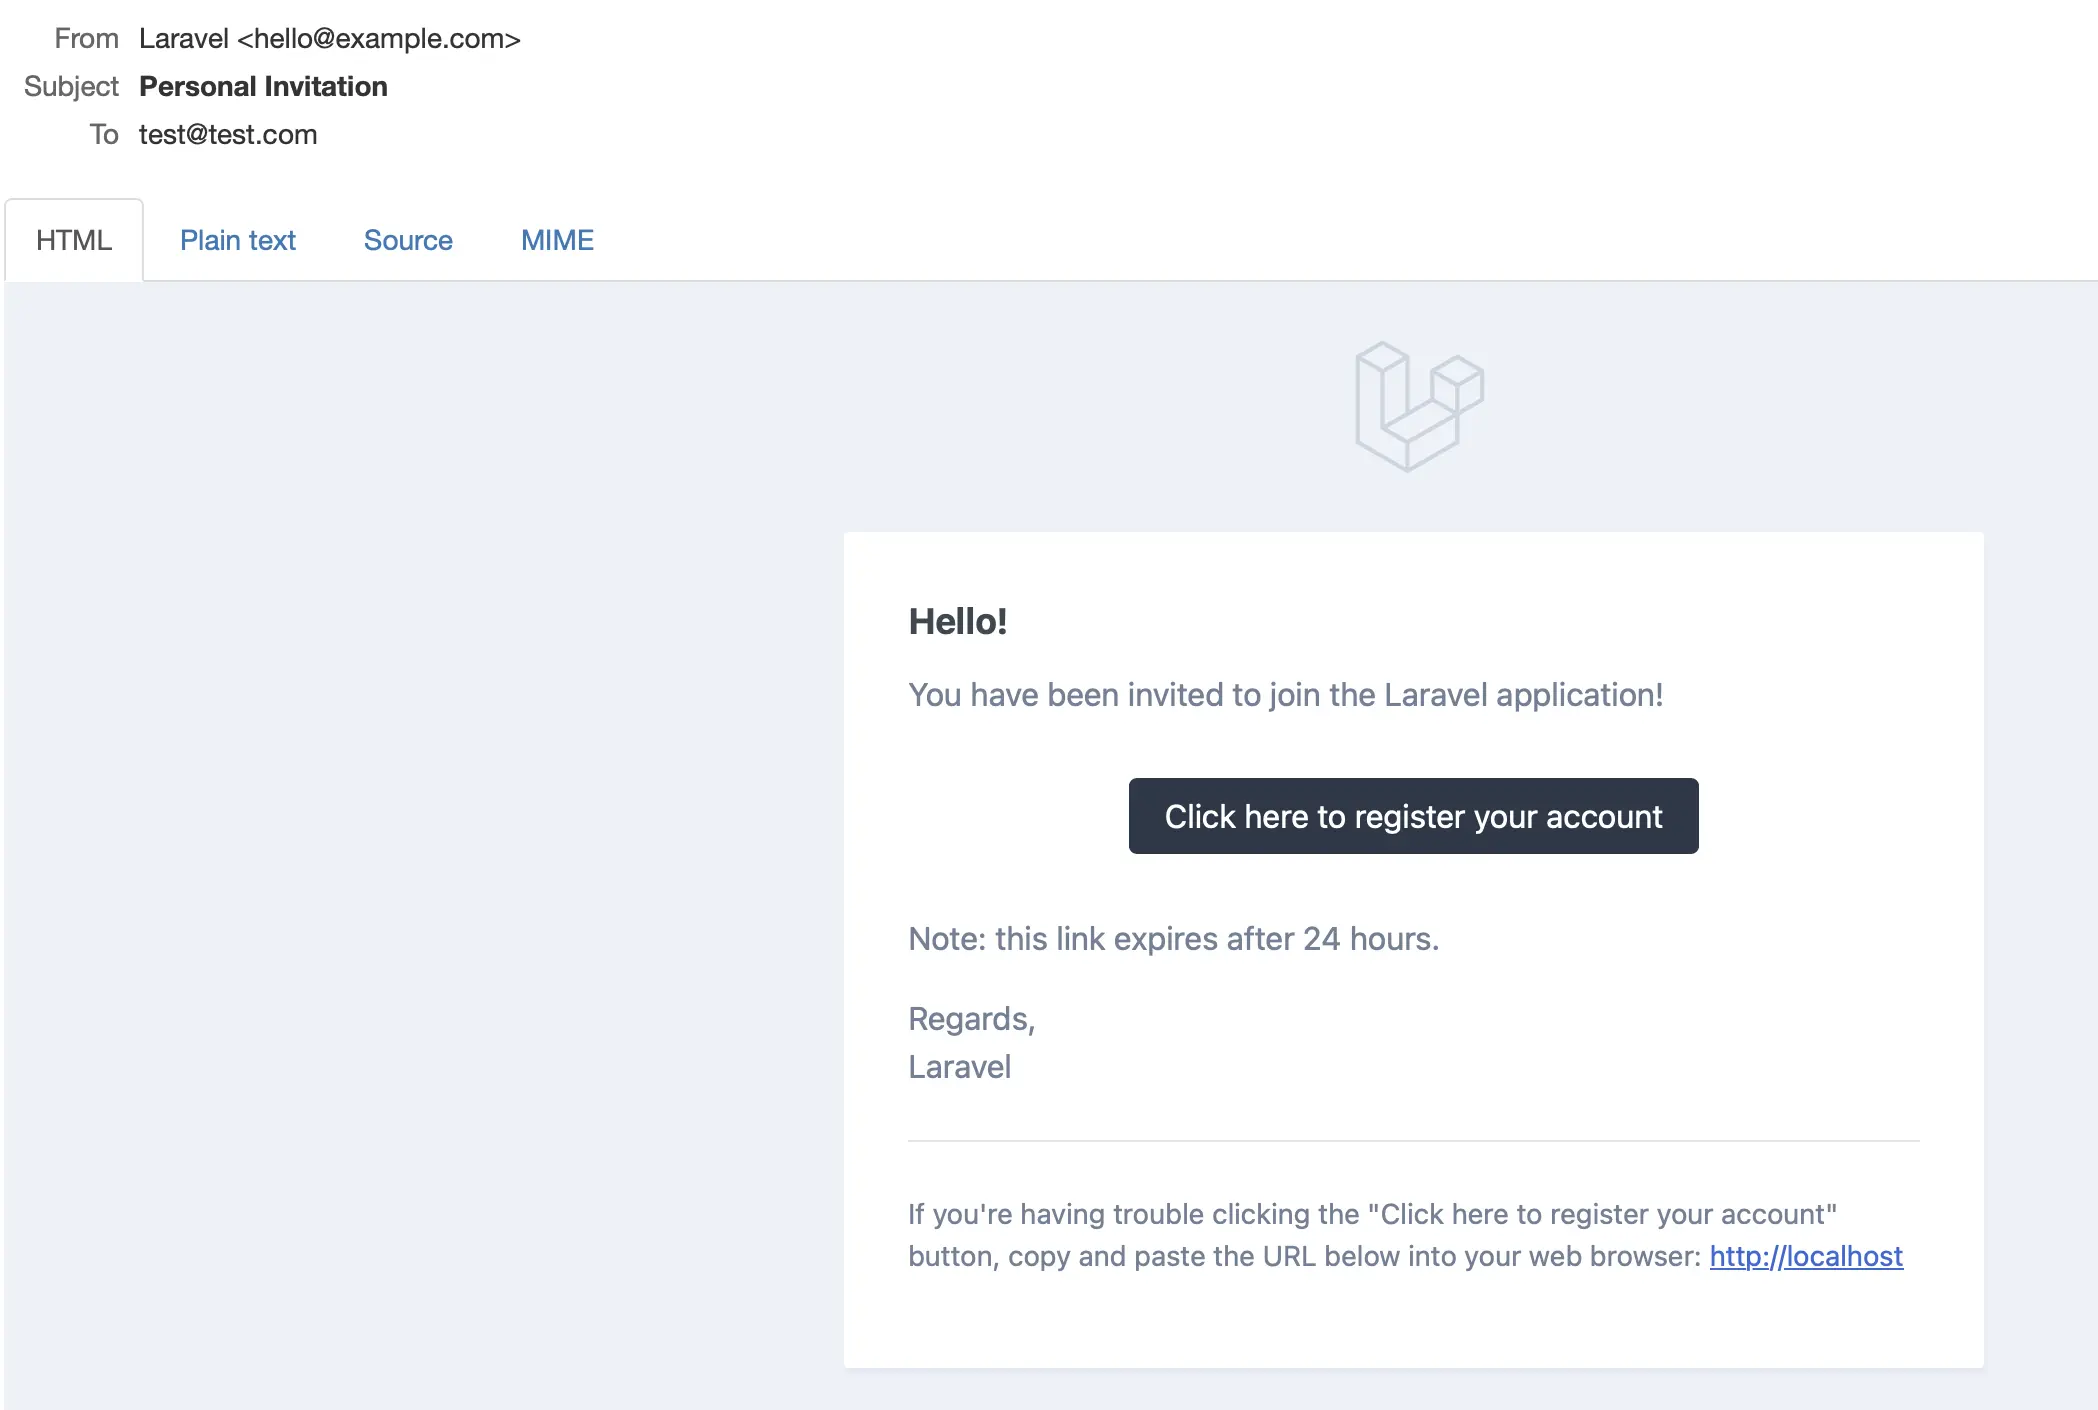
Make sure to have an email testing tool running (Mailhog comes with Laravel Sail) and invite a new user. Check the email testing tool and you should see an email that looks like this:
Let’s quickly add a flash message to let the user know everything went successfully, or not:
// send mail to invite the new user with the given user level.
- Notification::route('mail', $email)->notify(new UserInvited());
- return redirect('/users');
+ try
+   {
+     Notification::route('mail', $email)->notify(new UserInvited());
+   }
+   catch( \Exception $e)
+   {
+     return redirect('/users')->with('error', "<b>Oh no!</b> Something went wrong. Please try again later.");
+   }
+   return redirect('/users')->with('success', "<b>Success!</b> An invite with level $userLevel->name has been sent to $email.");
And build these messages into the users/index.blade.php view:
<div class="py-12">
  <div class="max-w-7xl mx-auto sm:px-6 lg:px-8">

+   {{-- MESSAGES --}}
+   @if(session('success'))
+     <div class="flex items-center bg-green-50 p-6 mb-6 w-full sm:rounded-lg sm:px-10 transition duration-700 ease-in-out"
+          x-data="{show: true}"
+          x-show="show"
+          x-init="setTimeout(() => show = false, 30000)"
+          x-transition>
+       <div class="flex mx-auto">
+         <svg class="h-6 w-6 flex-none fill-green-800 stroke-green-50 stroke-2" stroke-linecap="round" stroke-linejoin="round">
+             <circle cx="12" cy="12" r="11" />
+             <path d="m8 13 2.165 2.165a1 1 0 0 0 1.521-.126L16 9" fill="none" />
+         </svg>
+         <p class="ml-2 text-green-800">
+             {!! session('success') !!}
+         </p>
+       </div>
+     </div>
+   @endif
+
+   @if(session('error'))
+     <div class="flex items-center bg-red-100 p-6 mb-6 w-full sm:rounded-lg sm:px-10 transition duration-700 ease-in-out"
+          x-data="{show: true}"
+          x-show="show"
+          x-init="setTimeout(() => show = false, 30000)"
+          x-transition>
+       <div class="flex mx-auto">
+         <svg class="w-6 h-6 flex-none fill-red-800 stroke-red-100 stroke-2" fill="none" viewBox="0 0 24 24" stroke-width="1.5"  >
+             <path stroke-linecap="round" stroke-linejoin="round" d="M12 9v3.75m9-.75a9 9 0 11-18 0 9 9 0 0118 0zm-9 3.75h.008v.008H12v-.008z" />
+         </svg>
+         <p class="ml-2 text-red-800">
+             {!! session('error') !!}
+         </p>
+     </div>
+     </div>
+   @endif

    <div class="flex items-center">
      <h1 class="text-2xl font-extrabold flex-1">Users</h1>
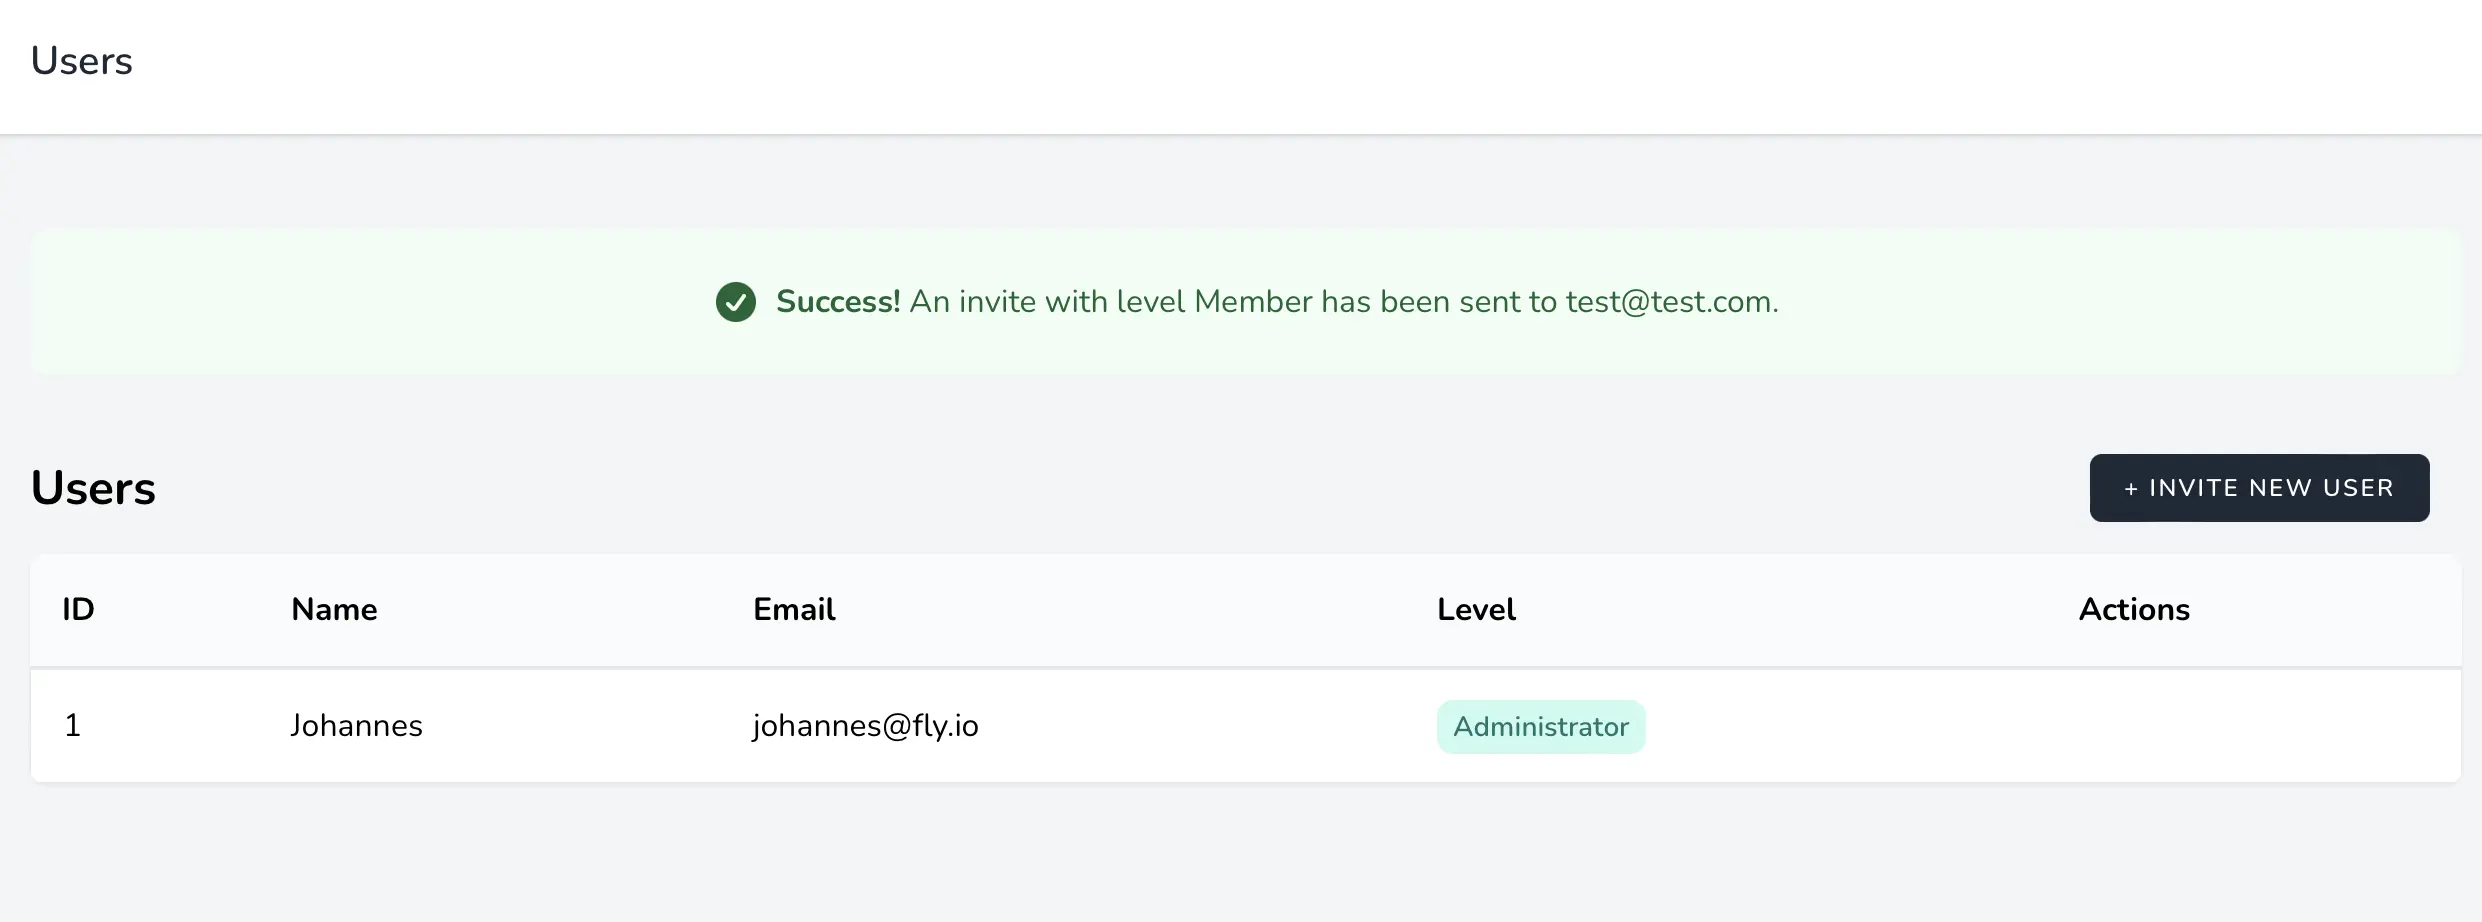
Here’s how it looks:

Great! Now, our users are informed about what’s happening. Now, the last step is to prepare a decent URL, since the one we’re sending right now just links to '/'. To make sure the user doesn’t tamper with the url, we’ll use a Signed URL. Hop into the UserInvited notification and add this method:
/**
 * Generates a unique signed URL that the mail receiver can user to register.
 * The URL contains the UserLevel and the receiver's email address, and will be valid for 1 day.
 *
 * @param $notifiable
 * @return string
 */
public function generateInvitationUrl(string $email)
{
  // ! Don't forget to import the URL Facade !
  return URL::temporarySignedRoute('users.create', now()->addDay(), [
    'level' => $this->userLevel,
    'email' => $email
  ]);
}
Now, you’re probably wondering where the $userLevel and $email will come from. We’ll add the userLevel to the constructor of the notification, like this:
/**
 * Create a new notification instance.
 *
 * @param UserLevel $userLevel
 * @param User $sender
 * @return void
 */
public function __construct(public UserLevel $userLevel, public User $sender)
{
}
Don’t forget the imports of User and UserLevel as well!
I’ve also added the User that’s sending out the invite, to display in the email. We just need to reflect these changed arguments where we’re using the constructor, which is in the UserInviteController:
- Notification::route('mail', $email)->notify(new UserInvited());
+ Notification::route('mail', $email)->notify(new UserInvited($userLevel, $request->user()));
Now, let’s look at the $email we’re using in the signed URL. This will be the email address the admin entered in the invite form, and will also be the email where this notification is sent to. Remember how we’re sending the notification in the controller?
Notification::route('mail', $email)->notify(new UserInvited());
The 'mail' is the channel we’re using, and $email is the route. We can access this route in the toMail() method in the notification like this:
$notifiable->routes['mail']
This will get all the routes (see them like destinations, email addresses in our case) for the mail channel. Exactly what we need!
So, let’s generate our URL and pass it along with our email. In the toMail() method of UserInvited, make these changes:
public function toMail($notifiable)
{
  $appName = env('APP_NAME');

+ $url = $this->generateInvitationUrl($notifiable->routes['mail']);

  return (new MailMessage)
              ->subject('Personal Invitation')
              ->greeting('Hello!')
-             ->line("You have been invited to join the {$appName} application!")
+             ->line("You have been invited by {$this->sender->name} to join the {$appName} application!")
-             ->action('Click here to register your account', url('/'))
+             ->action('Click here to register your account', url($url))
              ->line('Note: this link expires after 24 hours.');
}
There we go: a Notification with a signed URL. It contains all the information we need, is tamper-proof because it’s signed, and it expires after 24 hours. Good stuff!
Registering new Users
We’re in the home stretch now. The last hurdle is this: when the new user clicks the URL in the invitation email, they need to be able to register their account.
I’m not sure if you already noticed but when we try to send an invite, you’ll see an error instead of a success message! You could debug it and see what exception is being thrown, or I could just tell you: You’ll get a RouteNotFoundException because the route users.create we’re trying to make a signed URL for, doesn’t exist yet. Let’s add it in web.php:
// show the 'create new user' screen
Route::get('/users/create', [UserController::class, 'create'])
    ->middleware('signed')
    ->name('users.create');

// create the new user
Route::post('/users/store',[UserController::class, 'store'])
    ->name('users.store');
You’ll notice we’re using the ‘signed’ middleware. This will check the URL to see if the signature is still valid (the information in the url hasn’t been tampered with) and if the URL isn’t expired. Thanks Laravel for including this! I’ve also included the store route because we’ll need it later.
I’ll pick up the pace a bit since we’re doing more of the same: I’m going to add the create() method on the UserController, make a formRequest for it, and make a view to show the register form for invited users. See you on the flipside!
// Usercontroller create method
public function create(CreateUserRequest $request)
{
    $validated = $request->validated();
    return view('users.create', ['email' => $validated['email'], 'level' => $validated['level']]);
}
CreateUserRequest: php artisan make:request CreateUserRequest
use App\Enums\UserLevel;
use Illuminate\Foundation\Http\FormRequest;
use Illuminate\Validation\Rules\Enum;

class CreateUserRequest extends FormRequest
{
    /**
     * Determine if the user is authorized to make this request.
     *
     * @return bool
     */
    public function authorize()
    {
        // this should always be authorized, even without a logged-in user.
        return true;
    }

    /**
     * Get the validation rules that apply to the request.
     *
     * @return array<string, mixed>
     */
    public function rules()
    {
        return [
            'email' => ['required', 'string', 'email', 'max:255', 'unique:users'],
            'level' => ['required', new enum(UserLevel::class)]
        ];
    }
}
Don’t forget to import the formRequest in the UserController! Let’s quickly add the users.create view, which will be based heavily on Breeze’s default register view:
<x-guest-layout>
    <form method="POST" action="{{ route('users.store') }}">
        @csrf

        <!-- Name -->
        <div>
            <x-input-label for="name" :value="__('Name')" />

            <x-text-input id="name" class="block mt-1 w-full" type="text" name="name" :value="old('name')" required autofocus />

            <x-input-error :messages="$errors->get('name')" class="mt-2" />
        </div>

        <!-- Email Address -->
        <input type="hidden" id="email" name="email" value="{{$email}}">

        <!-- User Level -->
        <input type="hidden" id="level" name="level" value="{{$level}}">

        <!-- Password -->
        <div class="mt-4">
            <x-input-label for="password" :value="__('Password')" />

            <x-text-input id="password" class="block mt-1 w-full"
                          type="password"
                          name="password"
                          required autocomplete="new-password" />

            <x-input-error :messages="$errors->get('password')" class="mt-2" />
        </div>

        <!-- Confirm Password -->
        <div class="mt-4">
            <x-input-label for="password_confirmation" :value="__('Confirm Password')" />

            <x-text-input id="password_confirmation" class="block mt-1 w-full"
                          type="password"
                          name="password_confirmation" required />

            <x-input-error :messages="$errors->get('password_confirmation')" class="mt-2" />
        </div>

        <div class="flex items-center justify-end mt-4">
            <a class="underline text-sm text-gray-600 hover:text-gray-900" href="{{ route('login') }}">
                {{ __('Already registered?') }}
            </a>

            <x-primary-button class="ml-4">
                {{ __('Register') }}
            </x-primary-button>
        </div>
    </form>
</x-guest-layout>
Whew, lots of code being thrown around! Right now you should be able to click the link in the email and see a familiar screen:
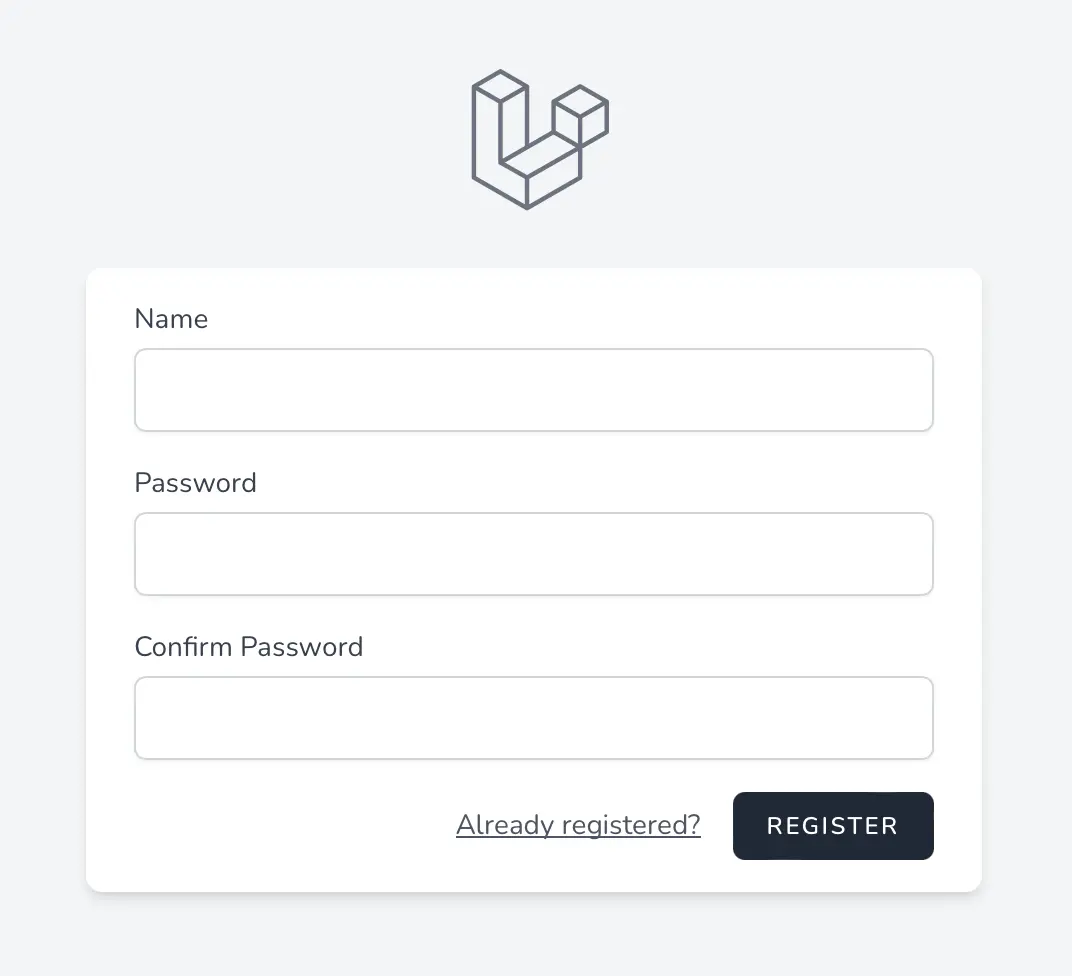
Registering won’t work yet, since the store method isn’t wired up yet. We’ll again use a formRequest for the validation, so run php artisan make:request StoreUserRequest and add the following:
use App\Enums\UserLevel;
use Illuminate\Foundation\Http\FormRequest;
use Illuminate\Validation\Rules\Enum;
use Illuminate\Validation\Rules\Password;

class StoreUserRequest extends FormRequest
{
    /**
     * Determine if the user is authorized to make this request.
     *
     * @return bool
     */
    public function authorize()
    {
        // this should always be authorized, even without a logged-in user.
        return true;
    }

    /**
     * Get the validation rules that apply to the request.
     *
     * @return array<string, mixed>
     */
    public function rules()
    {
        return [
            'name' => ['required', 'string', 'max:255'],
            'email' => ['required', 'string', 'email', 'max:255', 'unique:users'],
            'password' => ['required', 'confirmed', Password::defaults()],
            'level' => ['required', new enum(Userlevel::class)]
        ];
    }
}
The email and level inputs come from the signed URL and are hidden on the create form. Now, we can fill in the store method on the UserController:
/**
 * Handle an incoming registration request. This will be called when an invited User accepts the invitation and registers.
 *
 * @param  \Illuminate\Http\Request  $request
 * @return \Illuminate\Http\RedirectResponse
 *
 * @throws \Illuminate\Validation\ValidationException
 */
public function store(StoreUserRequest $request)
{
    $validated = $request->validated();

    $user = User::create($validated);

    event(new Registered($user));

    $user->markEmailAsVerified();

    Auth::login($user);
    //don't forget to import the RouteServiceProvider!
    return redirect(RouteServiceProvider::HOME);
}
We’ll validate the data, then create a User if the validation went through. After that, we’re following the default Breeze Logic by dispatching an Event, logging in the user and redirecting to the homepage. The only addition I’ve made is to set the user’s email as verified right away, since they come from the invite in their email inbox.
Let’s give it a whirl! Send out an invite, click the link and register a new user. If everything went well you should now be logged in as the new user. You should be able to delete your own account, and if you made the new user an admin you will also be able to send out invites and edit/delete the other users. Well done!